Last Updated on September 9, 2025 by foxintheforest
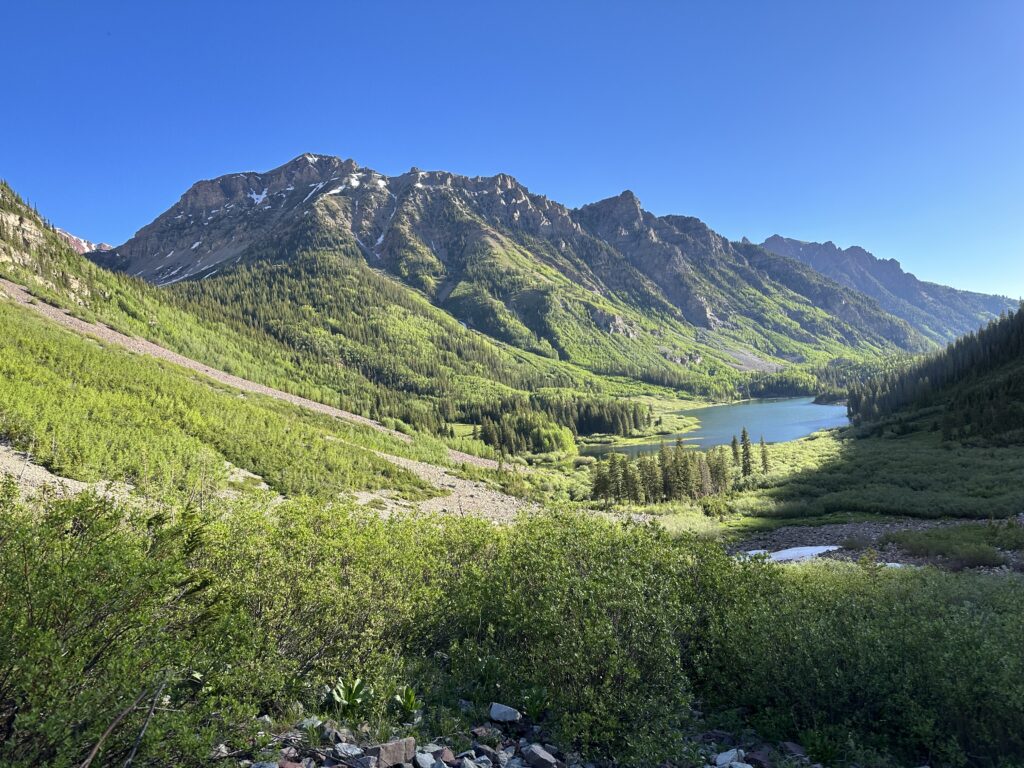
There’s something stunning and classic about the Maroon Bells hike. Nestled in the heart of the Maroon Bells Wilderness, prominent peaks line a lush mountain valley. The Maroon Bells themselves, ironically viewed from either Maroon Lake or Crater Lake are straight out of a postcard-worthy scene.
There are several different Maroon Bells hikes suitable for all skill levels. That, coupled with dreamy alpine landscapes, makes this area one of the prettiest places in Colorado.
I’ve lived in Colorado for nearly 15 years and I’ve been hiking the trails since I stepped foot here. The Maroon Bells hike and Maroon Lake are a place I love to keep coming back to. There are just so many options for adventure. So if you’re looking for how to visit the Maroon Bells like a local, not a tourist, then you’re in the right place.
About This Guide to the Maroon Bells
Inside this local guide to the Maroon Bells hike and Maroon Lake you’ll find:
- Hot info about getting to the Maroon Bells
- Insider info about permits for the area
- Hiking the Maroon Bells without a reservation
- The top Maroon Bells hikes for all abilities
- Tips and tricks for visiting with kids
- Camping near the Maroon Bells
- Additional Colorado hiking resources

Getting to the Maroon Bells
The Maroon Bells Wilderness Area has many trailheads and entry points, with the most popular being the Maroon Lake Scenic Area.
From Aspen, take Highway 82 west out of town. At the roundabout take the southwest exit for Maroon Creek Road.
If you have a parking pass, continue along Maroon Creek Road until it ends (past the guard house) and park in a designated area – either overnight parking (for backpacking trips) or day-use parking.
If you’re taking the shuttle, park at the Aspen Highlands Parking Structure ($7 per hour, up to $40) and follow signs for the RFTA shuttle to the Maroon Lake Scenic Area.
It’s about a 30-minute drive from Aspen to the parking area.

The Best Time to Visit the Maroon Bells
If you’re looking to hike, then the best time to tackle one of the Maroon Bells trails is from June through September, in the morning (try to arrive earlier than 7:30 am if you want solitude).
For backpacking or longer day hikes, trails are typically passable by late June or early July through September.
Photographers will want to visit the Maroon Bells and Maroon Lake at dawn since the peaks get bathed in golden sunlight.
The road past the Maroon Bells Welcome Station is not maintained over and there is no parking along the road. Meaning you’ll have a long road walk-in – often over snow. So, maybe skip this place in Colorado in November.
Local Tip: Parking and shuttle reservations are required when the gate is open – typically mid-May through October.
Reserving Maroon Bells Parking Permits
Okay, so this area is home to some of the best hikes in Colorado, you better believe the permit system is a complete hot mess. But it’s navigable. Here’s what you need to know.
If you want to drive to Maroon Lake and visit the Maroon Bells hikes by car, you’ll need an advanced permit to park. Parking reservations are required from May 15 until October 31. You can snag a permit through the Aspen Chamber website. It costs $10 per vehicle, or free with an America the Beautiful Annual Parks Pass. And getting one is a bit of a confusing process.
Here’s a look at the release dates for shuttle reservations:
- March 1: May and June reservations. Opens at 10 am MST
- April 1: Reservations for July and August. Opens at 10 am MST
- May 1: September and October. Opens at 10 am MST
Local Tip: Weekend shuttles tend to fill up fast – especially over holiday weekends. Plan ahead!
Day Use Parking Permits for the Maroon Bells
If you’re visiting for the day, you have a few options for parking. Each permit costs the same amount and has similar restrictions. Here are your choices:
- Day-use parking: Midnight to 4:30 pm but you can only park your vehicle before 8 am. You must leave by 4:30 pm. $10 Best for: Sunrise photography, most day hikes.
- Evening parking: 5 pm to Midnight. You must arrive after 5 pm and leave by midnight. $10 Best for: sunset photography, amphitheater shows, astrophotographers, hikers looking to do short sunset hikes.
- Midnight to Midnight: 12 am to 12 am parking. You must arrive before 8 am. $10 Best for: All of the above plus those looking to do 14ers in a day, long endurance hikers, when combined this is a great option for backpackers (see below).
Overnight Parking Permits for Maroon Lake
There are 35 spaces in a separate lot for overnight permit holders.
There are several types of overnight permits. When I originally came here, I didn’t know that if I had a backcountry permit, I wouldn’t need an overnight permit. This made the entire process REALLY confusing.
I ended up with 3 permits – what a headache!
Local Tip: If you have a backcountry permit, you automatically get a parking permit with your backcountry permits. You can get info on how to obtain your overnight permit with your backcountry permit on reservation.gov. (Don’t worry, I’ll get into that process in a bit).
If you’re heading to Crested Butte from Aspen and you don’t have any backcountry permits, then you’ll need an overnight permit to hike the trail.
- Midnight to midnight permits: You can reserve these permits back-to-back if the 60-hour permits are full. I had no issue doing this when I backpacked from Crested Butte to Aspen. Best for: Crested Butte to Aspen hikers, 14er hikers taking more than a day, and any overnight trips into the backcountry. $10
- 60-hour midnight to 6 pm permits: These are official multi-day permits that span 2 nights. Ideal for 4 Pass Loop hikers. $10

Bus Pass Reservations
The Bus Reservation system isn’t any less complicated. Busses leave from Aspen Highlands Parking Area from 7 am til 3 pm out to Maroon Lake. The shuttle starts running May 26th and stops October 22, 2023 (differs each year!).
The last shuttle departs from Maroon Lake at 5 PM
You’ll need a reservation to ride the shuttle no matter what. There are several types of tickets.
- One-Way Downhill Shuttle: Goes from Maroon Lake to Aspen Highlands. Best for: backpackers/hikers going from Crested Butte to Aspen. Hikers who don’t want to return via the Maroon Creek Trail. $10
- Round Trip Pass: Ideal for day hikers who can’t get parking permits and backpackers starting and ending at Maroon Lake. $16 for adults, $10 for seniors, $10 for children under 12.
- Day-of tickets: These are limited and much more expensive. $20 for adults, $15 for seniors, $14 for children under 12.
Local Tip: Vehicle reservations are required whenever the road is open, even if the shuttle isn’t running.
Can You Hike Maroon Bells Without a Reservation?
You don’t need permits to day hike the Maroon Bells, but you will need some type of transportation reservation. This is different than a permit.
Biking to Maroon Lake
Renting an e-bike and heading to Maroon Lake is one of the top things to do in Aspen. Keep in mind that there are no shoulders and buses frequent the road. You’ll also want to pack for a full day, as it’s still a lung-buster, even with an e-bike!
If you opt to bike into the Maroon Bells you do not need a reservation. But keep in mind it’s a 12.5-mile ride, with a steady uphill the whole way! There are bike parking areas, just be sure to lock your ride!
Hiking the Maroon Bells in Winter
You can hike the Maroon Bells without a reservation for anything during the winter months – but it’s 12.5 miles of walking along a road and 1,420 feet of gain. This is no easy task and shouldn’t be underestimated.
Overnight Backcountry Permit Reservations for the Maroon Bells Hikes
OMG…ya. We are still talking about permits! Sheesh!
Lastly, if you plan on camping near the Maroon Bells (there is camping at Maroon Lake) or backpacking in the Maroon Bells, you need a backcountry permit or campground reservation.
Backcountry permits are required in the wilderness area year-round.
You can reserve your permits through recreation.gov. You’ll want to look over the info carefully here, and be prepared to snag your permits the second they open – they’ll fill up almost instantly.
Local Tip: Have a plan A and a Plan B! Permits fill quickly so be prepared by picking your most-wanted zone, then plan from there.
You’ll need to know your backcountry zone and the number of people in your party. Here’s when backcountry permits are released (see the “Camping” section for campground info):
- Feb 15: Overnight permits from Feb 15 through July 31 are released at 8 am MST
- June 15: August 1 through November 30. 8 am MST
- October 15: December 1 through March 31. 8 am MST
Local Tip: If you’re not picky about where you go, you may be able to snag some last-minute permits. We got our Maroon Zone permits in March for late June. But there was only one day and one zone available.

The Perfect Maroon Bells Hike for You
Okay, so now that we see how complicated and convoluted the reservation system is, you’re probably asking, is it worth it?
My answer is a resounding yes (and yes – I was surprised to feel this way). This area is truly a stunning place – and I’ve been all over the state and then some for the last 15 years!
What makes it worth it is the easy access to killer views. And if you’re up for the challenge, the views get better the further into the wilderness you go.
There are several amazing Maroon Bells hikes worth checking out. Here are a few fan favorites from the Maroon Lake Trailhead.
Maroon Lake
Arguably one of the best Colorado lakes, Maroon Lake is the first stop on all of these trails. It’s also the easiest place in the Maroon Bells to access. And it’s home to those famous views you see photos of.
An ideal place for photographers with heavy gear to take a perch, it’s a quick walk from the parking lot to the viewpoint. You can jump on any of the other hikes on this list from Maroon Lake.
Local Tip: Weekday sunrises are quiet – highly recommend it! Just be aware that later in the year, the lake starts to drain, making photography more difficult as there are barriers around the edge of the lake.
Round-Trip Distance: 0.2 miles
Elevation Gain: negligible
Difficulty: very easy
Estimated Time: 5 minutes of hiking, more if you want to enjoy the views. Plan for an hour or two.
Best time to visit: June through September, in the mornings.
Backcountry Zone: Crater. Camping only allowed in designated sites. Advanced permit required.
Dogs Allowed? Yes, on leash
Red Tape: Parking permit or bus reservation required. Camping is only allowed in designated sites around Crater Lake (walk-in, backcountry sites only with no facilities)
Can I Swim at Maroon Lake?
Since this is a delicate high-alpine environment and one of the top Colorado attractions, there is no swimming, boating, floating, or SUPing in Maroon Lake.
Can I Fish at Maroon Lake?
Fishing is allowed in Maroon Lake with a Colorado fishing license.
Is the Maroon Bells Hike Easy?
Yes. There are 3 easy to moderate hikes right at the Maroon Bells scenic area. Maroon Lake trails are wide, flat, and a mix of dirt and gravel. Hiking above to Crater Lake is pretty rocky and a little steep, but very short by Colorado standards.

Maroon Bells Scenic Loop
This easy meandering path takes you around parts of Maroon Lake and into the stunning surrounding valley. Early-morning visitors often report wildlife (we saw a lot of deer), so keep your eyes peeled!
The loop takes you to some rapids (Maroon Creek is swift, especially early season), and around a meadow.
This is a great addition to Maroon Lake or Crater Lake. More avid hikers can tack it on to a longer day.
Round-Trip Distance: 1.9 miles
Elevation Gain: 160 feet
Difficulty: very easy
Estimated Time: 45 minutes
Best time to visit: June through September, in the mornings.
Backcountry Zone: Crater. Camping is only allowed in designated sites with an advanced permit.
Dogs Allowed? Yes, on leash
Red Tape: Parking permit or bus reservation required. Camping is only allowed in designated sites around Crater Lake (walk-in, backcountry sites only with no facilities).
Local Tip: For the best chance at solitude, opt to get a pre-8 am parking pass.
Crater Lake Hike in the Maroon Bells
For one of the best views of the Maroon Bells, continue along the Maroon Lake Trail until you reach a signed junction for Crater Lake.
The trail goes up and over a ridge and is mostly shaded with pine trees. The trail is rather rocky but easy to navigate.
You’ll drop down from the ridge to Crater Lake which is gorgeous! Past here, the trails get more vigorous.
Local Tip: Continue past the lake for about 0.5 to 0.75 miles (one way) over a talus field for a bird’s eye view of the lake!
Round-Trip Distance: 3.5 miles
Elevation Gain: 688 feet
Difficulty: Easy to moderate
Estimated Time: 1.5 to 2 hours
Best time to visit: June through September, in the mornings.
Backcountry Zone: Crater. Camping is only allowed in designated sites. Advanced permit required.
Dogs Allowed? Yes, on leash
Red Tape: Parking permit or bus reservation required. Camping is only allowed in designated sites around Crater Lake (walk-in, backcountry sites only with no facilities)
Local Tip: This is one of the most popular lake hikes in Colorado. Get an early start and be at the trailhead before 7 am on weekends or 8 am on weekdays if you want solitude. We were here and there was no one around at 7:30 am on a Thursday.
Maroon Creek Trail
If you’d rather take the road less traveled, consider taking the Maroon Creek Trail to Maroon Lake. Yes, you still need to navigate the obnoxious parking situation, but you’ll be able to get some solitude along this trail.
It’s not as scenic as other trails, but a great option if you want some extra miles.
Round-Trip Distance: 6.3 miles
Elevation Gain: 1,066 feet
Difficulty: Moderate
Estimated Time: 3 hours
Best time to visit: June through September, in the mornings.
Backcountry Zone: None. You are following a trail that follows the road to the Maroon Lake area. From here you can jump to any of the hikes starting at Maroon Lake
Dogs Allowed? Yes, on leash
Red Tape: Parking permit or bus reservation required. Camping is only allowed in designated sites around Crater Lake (walk-in, backcountry sites only with no facilities)
Local Tip: This hike sees horse traffic and ends at Maroon Lake. You’ll still need a permit, but if you want a quieter creek-side trail, this is it! If you don’t want to do the whole thing, you can take the bus back down.
West Maroon Pass Trail
This has to be one of my favorite hikes in Aspen (especially if you keep going). For those that don’t want to go down and up a pass in the same day or deal with the hassle of backpacking from Aspen to Crested Butte, this is an amazing option.
Simply take the Maroon Creek Trail from Crater Lake all the way to West Maroon Pass. The views are stellar and the trail is amazing! You’ll do most of the one-way journey to Crested Butte which is a pretty sweet bonus!
Round-Trip Distance: 11.8 miles
Elevation Gain: 3,142 feet
Difficulty: Difficult
Estimated Time: 6 hours
Best time to visit: Late June through September.
Backcountry Zone: Maroon Zone. Advanced permit required.
Dogs Allowed? Yes, on leash
Red Tape: Parking permit or bus reservation required. Camping is only allowed in designated sites around Crater Lake (walk-in, backcountry sites only with no facilities). Backcountry camping is at-large in the Maroon Zone.

Aspen to Crested Butte Trail
The Trail from Aspen to Crested Butte is certainly a bucket list hike! There are several ways to do this iconic trip (some of which don’t include staying in a tent). Although it makes for a really nice backpack.
From Maroon Lake, you’ll hike up and over West Maroon Pass winding your way down towards Crested Butte. The trail ends at the West Maroon Trailhead, so you’ll need to make a return journey (and surmount the pass again).
Best done as an overnight, this is a must-do adventure!
Round-Trip Distance: 20.6 miles
Elevation Gain: 4.480 feet
Difficulty: Very challenging in a day, challenging as a 2-day hike
Estimated Time: One night.
Best time to visit: June through September, in the mornings.
Backcountry Zone: Crater zone, Maroon Zone (largest), East Fork Zone. Advanced permit required for overnight backcountry camping.
Dogs Allowed? Yes, on leash
Red Tape: Parking permit or bus reservation required. Camping is only allowed in designated sites around Crater Lake (walk-in, backcountry sites only with no facilities). Backcountry camping is at-large in other zones.

Willow Lake Trail at the Maroon Bells
If scaling mountain passes aren’t quite your thing, but you still want a butt-busting hike, look no further than Willow Lake at Maroon Bells (not to be confused with the Willow Lakes near Silverthorne).
This hike is mega-tough, thanks to tons of butt-busting elevation. But it’s away from the crowds of the Four Passes Loop, Crested Butte to Aspen hike, and Maroon Lake.
You’ll see a sign for the Buckskin Pass Trail just before Crater Lake. It’s worth it to continue the 0.2 miles to check out Crater Lake (not included in the trail stats), then make your way back to the junction and grind your way to Willow Lake.
Round-Trip Distance: 11.6 miles
Elevation Gain: 3,779
Difficulty: Very Challenging
Estimated Time: 7 hours
Best time to visit: Late June/Early July through September.
Backcountry Zone: The Lake is in the at-large Maroon Bells Wilderness zone. You’ll pass through the Crater Zone. Camping only allowed in designated sites in the Crater Zone. Advanced permit required.
Dogs Allowed? Yes, on leash
Red Tape: Parking permit or bus reservation required. Camping is only allowed in designated sites around Crater Lake (walk-in, backcountry sites only with no facilities). Camping is at-large, but must be 200 feet from water around Willow Lake.
Buckskin Pass Trail
Arguably one of the hardest passes along the Four Passes Loop, Buckskil Pass is a real lung-buster. This Maroon Bells hike takes you up and over a steep pass, that has a daunting approach.
If you don’t want to commit to the full backpack or you want a challenging day hike, look no further the Buckskin.
Local Tip: Buckskin Pass holds snow longer than other passes in this area – check conditions if you’re hiking in early summer.
Round-Trip Distance: 8.2 miles
Elevation Gain: 2,916 feet
Difficulty: Challenging
Estimated Time: 6 hours or overnight.
Best time to visit: Late June or early July through September.
Backcountry Zone: Maroon Zone and you’ll pass through Crater zone. The backside of Buckskin is in the Upper Snowmass Zone. Camping only allowed in designated sites around Crater Lake. Advanced permit required.
Dogs Allowed? Yes, on leash.
Red Tape: Parking permit or bus reservation required. Camping is only allowed in designated sites around Crater Lake (walk-in, backcountry sites only with no facilities). Backcountry camping is at-large in the Maroon Zone.

Four Passes Loop
Known as one of the most scenic backpacking routes in Colorado, the Four Passes Loop needs to be on your bucket list. This hike is exceptionally challenging. Most people opt to do it in 3-4 days.
You’ll pass over four distinct passes: Buckskin, Trail Rider, Figid Air, and West Maroon Pass.
There are different ways to hike it, as well as several entry points in the Maroon Bells Wilderness system. The bonus of starting out at Maroon Lake (aside from the wonderful reservation system – ugh) is being able to check out Maroon Lake without having to add any detours.
Local Tip: This route is CROWDED and requires permits year-round.
Round-Trip Distance: 25.7 miles
Elevation Gain: 11,552 feet
Difficulty: Extremely difficult day hike (more like a trail run) and a very challenging backpacking trip.
Estimated Time: 3-4 days
Backcountry Zone: Crater, Upper Snowmass, Snowmass Lake, Geneva Lake, North Fork Zone, East Fork Zone, and Maroon Zone. Advanced permit required.
Dogs Allowed? Yes, on leash
Red Tape: Parking permit or bus reservation required. Camping is only allowed in designated sites around Crater Lake, Snowmass Lake, and Geneva Lake. Backcountry camping at large in all other zones. (walk-in, backcountry sites only with no facilities)

14ers in the Maroon Bells Wilderness Maroon Lake Area
There are six Colorado 14ers in the Elk Range – where the Maroon Bells Wilderness is. Three of those are right next to each other in the Maroon Lake Area.
The two Maroon Bells (Maroon Peak and North Maroon) have Pyramid Peak as their neighbor. All 3 of these peaks are not beginner-friendly.
Rotten rock, high exposure, and complicated route finding guard these mountains. Not to mention, each one has over 4,000 feet in elevation gain – certainly not an easy task. Each one requires scrambling skills.
Maroon Peak
The longest route, but not the easiest! Maroon Peak commands your attention with complicated route finding over crumbling rock.
Mileage: 12 miles
Elevation Gain: 4,800 feet
Estimated Time: 10 hours
Difficulty: Extremely difficult. Class 3. Use of hands is required.
Overnight Permit Zone: Crater or Maroon
North Maroon Peak
A general slog and certainly easy to get lost, North Maroon should not be underestimated. You’ll be near Buckskin and Willow Lake if you want to make a trip out of it.
Mileage: 9.25 miles
Elevation Gain: 4,500 feet
Estimated Time: 10 hours
Difficulty: Extremely difficult. Class 4. Use of hands is required. Exposure is very significant. Falls can be deadly
Overnight Permit Zone: Crater or Maroon
Pyramid Peak
Notorious for being one of the hardest Colorado 14ers, a lot of people save Pyramid Peak for last. It’s right across the valley from the Maroon Bells. So when you’re hiking don’t forget to give this sentinel a nod!
Mileage: 8.25 miles
Elevation Gain: 4,500 feet
Estimated Time: 10 hours
Difficulty: Extremely difficult. Class 4. Use of hands is required. Exposure is significant and falls could be fatal.
Overnight Permit Zone: Crater

Can You Walk into Maroon Bells?
Yes. You can. Walking into the Maroon Bells requires an extra 12.5 miles of road walking (no shoulder or sidewalk) and 1,400-plus feet of gain. It’s not easy to do and will likely completely tire you out.
I wouldn’t recommend it simply because it’s worth it to save some energy for other Maroon Bells hikes.
Tips and Tricks for Enjoying Your Maroon Bells Hike
Be in the know before you go! Here’s a look at some quick Colorado hiking tips to keep you safe and our beloved outdoor spaces healthy.
Local Tip: Backpacking in the Maroon Bells requires a bear canister. And yes. Rangers check. Keep this in mind when planning your route.
Pack layers
Non-cotton layers are essential in Colorado’s high country. It can snow here in July and thunderstorms are frequent afternoon guests. Bring everything from a t-shirt to a puffy layer.
Pack it out
Bring a small baggy to pack out all of your trash including toilet paper, food wrappers, fruit peels, and more.
Bring sun protection
The sun is harsh in the mountains. Pack sunscreen, a sun hat, sunglasses, and even a sunshirt. If snow is present, be sure to get under your chin and nose with sunblock.
Afternoon thunderstorms are dangerous. From late June through July daily afternoon thunderstorms plague the mountains (we call it monsoon season), plan to be below treeline before 11 am in order to avoid deadly lightning strikes. Bring rain gear and remember, weather can be coming and the mountains will block the view!
Acclimatize Safely
Plan on taking a day to get used to the altitude if you’re from out of town. Altitude sickness can strike anyone at any time. Drink plenty of water, eat salty foods, get lots of rest, and avoid caffeine and alcohol until you’ve adjusted to the elevation.
Photographing the Maroon Bells
Tons of people come to the Maroon Bells for photography. When we backpacked from Crested Butte to Aspen, I even lugged my tripod on the journey!
Photography opportunities are everywhere. Of course, man people want the iconic photo, but you’ll be amazed at what other views await you.
The best time for photography of the Maroon Bells is in the morning, while the other side of the valley sees gorgeous afternoon light.
Hiking with Toddlers and Kids to the Maroon Bells
As a mom to a mighty toddler, I’d absolutely feel comfortable taking my kid hiking on any of the easier Maroon Bells hikes. The trails are a bit rocky past Maroon Lake, but the ambitious kiddo will be fine.
It’s always important to check conditions before you go on any of the more challenging trails. River crossings, snow bridges, and navigating pesky willow fields are common past Crater Lake.
Camping near the Maroon Bells
There are several campgrounds near the Maroon Bells, however they are quite small and fill up immediately. You can make reservations through recreation.gov.
Here’s a look at campgrounds near the Maroon Bells and Maroon Lake:
- Silver Bar Campground: 4 sites. Primative. Bring your own water and bug spray
- Silver Bell: 14 sites. Bring bug spray. Some sites are first-come-first-serve
- Silver Queen: 5 sites. Bring bug spray
Campgrounds are open for reservations through May 28th starting on November 28th at 8 am. See each campground for specific info, as it does change.
Nearby Attractions
There are tons of things to do in Aspen and the surrounding area to keep you busy after you’re done enjoying the Maroon Bells hikes. Here are a few of my favorites:
- Soak in hot spring at Glenwood Springs
- Shop in Aspen (pricey)
- hike to Hanging Lake
- Enjoy some food in Carbondale
What to Pack for the Maroon Bells
This in-depth packing list is perfect for any mountain hike.
What to wear:
- Sunshirt
- Noncotton socks
- Hiking footwear with good traction that you are comfortable wearing all day.
- Non-cotton shorts for hiking
- Or non-cotton, pants for hiking. Convertible pants are great too!
- Non-cotton shirt for hiking
What to pack:
- Hiking day pack. I love the REI Flash 22 for an affordable day pack.
- Water and snacks for the car – it’s always nice to have a treat at the end!
- Sunscreen, sunhat, sunglasses
- First Aid Kit
- Electrolyte powder – optional but nice to have!
- A water bladder capable of carrying at least 2 liters of water or two 1 L SmartWater Bottles
- Camera
- Camera clip to strap to your pack (optional)
- Beanie
- Glove liners
- Fleece layer
- Puffy layer
- Hiking poles (optional)
- A toilet kit: shovel, WAG Bag (if you plan to travel above treeline), hand sanitizer, TP/baby wipes, a small plastic baggy to pack out TP and sanitary items
- Pee funnel – optional
- Pee rag – optional.
- Headlamp
- GPS navigation
- emergency communication device
- Wind/rain layer
- Pocket knife
*NOTE These are affiliate links. Meaning I get a small kickback from every purchase, no matter the purchase, at no additional cost to you. This is a small way you can show support for my channel and it means a lot, so thank you!
Catch me on YouTube!
Want more secret backpacking trips? Ultralight hacks that every hiker can adapt? Experience the top outdoor destinations in the world without the crowds? If you want to get insider knowledge of all things outdoors, then you’ll wanna subscribe to my YouTube channel, where I am giving away my DECADES of knowledge as an outdoor professional. I’ll see ya there!