Last Updated on October 31, 2025 by foxintheforest
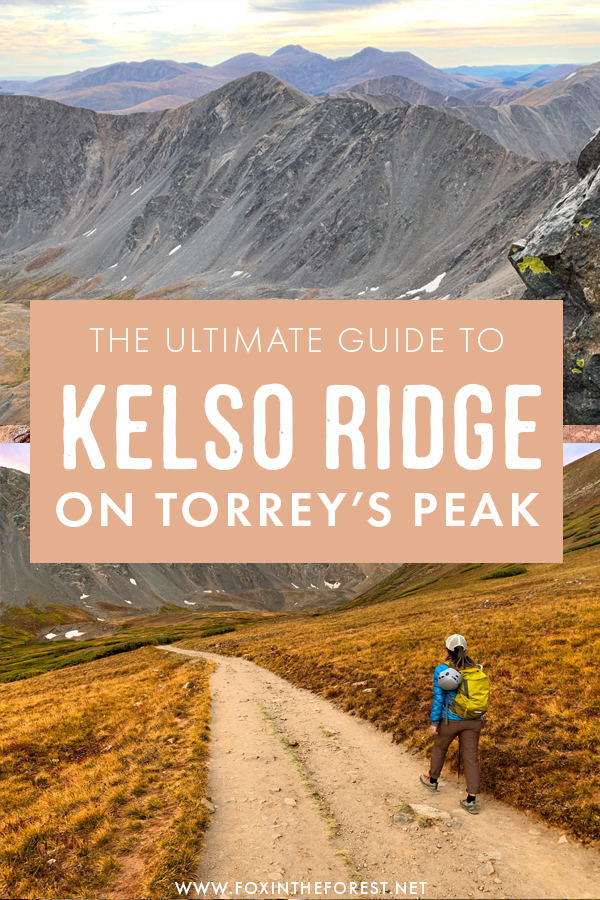
Kelso Ridge is a fun-filled scramble up Torreys Peak in the Front Range of Colorado. For the newbie Class 3 scramble enthusiast, it’s one of the best intro routes out there. You’ll be using your hands to climb up sections of rock and even get to traverse the spicy Kelso Ridge knife-edge – sure to get that adrenaline pumping.
Torrey’s Peak (14,267′) is one of the most classic Colorado 14ers and Kelso Ridge is certainly one of the most well-traveled routes on the peak. It’s the most direct line (6.75 miles round-trip) but it’s also one of the most difficult.
However, if you are up for an engaging scramble in the Front Range, then Kelso Ridge is for you. What makes this route a personal fave, is that you can keep the route to a mellower Class 3 or even find some low Class 5 terrain if you’re up for a little spice. The choice is yours.
That’s why I’ve climbed this route so much. I get to take newbie scramblers along, but I’m not totally bored myself. The Kelso Ridge knife edge is fun even for seasoned scramblers and it’s short enough to not be too freaky for beginners.
I’ve been a Colorado local for over 15 years. I stopped counting how many mountains I’ve summited after I hit 70 peaks, but I’ve trapezed my way from summit to summit all over Colorado. From walk-up peaks to multi-pitch alpine climbs, I’m an expert in navigating Colorado’s 14ers.
I’ve been up Kelso Ridge many times and done most of the named routes up both Grays and Torreys Peak. If you’re looking for expert advice to stay safe (and have a blast) on Kelso Ridge, then you’re in the right place.
About this Guide to Kelso Ridge
Inside this guide to Kelso Ridge, you’ll get expert advice from an outdoor pro. After reading through this post you’ll be all set to know everything you need to know for a successful summit. Here’s what to expect:
- The best time to scramble Kelso Ridge
- Practical info about Kelso Ridge on Torreys Peak
- Is Kelso Ridge a good beginner class 3 climb?
- Is the route difficult?
- The Kelso Ridge scramble
- The Knife Edge of Kelso Ridge
- Scrambling tips
- Special gear you’ll need
- Additional Colorado mountain climbs
When is the Best Time to Hike Kelso Ridge?
In general, you’ll want a snow-free experience with a clear weather window to scramble Kelso Ridge. This means the best time for scrambling is between late June through late September.
Grays and Torreys Peak is one of the most famous Colorado hikes. This means mega-big crowds. If you want some solitude, certainly opt to scramble the ridge during the week. You’ll still have people along the route, but there will be far less traffic.
When it comes to Colorado 14er safety, you’ll also want to start early – like before the sun rises early. This is to beat the threat of sudden afternoon thunderstorms that plague the Colorado Rockies during the summer. In general, the storms tend to lessen in late August through October.
You’ll also only want to scramble Kelso Ridge in good, clear weather. Inclimate weather can be deadly quickly in the mountains. Use weather.gov to search Torreys Peak and get pinpoint weather data up until the morning you wake up for your summit attempt. Use the charts to get precip, wind, and temperature info.
Practical Info about Scrambling Kelso Ridge
Although Torreys Peak is considered one of the easiest 14ers in Colorado, the Kelso Ridge route is one of the toughest ways to the top. With that being said, it’s an awesome day out!
Local Tip: Keep in mind that as one of the closest 14ers near Denver, you’ll be sharing the trail regardless of when you get out. Even on a brisk Tuesday morning in September, we had some company along the trail. Remember that the uphill has the right of way and to let quicker parties pass you.
Here’s what you’ll need to know for your hike.
Round Trip Distance: 6.75 miles
Elevation Gain: 3,100 feet
Max Elevation: 14,267 feet
Starting Elevation: 11,280 feet
Difficulty: Easy for a Class 3 14er, difficult for a hike
Rating: Class 3 – rock navigation and use of your hands required. Dangerous exposure and rockfall potential. For experienced hikers only.
Estimated Time: 5 to 7 hours
Dog-Friendly? NO.
Drive time from Denver: 1 hr 15 mins.
The trailhead for Kelso Ridge shares the same trailhead for Grays and Torreys. In the summer, this trailhead is absolutely packed by 5 am – especially on weekends. If you want to beat the crowds, I’d recommend showing up at 4 am. You’ll be hiking by headlamp, but it’s worth it.
Local tip: The road to the trailhead is rough and parking along the road is largely illegal (it’s dangerous for passing vehicles). A crossover SUV can barely handle the road. I’d recommend a little clearance and certainly leave the sedan at home.
Is Kelso Ridge a Good First Class 3 Scramble?
In terms of famous Class 3 routes, Kelso Ridge is an amazing scramble for first-timers. Of course, you’ll want to have plenty of Class 1 and Class 2 experience under your belt before you attempt a Class 3 scramble. But if you’ve got the itch, give it a go. This is one of the best beginner Class 3 routes in Colorado.
Local Tip: If the crowds aren’t your thing, then you can check out the East Ridge of Father Dyer for a first-time class 3 route.
What makes this route an ideal beginner Class 3 14er route is that there is a little bit of everything. You’ll have to navigate loose, crappy gullies, exposed (but short) headwalls, and a knife-edge.
However, unlike many of the other difficult 14er routes in Colorado, there is a distinct trail in between rock features. This makes navigation easier, although I’d still recommend downloading the photos on your phone with the 14ers.com app. So you stay found.
If you’re feeling confident it’s easy to bump up the difficulty, which gives the route some staying power.
Local Tip: Always review and download the beta. I’ve done this route many times, but I always find lost parties on this route. With a lot of steep, loose rock getting lost can put you in serious trouble fast. Pay attention and check your location frequently to stay found.
Is Kelso Ridge Difficult?
Yes. This is not a hike. It’s a scramble, which is closer to climbing than it is hiking.
As far as Class 3 routes go, it’s a very mellow route. with a few short sections of required climbing (including a knife-edge that is a little daunting to the uninitiated).
Most people opt to do this route as their first Class 3 route and with good reason.
For someone who is super-experienced, is it the greatest route? No, not by a long shot. It’s loose, it’s got some crap dumpster gullies with a few fun moves.
But is it a good place to get a feel for Class 3 terrain? Absolutely.
I didn’t climb Kelso Ridge until I had a lot of experience under my belt. Not because it’s dangerous or scary, but because I prefer climbing Colorado 13ers and 12ers where there are far fewer people.
Local Tip: If you’re a seasoned scramble nerd like myself, I’d suggest taking the direct line (not the 14ers.com route) along the Arapaho Traverse or the Citadel to Pettingell Traverse instead. If you’re hooked on 14ers, then the Crestone Needle is the way to go.
Is Kelso Ridge on Torreys Peak Dangerous?
Yes.
It’s naive to think that any mountain isn’t dangerous. The exposure, rockfall, and loose rock can easily cause serious injury or death.
Know what you’re getting into before you go.
Now that the obligatory “This is not Disneyland” speech is out of the way. If you’re looking to try Kelso Ridge for your first Class 3 route. Go for it!
It’s a great beginner ridge. The well-worn trail makes rock navigation less daunting. With the low commitment (you can turn around at any point) and short mileage, you won’t toast yourself just reaching the ridge.
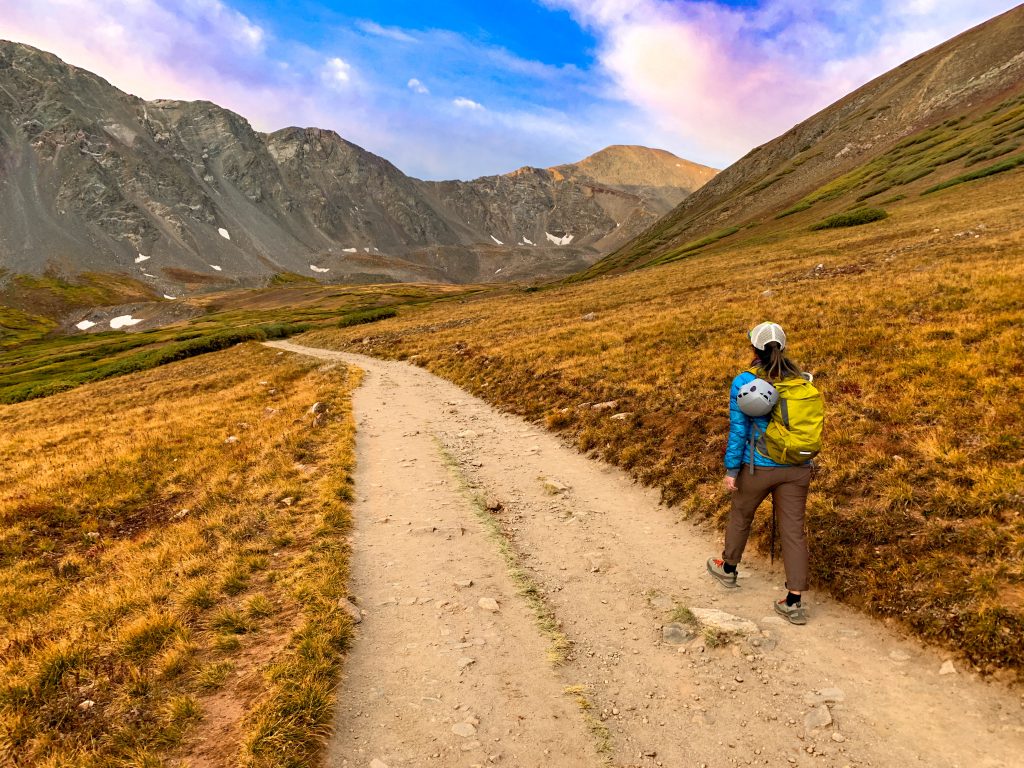
The Approach to Kelso Ridge
To reach Kelso Ridge you’ll hike 1.75 miles up the Grays Peak Trail. After you cross a flat, rocky area the Grays Trail banks left. Look for a small climber’s trail to the right.
The trail is pretty obvious but it’s definitely not as wide or well-used as the main trail. Plus, you’ll likely be hiking with a headlamp so use a GPS and keep your head on a swivel to find the junction.
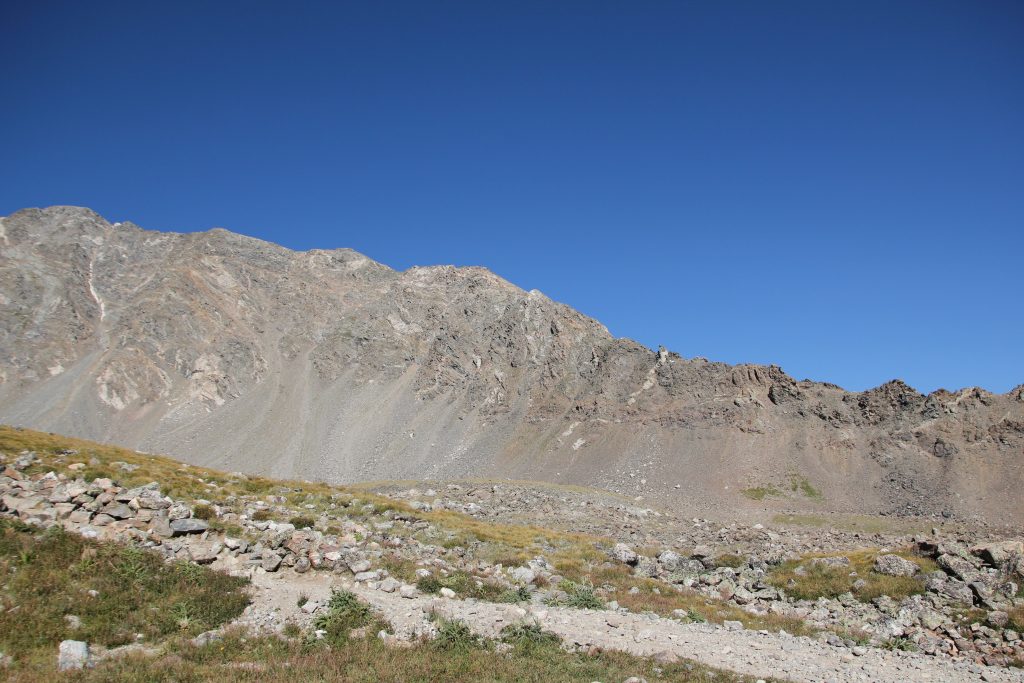
Follow the smaller trail until you gain the ridge over a small bump.
Take a break here if you need to. You’ll finally get a sense of this jagged ridge from this vantage point. There are giant rock pinnacles along the climber’s left side. These are impressive to look at, but in general, you’ll stay on the ridge proper, dropping right if the terrain gets too tough.
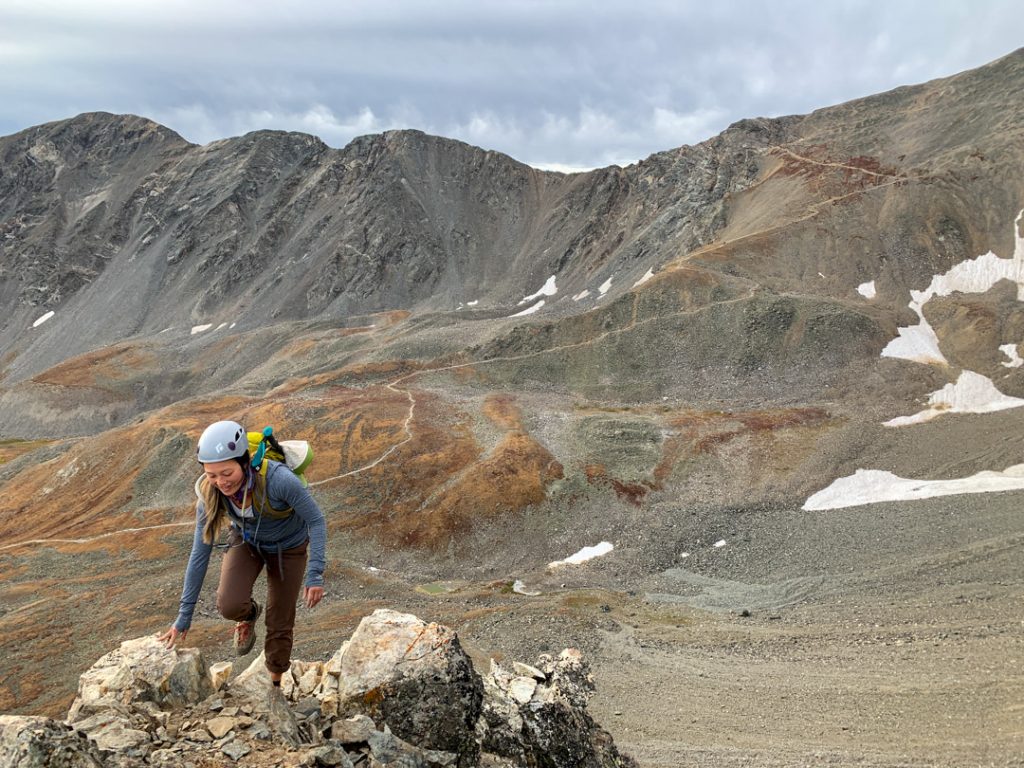
Scrambling Kelso Ridge
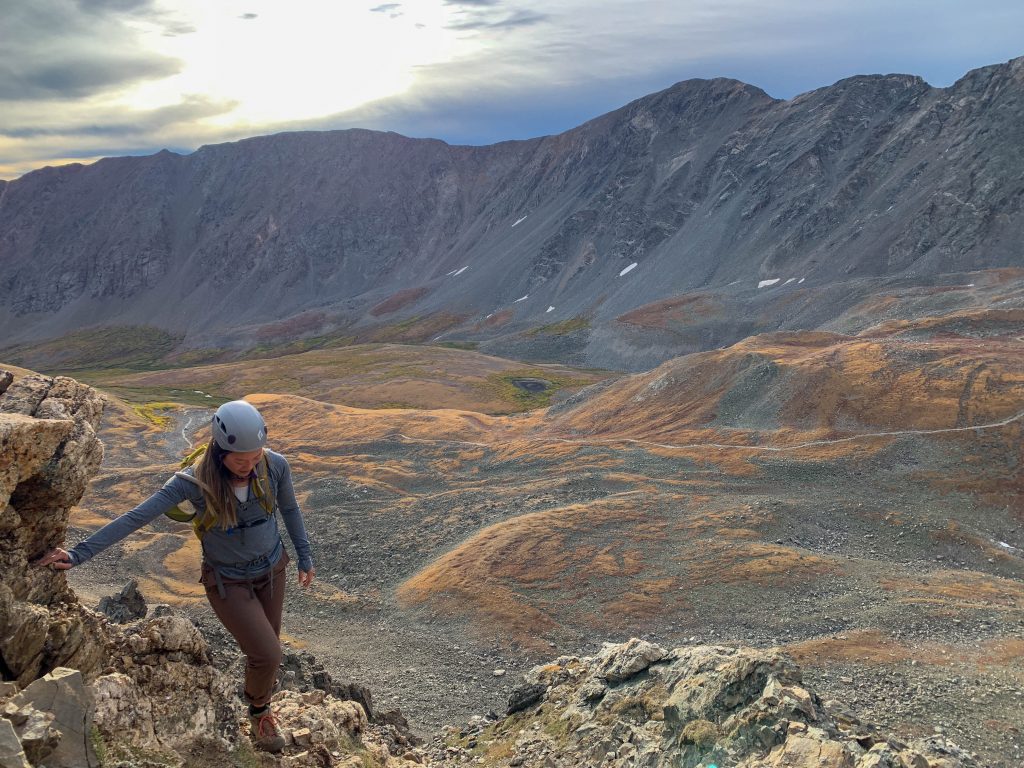
Once you reach the ridge, put your helmet on now, it’s time to rock (pun intended).
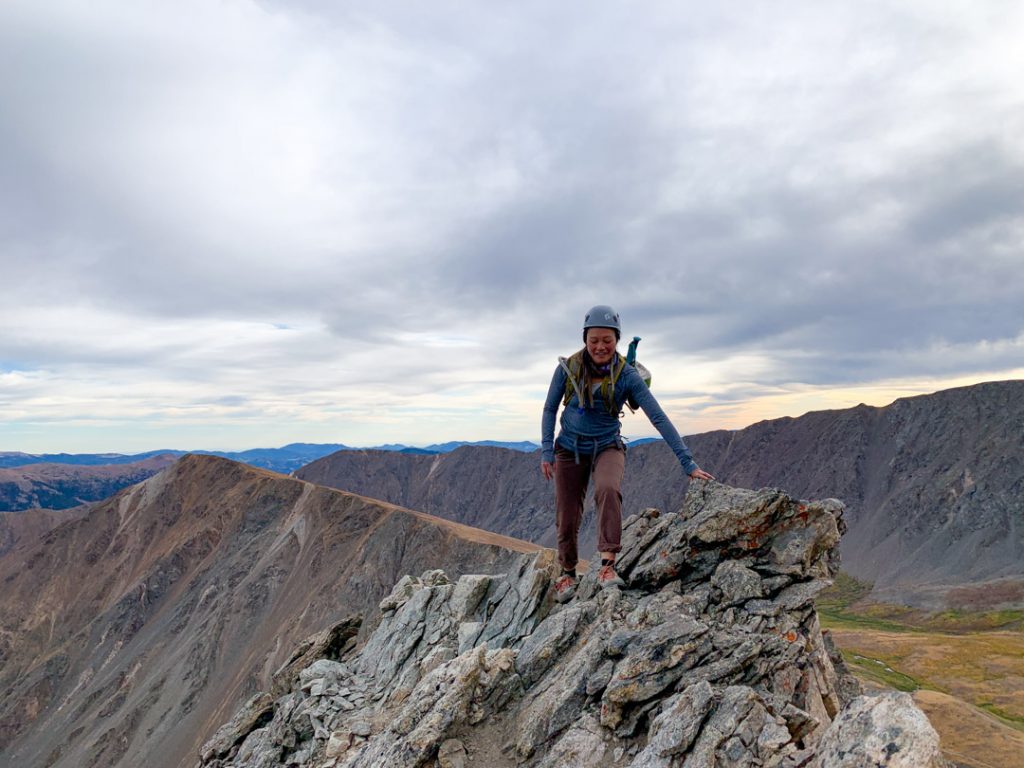
From here, just follow the obvious trail. You’ll generally stick to the right of the ridge, dropping into an obvious notch on the left. Drop a few more feet then head up the first chunk of class 3 rock.
You’ll bypass some fun stuff if you follow the trail (the entire ridge proper goes if you want more scrambling). If you choose the ridge proper, you’ll be scrambling upper 4 and low 5 rock. In general, the rock is solid, but always test holds before you commit all of your weight to it.
After you’re up the first class 3 section you’ll see tons of junky rock spires on your left and the terrain can be a little confusing, but in general, you’re heading up the ridge proper, bypassing obstacles to the right until you reach a white pinnacle of rock.
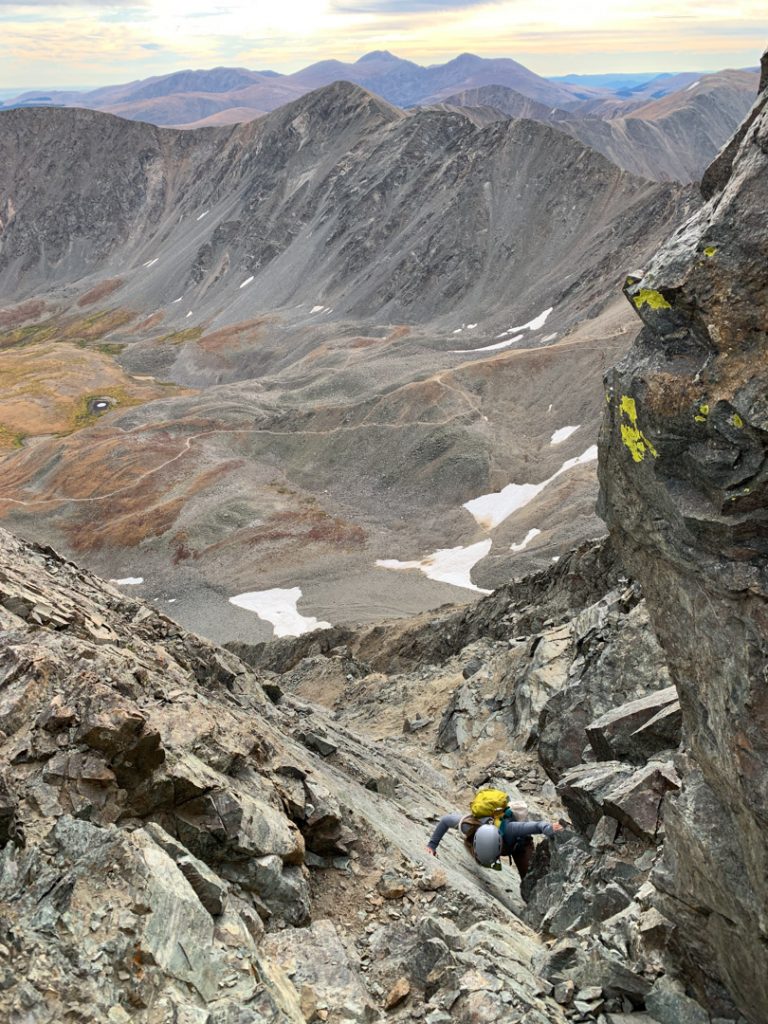
Head towards the white rib and climb up it (just left is the easiest route). Keep to the ridge (there is a well-worn trail) and as you encounter rock obstacles look for the path of least resistance and least exposure. When in doubt look for the worn-down sections that have been loved to death by past climbers.
From here, head either directly up and over (harder) or around and right of the tower of white rock. You’re almost to the famous Kelso Ridge knife edge.
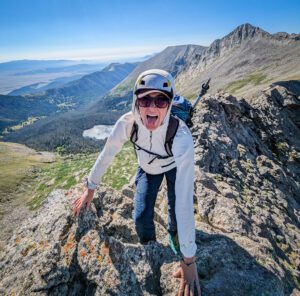
Pro Tip: A knife edge is exactly what it sounds like! A thin fin of rock that’s generally smooth on either side. You can use your hands to hold the edge or scoot on your butt, straddling the edge.
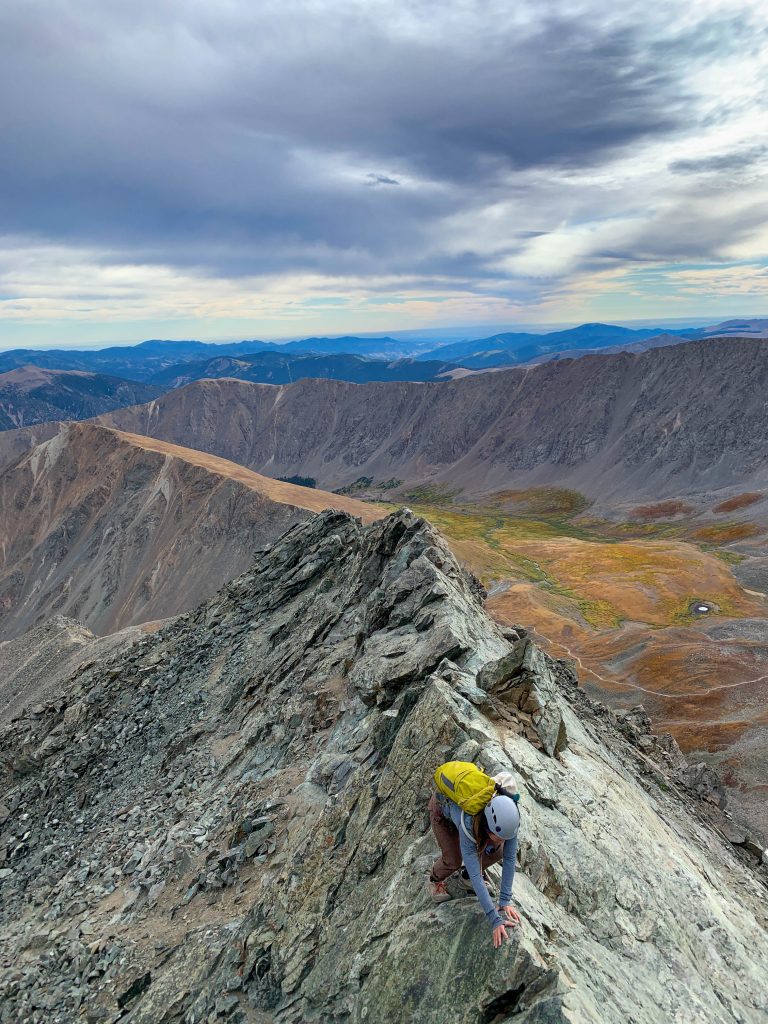
The Crux Knife Edge of Kelso Ridge
Stay left of the large, angled rocks and scramble up a gully to reach the “knife edge.” This is the mental crux (the hardest part) of the climb. Don’t freak out, it’s really not too bad.
Climb on the right side (the left side is steeper), hold on to the edge with your hands or scoot on your butt across it. It’s worn and slick so watch your footing.
The exposure is pretty real, but it’s certainly easier than it looks.
Getting Back Down
The easiest way to hike back down from the top is to follow the Torreys Peak Trail. This route heads down the south slopes down a well-marked signed trail.
At the junction between the Grays and Torreys saddle, head downwards to connect with the main trail. Or, if you’re still feeling feisty, take the extra mile-long hike up Gray’s Peak and bag two peaks in a day!
Can I Descend Kelso Ridge?
Yes you sure can. In fact, this is the way I’ve always climbed it. It’s shorter and a little more engaging.
I can’t say it’s a pleasant experience. The loose crappy rock gets old fast. But for me, it beats joining the herds of humans on either the Grays or Torreys Peak trail.
If it’s your first Class 3 route, I wouldn’t recommend descending this one. Anything you climb up is always much harder to climb down since it’s harder to see your footing.
Safety Tips for Scrambling
Scrambling is a dangerous activity. Whenever you hike a Colorado 14er, you’ll want to think about the risks. Risk is a super-personal thing and assessing the right risks for you takes some experience to really nail. But if you want to stay safe on Kelso Ridge, here are a few scrambling tips to keep in mind.
Rock Fall is Real
ALWAYS shout “rock” if you let a rock fall or slip. This lets parties below you know that something is flying. You never know who is below you, so always yell! If you hear or see flying rock, lean and crouch as close to the rock wall you’re scrambling on as possible, with your helmet pointing up (no bent neck!). To avoid rockfall, go one at a time over loose terrain and give the person space.
Wear Your Brain Bucket
Anytime you’re on Class 3 terrain, you’ll want a climbing-specific helmet. This is not just for an accidental fall, you may encounter obstacles that are above you where you can bump your head, or rocks may fall from above you. If you don’t have a climbing helmet the Black Diamond Half Dome is a budget-friendly, durable climbing helmet.
Test Holds and Don’t Overcommit
Don’t assume that the rock is stable. Although Kelso Ridge is well-traveled and most of the loose stuff has been disposed of already, always test a hold. Look for cracks or seems on a hold and if the rock moves when you gently tug it, try to find a more stable option.
A good rule of thumb is to spread out your weight. If you can, try to distribute your weight across at least three points of contact with the rock. That way, if a hold unexpectedly breaks, you still have two other points of contact to rely on.
Watch the Weather
The weather is wild in the mountains. Hikers and climbers alike get stranded above treeline in dangerous lightning storms every year.
Avoid scrambling Kelso Ridge (or any scramble for that matter) in super strong winds, snow, rain, or storms. Rocks get slick when wet and they often seep water for days, which can cause ice buildup even in summer. Check the forecast and follow along for safe climbing.
Pack Layers
Temperatures on the tops of mountains can easily get below freezing, even in summer. Always pack a puffy layer, gloves, hat, wind layer, and wear pants when you’re scrambling peaks. Even if the forecast is clear, you’ll want to pack plenty of layers.
Know Your Route
Do your homework before heading out, even if you aren’t leading the charge. Your safety is always your responsibility, no matter the experience level of you or the group. Do your homework, download the route beta (information) such as the GPX file of the route, offline maps, photos of the route, and more. Know what you’re getting into.
Level Up Your Head Game
Overcoming a fear of heights in climbing is a real thing. It can be super unnerving to climb high above a valley floor. Take your time, breathe, and focus on what’s in front of you, not below you. Never go up anything you aren’t comfortable coming down (which is much tougher to do).
Also, don’t let the challenge of making it to the summit cloud your judgment. It’s always okay to turn around. The mountains will always be there and no summit is worth your life or well-being.
Local Tip: Summiting mountains isn’t about a perfect record. In fact, you’ll only summit 50% of the peaks you attempt. Remember, if you’re not feeling it, even if you know you can do it. Just call it a day and try again.
Go With People You Trust
Group dynamics is one of the most important parts of summiting any peak. Go with people you know and trust. Understand that group decisions means everyone has a say – regardless of their skill level. Even the most seasoned mountaineers can make mistakes. Don’t be afraid to speak up and only climb with people who respect your right to chat.
Know Your Snow
If you’re traveling in the shoulder seasons, you may encounter snow. Always read avalanche forecasts before you head out (from October through June) and understand snow safety if there are snow obstacles present. If you carry an ax, know how to use it.
Do I Need Special Gear for Kelso Ridge?
Aside from the standard 14er packing list you’ll also want to bring along:
- A climbing-specific helmet
- Fingerless gloves (optional, but helpful on cold rock)
- An ice ax (if there is snow)
- microspikes or crampons (optional, depending on snow conditions)
Catch me on YouTube!
Want more secret backpacking trips? Ultralight hacks that every hiker can adapt? Experience the top outdoor destinations in the world without the crowds? If you want to get insider knowledge of all things outdoors, then you’ll wanna subscribe to my YouTube channel, where I am giving away my DECADES of knowledge as an outdoor professional. I’ll see ya there!
Additional Colorado Mountain Resources
Wanna climb the best peaks in Colorado? Check out these amazing resources:
- Climbing the Skywalker Couloir is Mad Fun
- Lone Eagle Peak is Colorado’s Most Beautiful Mountain
- Your Guide to Climbing Longs Peak (coming soon)
PIN THIS POST