Last Updated on September 9, 2025 by foxintheforest
Every year, many people flock to the famous Coyote Gulch in Escalante to scope out the impressive Jacob Hamblin Arch. I have to admit, it’s an impressive arch! However, if you plan to visit the arch in the most efficient way possible it’s actually quite a serious (and dangerous) endeavor.
I’ve been coming to Grand Staircase Escalante National Monument for nearly a decade and Coyote Gulch is an amazing oasis in a strange and remote landscape. Jacob Hamblin Arch is one of the top sights along the Coyote Gulch “trail” (more like a river bed).
However, this is also one of the most popular hikes in Escalante, so don’t expect solitude (unless you read this guide of course!). If you want the inside scoop on how to reach the Jacob Hamblin Arch like a pro, not a tourist, then keep reading.
About the Guide to Jacob Hamblin Arch
Inside this expert guide to the Jacob Hamblin Arch, you’ll find:
- Practical info about the arch hike, difficulty, distance, and more
- A look at the best time to visit
- Information about using ropes
- Nearby attractions and other things to see while you’re enjoying Coyote Gulch!

Where is Jacob Hamblin Arch?
The Jacob Hamblin Arch is located within Coyote Gulch. The gulch is an oasis in its own right – it’s got a permanent stream running through it. This makes Coyote Gulch a great place to backpack and many people set out on multi-day backpacking trips in this unique landscape.
You’ll find the Jacob Hamblin Arch almost in the middle of the traditional backpacking route through Coyote Gulch. Over the years, intrepid hikers (read: this really isn’t a hike) have created a shortcut to Jacob Hamblin Arch via the “sneaker route.”
You can access this route from the Water Tanks Trailhead on Hole in the Rock Road. This cuts many miles off the journey, but you will need ropes to complete this hike (more on that in a minute, don’t worry).
How to Access the Water Tanks Trailhead
To reach the “sneaker” route trailhead you want to head down Hole in the Rock Road. This is a long, washboard-ridden, dusty, dirt-road romp.
Most cars can make it only if the weather has been dry for several days. Rain and snow quickly muddy up this path and puddles stay a while. The road can get serious ruts that won’t clear up until it’s been re-graded, so always be sure to check road conditions and weather before you head out. I’ve been stopped here in a 4Runner, so do your homework.
Reset your odometer and travel 36.3 miles down the road. You’ll see Fortymile Ridge on your left. Turn left.
Reset your odometer again. At 4.4 miles you’ll see a steep road that climbs up to the Water Tank Trailhead. Park here.
Pro Tip: Fill up on gas, food, and water in Escalante – there are no services for over 1.5 hours. Getting towed out here will cost you at least $1,500.

Practical Info
From the Water Tank Trailhead, you’ll make your way across multiple social trails to reach the drop-in for Jacob Hamblin Arch. Distances are approximate – I’m an expert at desert navigation and we for sure took a different way in than out.
The social trails wind their way through deep sand, cacti gardens, and slickrock, so watch your footing. There is no shade until you descend into the canyon. Look for cairns to lead the way, but remember there are no rangers maintaining this route so bring a GPS track with you.
Here’s a look at a few details for your hike:
Distance: 4.4 miles with the option to add more (recommended).
Elevation Gain: 734 feet with the option for more
Estimated Time: 2.5 – 3 hours depending on how comfortable you are with exposure or how long you spend in Coyote Gulch.
Difficulty: Advanced due to the use of ropes. Moderate in terms of overall hiking.
Dog-Friendly? Dogs are NOT allowed in Coyote Gulch, nor is this route safe for dogs. LEAVE YOUR DOG AT HOME.
Red Tape: Self-issuing permit at the trailhead. If you want to camp here overnight, you’ll need a special permit at the Escalante Ranger Station. Y
Local Tip: If roped descents aren’t your thing, you can still see the arch by accessing the Hurricane Wash Trailhead (34 miles down Hole in the Rock Road). You can connect to Coyote Gulch via Hurricane Wash but it is a BRUTAL 13.4-mile out-and-back hike largely without shade and water.
The Best Time to Visit
The absolute best time to hike to Jacob Hamblin Arch or Coyote Gulch is April through early May and October through early November. Autumn has a slight advantage over spring because it’s typically drier and less windy.
Escalante sits at an elevation of 5,820 feet, so desert temperatures can be a bit cooler in this area in my experience. Coyote Gulch also has some cooler microclimates, but the route in can quickly deplete you in the heat of the day.
Early morning is best, not only for crowds but to beat the mid-day heat.
Summers are dangerously hot and flash flooding is a risk in the afternoons. Winters can be brutally cold and Coyote Gulch will be the least crowded, but it’ll be frigid and unpleasant down there!
Pro Tip: Wet sandstone is dangerous when wet. The anchor will be compromised if you’re climbing the Sneaker Route in wet conditions. It’s already very small and can break at any time.

Do I Need a Rope to Reach Jacob Hamblin Arch?
Yes. If you plan on hiking the Sneaker Route, do not expect someone to bring a rope for you. Individual hiking groups are responsible for their own ropes – BLM and park services DO NOT provide ropes. Nor do they maintain the anchor.
So if you use someone’s rope coming down, there is no guarantee it will be there when you get back.
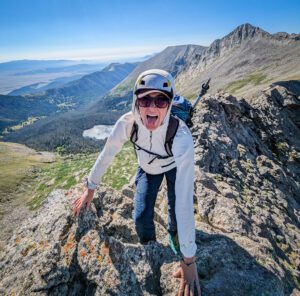
I am an avid mountaineer, canyoneer, and technical rock climber. I have boatloads of experience scrambling and climbing in canyons and the desert. This route is a class 4, 60m mega slab that I would not be comfortable descending without a rope. A fall would kill you.
We ascended more than half of it without ropes, but the average hiker would not be cozy doing that. Add in backpacking weight (if that’s what you’re after) and it’s even trickier.
Pro Tip: The anchor is pretty suspect in my expert opinion. It’s narrow and starting to wear pretty heavily. I’m an expert rock climber with decades of experience, and this one gave me a bit of pause. It was fine to use as a hand line, but I really didn’t trust my entire weight to it. My guess is this will get bolted at some point, just because of the popularity.
Are Dogs Allowed in Coyote Gulch?
No. Please leave your dog at home. They aren’t allowed here due to the fragile nature of the ecosystem. The Sneaker Route is not at all safe for dogs. There are signs everywhere at the trailheads letting you know that dogs are not allowed, so leave Fido at home – it would be unsafe to leave your dog in a hot car.
Reaching the Jacob Hamblin Arch
The hike winds its way through a few sandhills, with a few obvious paths towards 2 big rocks, but they criss cross frequently. Sand gives way to slickrock as you get closer to the anchor. Cairns generally lead you in the right direction, but carry a GPS track because these are social cairns, nothing official.
Typically you’ll want to look forward and left (west) for cairs. We didn’t have any trouble following the worn paths or the slickrock, but we are experts at navigating rock and it was easy for us to see the worn spots of rock and trails.
The slickrock will start to steepen and you can then see the top of Jacob Hamblin Arch. You might not even notice it’s an arch! Eventually, the terrain steepens substantially and there will be a small rock shelf with a tiny (6-8 inch) arch weakness in the rock. This is your anchor.

The Sneaker Route Scramble
From the anchor, you’ll want to set up your rope. Using a bowline knot is fine. We ended up using a biner block, which I wouldn’t recommend simply because it has a lot of impact on the rock. We put a bit of climber’s tape on the rope with the date on it so if any rangers came by they would know that we were planning to return and it wasn’t an old rope.
We didn’t rappel the route, that would put a lot of undue pressure on the anchor (nor am I stoked on single-line raps, so I nixed it). Instead, we set it up and navigated it like a handling. As you can tell by the photo, this anchor won’t be here forever so we never fully trusted all of our weight to it.
If you think I’m speaking in tongues, I’m basically saying that this thin slice of rock will crack and break one day, don’t let that day be when you’re using it!
A 60m rope didn’t reach the ground, but it reached a point where we could easily scramble down about 25 feet (class 3) to reach the bottom of Coyote Gulch.
The rope was most helpful for the initial 100 feet or so, where it’s slick and there isn’t much to grab onto.

Pro Tip: If you do plan to scramble this route, the west (skier’s left) side has more features for scrambling. We took this way back up until we reached the final “pitch” if you will, we scurried over to the rope for security.
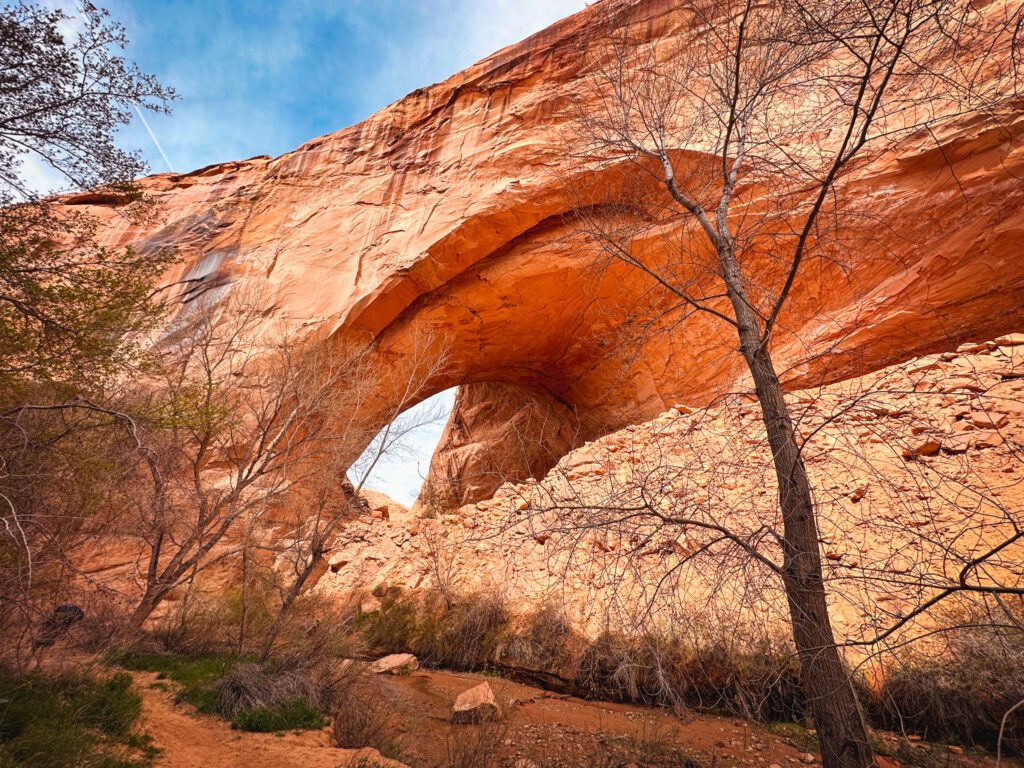
Jacob Hamblin Arch
Lead left (downstream) when you reach the bottom and you’ll immediately see Jacob Hamblin Arch. It’s worth it to walk a little way down Coyote Gulch to catch a better view of the arch.
It’s magnificent! Jacob Hamblin Arch is around 100 feet tall and 150 feet wide.
Things to Do Near Jacob Hamblin Arch
Since you’re down here, you might as well keep going through Coyote Gulch. Head up river until you reach Coyote Natural Bridge – about 1.5 miles ahead.
This track will take you through Coyote Gulch, including some red rock rapids, plenty of water crossings, and more. It’s really a fantastic landscape.
If you keep going, you’ll eventually reach a junction another 4 miles down veering off to the right. This is Crack in the Wall, a popular, scrambly exit and entry point to Coyote Gulch. From here it’s a cross-country navigation nightmare over open desert to get back to the water tanks – bring a GPS!
Pro Tip: If you’re planning to explore more of Coyote Gulch, definitely bring some water shoes – you’ll be forced to cross the stream many times.

What to Pack
There are several things you’ll need for your Jacob Hamblin Arch hike. Here’s a look at what to bring:
- 60 m rope (static or dynamic is fine – we used a dynamic 9.8 mm rope and it was great).
- Sun hat, sunglasses, sunscreen
- sunshirt
- At least 2.5 liters of water – plus a filter if you want to spend more time in Coyote Gulch
- First aid kit with tweezers (for cacti)
- salty snacks
- a day pack
- non-cotton socks that go above the ankle (protect your feet from cactus).
- GPS device
- A puffy layer (for emergencies or if the inner canyon is cold)
- water shoes
- a quick dry towel (to keep your feet dry as you transition from hiking shoes to )
- hiking shoes or approach shoes (preferred)
Other Attractions at Hole in the Rock Road
You can spend a lifetime down Hole in the Rock Road and still feel like you have things to explore. Most of these attractions require special gear, knowledge, or even technical skills, but there are a few accessible adventures you’ll want to put on your bucket list.
Here are a few of my faves!
- Egypt Slot Canyons (technical canyoneering skills and gear required)
- Spooky Gulch and Peek-a-boo Slot Canyon
- Backpacking Reflection Canyon
- Zebra and Tunnel Slot Canyon
Camping
There are several dispersed camp sites along Hole in the Rock Road. However, keep in mind that most of them require a high-clearance vehicle or a small SUV to reach. They can be found on spur roads from the main road.
Pro Tip: You need to pick up a free permit to camp at the Escalante Inter-Agency Visitor Center. It’s free and easy to grab before you head down Hole in the Rock Road.
Catch me on YouTube!
Want more secret backpacking trips? Ultralight hacks that every hiker can adapt? Experience the top outdoor destinations in the world without the crowds? If you want to get insider knowledge of all things outdoors, then you’ll wanna subscribe to my YouTube channel, where I am giving away my DECADES of knowledge as an outdoor professional. I’ll see ya there!
Additional Desert Adventures in the American Southwest
Looking to travel the American Southwest like a pro? I’ve got you covered with expert guides to the most stunning landscapes in the area!