Last Updated on September 9, 2025 by foxintheforest
There are countless amazing hikes in the Grand Canyon. This magical place is nearly impossible to comprehend. The sheer scale and magnificence of this landscape can only really be understood by hiking. Layers of rock holding countless mysteries will keep you coming back again and again.
About This Guide to Grand Canyon Hikes

Hiking on the North or the South Rim – Which is Better?
When it comes to choosing between the North Rim vs the South Rim of the Grand Canyon, there are a few important things to know.
First, the North Rim of the Grand Canyon is only accessible from May 15 until October 15. The road in isn’t maintained over the winter.
However, if you want solitude, the North Rim sees just 10% of the visitors of the South Rim. It’s quieter and feels more natural than the hustle and bustle of the south rim.
I’ve visited both rims multiple times (and continue to go back). The South Rim of the Grand Canyon is the best if you’re looking to hike below the rim. Simply put, there are more options for named trails below the South Rim.
However, if you’re looking for easier hikes, the North Rim has more on offer. Since the cliff walls are much steeper on the south side (comparably, both are steep!) hikes tend to be more demanding.
Pro Tip: If you’re looking to backpack in the Grand Canyon, then you’ll likely want to base yourself on the South Rim.
Dipping Below the Rim
There is a massive difference between hiking above and below the rim. First, almost every hike below the rim of the Grand Canyon is difficult. This is because the trail is extremely steep.
The next big factor is water and heat. Regardless of where you are hiking in the Grand Canyon, you need to have a water plan! The Corridor (where the rim-to-rim hikes are) has a water system, but it’s going to be under construction for a few years. Hikes outside of the corridor often have no water or utilize springs deep in the canyon.
Always do your homework before embarking on a hike below the rim!
The heat is also a major factor. For every 1,000 feet of elevation loss, expect the temperatures to rise 5.5 degrees. This may not sound like a huge deal, but it is. It’s not uncommon to be below freezing above the rim and temperatures to be sweltering below.
Heat exhaustion is a serious concern. When you choose to hike matters! Don’t worry – we’ll dive into that in a second.
It doesn’t matter if you’re an expert hiker or a total newb, being prepared, researching your hike, and planning appropriately is the key to success when it comes to hiking in the Grand Canyon.
How Hard is it to Hike into the Grand Canyon?
Any hike into the Grand Canyon is challenging. I’m a mountaineer and live at high altitude. I’m no stranger to intense gains, and some of the routes here have tested me. But there are plenty of moderate and easier options for getting below the rim.
The key is to be prepared and do your homework!
It requires basic desert hiking skills to hike into the Grand Canyon. But that isn’t to say that you’re not capable. Here’s what you’ll need to understand to hike into the Grand Canyon:
- Avoid the heat of the day at all costs – the Grand Canyon offers little shade and is a blast furnace.
- What goes down, must come up. So if it’s cool in the morning, but hot in the afternoon. You’ll be pushing yourself to hike out as uphill exerts way more cardiovascular energy than downhill. Downhill is harder on your joints and uphill is harder on your lungs.
- Plan your water consumption. Assume at least 4 liters per person per day. If you’re hiking out and there are no reliable water sources, consider caching a couple of liters of water (labeled with your name and the date of use) along the trail. DO NOT use someone else’s cache!
- Bring plenty of salty snacks! We use things like Liquid IV, salty chips, and more.
- Sun protection is essential. Wear a sunshirt, a wide-brimmed hat, sunglasses, and sunscreen to avoid sun exhaustion.
- Hiking poles are strongly recommended. Poles take a lot of pressure off of your joints!
- Budget 1 hour per 1,000 feet of gain/loss or 30 minutes per mile, whichever is longer. This helps you plan your routes with the temperatures.
- Altitude is a factor! The South Rim sits at 6,800-ish feet above sea level. The North Rim is around 8,000 feet. The higher you go, the more tired you’ll be and the altitude will compound this feeling.
Can a Beginner Hike in the Grand Canyon?
Honestly, I’m not the kind of person who wants to gate-keep Grand Canyon hikes. But I’m also not in the business of telling a beginner to do something dangerous. Hiking safely and responsibly in the Grand Canyon is your responsibility. Taking that risk is a personal decision.
If you do your homework, bring water, start at the right time, and you’re prepared, then yes, a beginner can hike below the rim. My recommendation would be to stick to the main corridor area of the park since the trail is well-maintained and there are more options for water.
I’d recommend beginners sticking to lower-mileage below-the-rim hikes. Just be aware that there are steep drops nearby – it’s a canyon after all!
If all of this sounds too intimidating, then there are plenty of hikes along the rim that are well-suited to beginners.
Pro Tip: Look for the “beginner-friendly below-rim hike” tag on the “difficulty” section of each hike. These are still tough hikes, but due to shorter mileage, lower gains, and (occasional) shade or water availability, a beginner can try them.
The Best Time of Year to Hike
The best time of year to hike in the Grand Canyon is late spring (April) and late fall (October to November). Snow and ice are long gone (most years) and the temperatures in the inner canyon aren’t blistering hot.
The key to hiking in the Grand Canyon is to start early regardless of when you visit the Grand Canyon. Think 6 am or earlier for hikes that go well below the rim. This will help you move through the hotter areas before the mid-day heat. Not to mention, you’ll beat a lot of the crowds.
There is little to no shade on virtually every Grand Canyon hiking trail. The sun can absolutely be a killer. Hot temperatures in the desert often feel much hotter than they actually are because the rocks reflect heat back onto you. Start early!
Pro Tip: Seeing a sunrise in the inner canyon is an incredible experience. Hike by headlamp, pack a tasty breakfast and watch the sun come up over the rim. Aim for trails that have views to the east for sunburst views, and west for sunlit cliffs.
Avoid hiking below the rim in the summer. It’s dangerous. In fact, the rangers don’t give out permits for many areas outside of the corridor for overnight backpackers for this very reason.
Winter in the Grand Canyon can also be a decent season to hike along the south rim for more advanced hikers looking to explore the Corridor, but you’ll want to be comfortable hiking on icy trails with exposed ledges. Bring traction such as microspikes and poles.
Hiking the Corridor vs Other Trails
There are three types of trails in the Grand Canyon.
- The rim trails (easiest). These stay above the rim or travel to various viewpoints through the forests.
- The Corridor (“easiest” below-the-rim hikes). This consists of the South Kaibab, North Kaibab, and Bright Angel Trail.
- Off-corridor hikes (hardest below-the-rim hikes). These are historic trails or less maintained routes that often require advanced desert hiking skills to navigate.
If you’ve never hiked challenging trails in the desert before and you want to dip below the rim, then stick to the Corridor hikes. This trail system is well maintained, suitable for pack animals, and has more resources than any other trail type.
The drawback is, that it’s crowded. This is because it’s the only route that crosses the Colorado River and there is lots of infrastructure for hikers. The Corridor is also home to some of the most famous parts of the Grand Canyon – so it’s certainly crowded for a reason!
Off-corridor, below-the-rim trails are far more rugged and a HUGE step up in difficulty. These routes are ideal for avid hikers who do not mind loose rock, exposure, steep gains, route finding, and other challenges. Trails are not as well maintained and have more of an adventurous feel.
Can You Hike the Grand Canyon in 1 Day?
Many ultra-endurance athletes hike the rim-to-rim in one day. This is a challenge reserved for those who have experience with long endurance hikes, big elevation gain, and loss, and know their limits. It’s 24.6 miles and 5,574 feet of gain. That’s a LOT!
South Rim Grand Canyon Shuttles
Quite a few of the best Grand Canyon hikes are only accessible by shuttle (one way or both ways). I reference shuttles throughout this post. So be sure to research shuttle schedules (they change seasonally) and understand which lines to take to the trailhead.
You can also avoid the shuttle issue and just book a Grand Canyon tour from Phoenix instead.
Best Grand Canyon Hikes on the South Rim
Now for the good stuff! Here’s a look at several awesome hikes on the South Rim of the Grand Canyon. Be on the lookout for hot tips about crowds and difficulty in the summary!
Pro Tip: Please note that the ratings on all of these hikes are relative to the Grand Canyon only. This means a challenging hike at home may not equate to a challenging hike in the Grand Canyon. People coming from places with minimal elevation gain/loss or lower altitudes (the Grand Canyon’s rim is at around 6,800 feet above sea level) are going to find hiking in the Grand Canyon to be pretty stiff for the rating.
(Relatively) Easy South Rim Grand Canyon Hikes
Here’s a look at the easier trails on the South Rim. None of these dip below the rim, but that doesn’t mean they don’t give you unbelievable views of the Grand Canyon!
1. Grand Canyon Rim Trail
This has to be my top hike above the rim of the Grand Canyon. This point-to-point trail hits all of the incredible viewpoints along Hermit Road and then some. What I love about this hike, is from the Hermits Rest shuttle onwards, you can catch a shuttle to Hermits Rest.
This makes this hike really accessible. Hike one way to Hermits Rest, then take the shuttle back. If you get tired, simply make it to the next shuttle stop and hop on!
Just be aware that all distances are one-way.
Pro Tip: Personally, hiking from Mather Point to Hermits Rest is a little silly. Start this hike from Hermits Rest.
Distance: 12.7 miles one way from Mather Point or 7.8 miles one way from the Hermits Rest shuttle depot
Elevation Gain: 583 feet from Bright Angel, 285 feet from the Hermits Rest shuttle
Difficulty: Easy from the Hermits Rest Shuttle, Moderate from Bright Angel
Estimated Time: 4 hours from the Hermits Rest shuttle to Hermits Rest. It’s about a 20-minute bus ride back to the start.
Dog-Friendly: yes, but they must be on a leash
Crowd Factor: Crowded between 10 am and 3 pm. We started at 8 am and were one step ahead of the crowds. Shuttle stops and viewpoints can get crowded, but the trail is relatively quiet.
Corridor? No, but the trail is well-maintained and even paved at parts. There are guardrails at most viewpoints, but the trail does get close to the rim without guardrails at a few spots.
2. Rim Trail: Mather Point to Bright Angel Trailhead
If you don’t mind crowds and you’re looking for more of a walk than a hike, then this is the trail for you. Hiking from Mather Point to Bright Angel is mostly paved. This is an ideal “hike” for those that want to soak in views, but don’t mind hordes of people and infrastructure
Distance: 6.0 miles round trip
Elevation Gain: 413 feet
Difficulty: Easy by Grand Canyon standards
Estimate Time: 3 hours
Dog-Friendly: yes, but they must be on a leash
Crowd Factor: Very crowded.
Corridor? Technically no, but this is a rim route that crosses through the busiest area of the park.
3. South Kaibab to Shoshone Point
This is mostly a horse and pack animal trail – so be prepared for poop and yield to stock animals. However, it’s a really quiet stretch of rim trail, making it the ideal choice for those who don’t want a brutal challenge, but want some solitude on the south rim.
Pack a picnic as there are a few cool picnic spots at Shoshone Point.
Pro Tip: You can “loop” this hike by either taking the shuttle to the official Shoshone Point Trailhead and walking the 1-mile (flat) trail to the point then taking the rim trail back to the village or visa versa.
Distance: 5.1 miles round trip
Elevation Gain: 503 feet
Difficulty: Easy
Estimate Time: 2.5 hours plus shuttle time.
Dog-Friendly: yes, but they must be on a leash
Crowd Factor: Quiet except for pack animals. Shoshone Point does see some crowds, but the hike in and required shuttle from the main road keep this viewpoint quieter.
Corridor? No.
Moderate Grand Canyon Hikes on the South Rim
Most of the trails on this list are various stopping points along the Rim-to-Rim Corridor. These stellar Grand Canyon hikes offer a chance to dip below the rim but without the rugged nature of off-corridor trails.
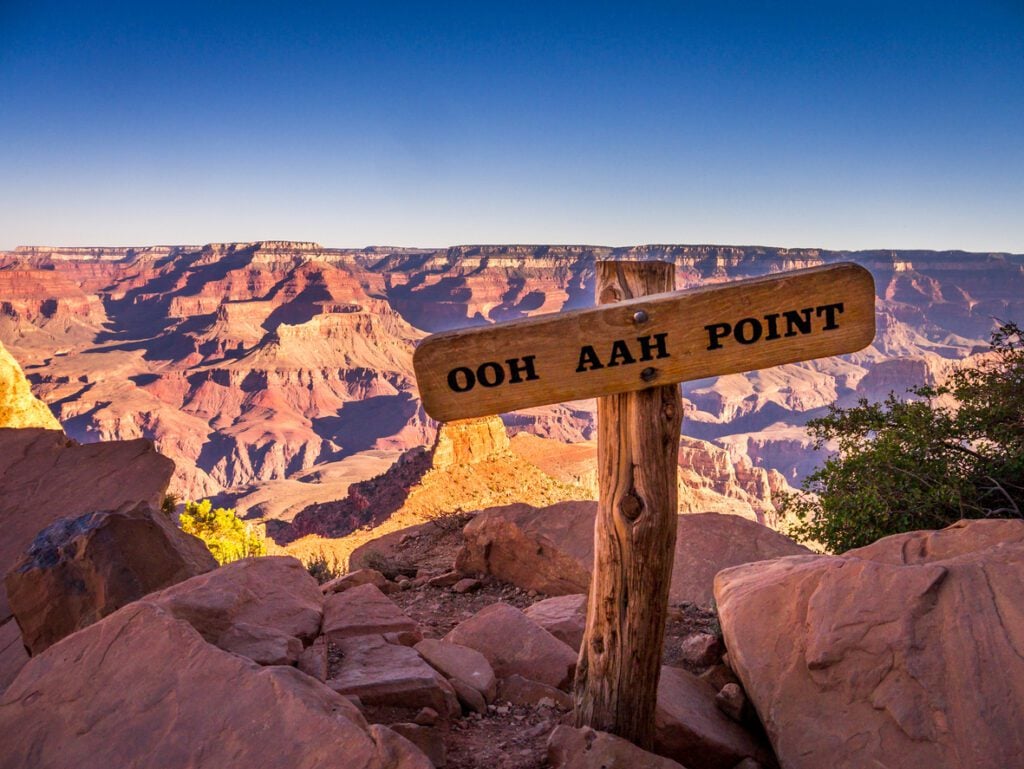
4. South Kaibab Trail to Ooh Aah Point
Ohh Ahh Point is arguably one of the most accessible below-the-rim Grand Canyon viewpoints. This is a quick jaunt to your first 180-degree view below the canyon along the rim. However, nearly everyone who visits and wants to hike does this trek to Ohh Ahh Point, so be prepared to share the trail and the views.
Pro Tip: There is no parking at the South Kaibab trailhead, so you’ll need to either take an approach trail along the rim, or take the shuttle from the main village area.
Distance: 1.8 miles
Elevation Gain: 685 feet
Difficulty: Moderate. Great beginner below-the-rim hike.
Estimate Time: 1.5 hours
Dog-Friendly: No. Dogs are not allowed below the rim.
Crowd Factor: Maximum crowds. Hike for sunrise or during the off-season for fewer people.
Corridor? Yes.
5. South Kaibab Trail to Cedar Ridge
Continuing an additional 0.7 miles (one way) along the South Kaibab Trail brings you to Cedar Ridge – a hitching post for the mule trains. This is a great add-on if you dip below the rim and still think you have extra energy past Ooh Ahh Point, just remember you need to go back up.
Pro Tip: Remember, there is no shade and no water except for seasonal water at the trailhead. If you’re inexperienced, weigh your choice to continue carefully.
Distance: 3.1 miles
Elevation Gain: 1,181 feet
Difficulty: Moderate. Great beginner below-the-rim hike.
Estimated Time: 2.5 hours
Dog-Friendly: No. Dogs are not allowed below the rim.
Crowd Factor: Maximum crowds. Hike for sunrise or during the off-season for fewer people.
Corridor? Yes
6. 1.5-Mile Rest House via Bright Angel Trail
Harder than the viewpoints from South Kaibab, the 1.5-mile rest-house features a steep jaunt through switchbacks along the iconic Bright Angel Trail.
This is a great intro to dipping into the Grand Canyon by foot. But remember, going down is the easy part. Bright Angel offers a little more shade during certain times of the day than South Kaibab, but it’s steeper!
Pro Tip: The Bright Angel Trail is closed from 12/1/23 through 4/14/24. Crews are working on the water lines so water is also intermittently shut off in the area.
Distance: 3.2 miles
Elevation Gain: 1,184 feet
Difficulty: Moderate by Grand Canyon standards. Great beginner below-the-rim hike.
Estimated Time: 2.5 hours
Dog-Friendly: No dogs allowed
Crowd Factor: Maximum crowds. Hike for sunrise or during the off-season for fewer people.
Corridor? Yes.
7. Santa Maria Spring Overlook via Hermits Rest
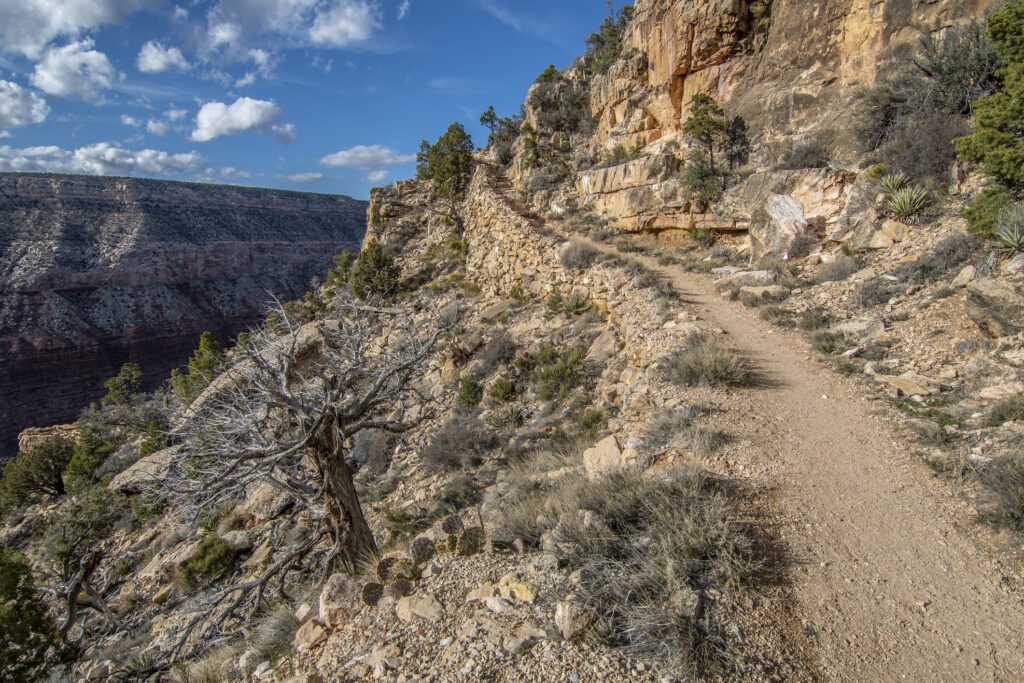
If you’re looking for something moderate (by comparison) outside of the corridor, then look no further than the Santa Maria Spring. Here you’ll get a taste of some of the better-maintained off-corridor hiking without hordes of people. This is still a challenging hike by most people’s standards, but compared to other Grand Canyon endeavors, it’s moderate.
What makes this hike really cool is the viewpoint just past the spring (about 0.5 miles round trip). Not to mention, if you bring a water filter, you can refill your water at the spring.
Pro Tip: The Hermits Rest Trailhead is only accessible by shuttle bus for most of the year. Otherwise you’re looking at a 7.8-mile approach hike via the Canyon Rim Trail. In the winter, you can acess this area by private car.
Distance: 4.0 miles
Elevation Gain: 1,751 feet
Estimated Time: 3.5 hours
Difficulty: Moderate to hard (by Grand Canyon Standards)
Dog-Friendly: No dogs allowed
Crowd Factor: Moderate crowds.
Corridor? No.
8. Dripping Spring via Hermits Rest
Although this gets a hard rating, I consider this hike to be leaning more toward moderate (comparatively). There are narrow sections of this trail with steep drops, so if you’re squimmish consider hiking elsewhere.
What makes Dripping Spring so great is that very few people come here. It’s a stop-off point for some rugged backpacking adventures. You’ll get the unique opportunity to experience a quiet spring in the heart of the Grand Canyon.
Remember you’ll need to take a shuttle spring through fall to reach Hermits Rest.
Pro Tip: If you’re an avid hiker, adding on the Santa Maria Spring makes this quite a day (read: hard) but a great way to snag some views too.
Distance: 6 miles
Elevation Gain: 2,135 feet
Estimated Time: 4.5 hours
Difficulty: Moderate to hard (by Grand Canyon Standards)
Dog-Friendly: No dogs allowed.
Crowd Factor: Low.
Corridor? No.
Challenging Grand Canyon Hikes in the South Rim
I’ve broken out this list of challenging hikes by reasonable day hikes to hikes that most (sane) humans will do as a multi-day adventure. However, since I’m an ultra-runner and endurance hiker myself, I included multi-day hikes that some extreme hikers do in a day here as well.
9. 3-mile Rest House via Bright Angel Trail
Back to corridor hikes. The 3 Mile Rest House along the Bright Angel Trail is the easiest hard hike on this list. There are fill-up stations for water (seasonal closures, check conditions) and toilets along this trail, making it a bit easier to manage.
Again, this feels more like a super highway and less like a hike. But the Bright Angel Trail is iconic and the views are amazing.
Distance: 6.1 miles
Elevation Gain: 2,112 feet
Difficulty: Hard to moderate by Grand Canyon standards
Estimated Time: 4.5 hours
Dog-Friendly: No dogs allowed below the rim
Crowd Factor: Maximum crowds. Hike for sunrise or during the off-season for fewer people.
Corridor? Yes.
10. South Kaibab Trail to Skeleton Point
If Ooh Ahh Point wasn’t enough, your next big viewpoint is Skeleton Point. The views are outstanding here, but the trail is punishing for the uninitiated on the return.
Pro Tip: This hike appears on several lists, but I think there are better Grand Canyon hikes with less people out there if you’re looking for a challenge.
Distance: 5.8 miles
Elevation Gain: 2,027 feet
Difficulty: Hard
Estimated Time: 4 hours
Dog-Friendly: no dogs allowed
Crowd Factor: Maximum crowds. Hike for sunrise or during the off-season for fewer people.
Corridor? Yes.
11. Plateau Point Trail via Bright Angel Trail
Plateau Point offers some incredible 360-degree views of the Grand Canyon. But the ticket to enter is high – with high mileage and steep gains, this one is a doozy. It’s also quite crowded. However the further you venture down the corridor, the thinner the crowds.
There is water and a few shaded rest areas along the way.
Head down Bright Angel until you see a signed junction for Plateau Point, then return the way you came.
Distance: 11.9 miles
Elevation Gain: 3,244 feet
Difficulty: Very hard
Estimated Time: 6.5 hours
Dog-Friendly: No
Crowd Factor: Very crowded.
Corridor? Yes.
12. Grandview Trail to Horseshoe Mesa
Out of all the hikes on this list – Grandview to Horseshoe Mesa is my favorite. Honestly, this is a seriously underrated trail. The trail construction is super unique, the views are incredible, and after the first mile or so of this trail, it’s pretty quiet.
You can hike out to each arm (11 miles round trip). The left (west) arm has a more defined path while the east (right) arm has a very light trail.
Pro Tip: Horseshoe Mesa is absolutely worth an overnight. There’s a TON to explore nearby that would be hard to accomplish in a day.
Distance: 8.0 miles
Elevation Gain: 2,732 feet
Difficulty: Very hard. Overnight strongly recommended, just for the views and nearby side trails.
Estimated Time: 6 hours. 1-2 nights if backpacking.
Dog-Friendly: No
Crowd Factor: moderately crowded towards the top. We spent the night here on a busy weekend and didn’t see anyone for 36 hours.
Corridor? No.
13. Bright Angel Trail
Arguably the most famous trail in the Grand Canyon, mannnnnyyyy people hike the Bright Angel Trail. Most people don’t do this in a day (in fact, if you haven’t done any Grand Canyon hiking, I don’t recommend it) and those that do this trail in a day usually loop it with the South Kaibab Trail or do the rim-to-rim in a day.
Pro Tip: The Bright Angel Trail is closed for water pipeline work until 4/14/24.
Distance: 15.3 miles
Elevation Gain: 4,478 feet
Difficulty: Very hard. Most people do this as an overnight.
Estimated Time: 10 hours. 1-2 nights if backpacking
Dog-Friendly: No
Crowd Factor: Very crowded. The crowds thin a little towards the bottom, but it’s still very busy.
Corridor? Yes.
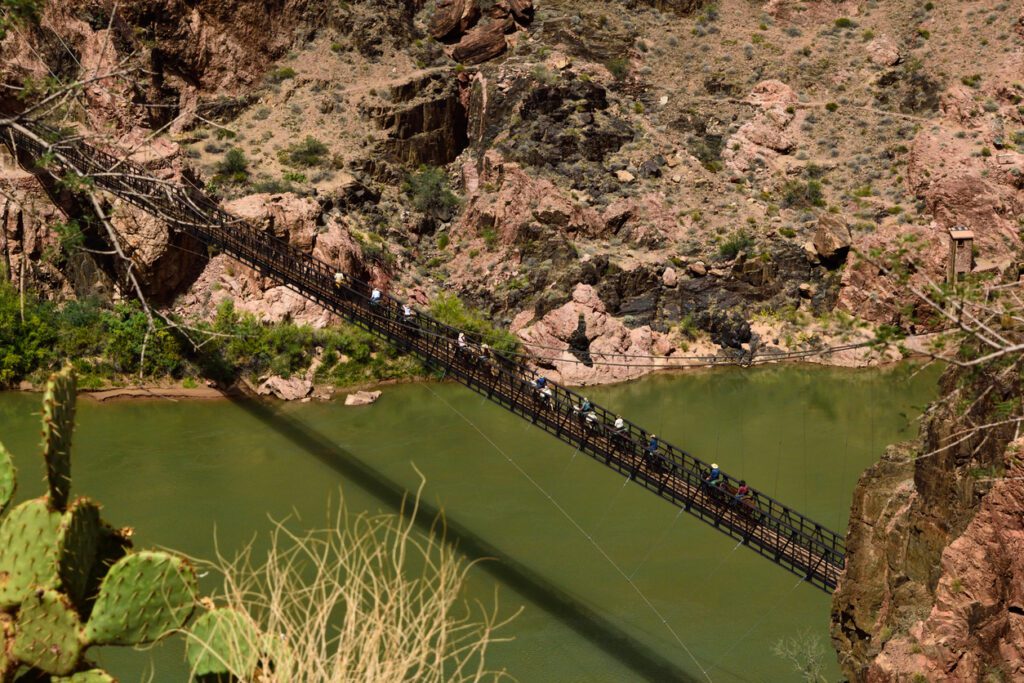
14. South Kaibab Trail to Phantom Ranch
Heading to South Kaibab to Phantom Ranch is slightly harder than Bright Angel for a few reasons. One, there aren’t as many rest points and there are no water stations (May through October there can be water at the trailhead). You’ll also need a shuttle to access this hike.
Because of this, the crowds really thin out past Skeleton Point, making it a more ideal choice if you’re looking for a suffer-fest in the corridor, but don’t want to commit to the Rim-to-Rim in a day.
Pro Tip: You can get water at Phantom Ranch, but bring a filter because in recent years it has been intermittently safe to drink.
Distance: 14.3 miles
Elevation Gain: 4,872 feet
Difficulty: Very hard. Most people do this as an overnight.
Estimated Time: 10 hours. 1-2 nights if backpacking.
Dog-Friendly: no
Crowd Factor: Very crowded up high, crowded down low
Corridor? Yes.
15. South Kaibab, Phantom Ranch, and Bright Angel Trail
This loop is arguably best done as a backpacking route since spending time in the canyon is really worth it. But if you’re looking to jump on a huge challenge, the Kaibab to Bright Angel is a great rim-to-river adventure that can be done in a day.
You’ll hike through two iconic trails, with a couple of chances to not be bombarded by humans and pack animals. You’re going to want a pre-dawn start for this endurance hike.
Pro Tip: Hiking from South Kaibab to Bright Angel lessens your water burden substantially since you can fill up at various points along the Bright Angel Trail.
Distance: 16.6 miles
Elevation Gain: 4,747 feet
Difficulty: Extremely hard. Most people do this as an overnight.
Estimated Time: 11 hours. 1 – 3 nights if backpacking.
Dog-Friendly: no
Crowd Factor: Very crowded up high, crowded down low
Corridor? Yes.
16. Hermit Trail to Hermit Rapids
This hike appears on a LOT of “best hikes in the Grand Canyon” lists, but I’ll level with you, this isn’t something to attempt in a day. This is definitely an instance where bloggers throw this hike in the mix because they see it on a list, not because they’ve actually done it.
This trail is a huge step up from the others on this south rim list. It’s rocky/loose, steep, meanders, requires multiple creek crossings, narrow traverses with steep drops, and can be tough to follow after Hermit Creek to reach the river. You’ll need to budget a lot of time to navigate the obstacles, including a few boulder fields.
Do people do it in a day? Sure – it’s a challenge for super-experienced Grand Canyon hikers. But for the average avid hiker, this trail is best done as an overnight.
Distance: 17.5 miles
Elevation Gain: 5,013 feet
Difficulty: Hardest trail on this south Rim list. Best done as an overnight.
Estimated Time: 12 hours – add in some buffer time for navigation. 1-2 nights if backpacking.
Dog-Friendly: no
Crowd Factor: Quiet
Corridor? No.
Best Grand Canyon Hikes on the North Rim
The North Rim sits over 1,000 feet higher than the South Rim. It’s also set a ways back, making it more ideal for vast views vs rim-to-river runs famous on the south side. However, it does have gentler trails for the more novice hiker.
Easy Grand Canyon Hikes on the North Rim
These easy North Rim Trails deliver awesome views of the North Rim.
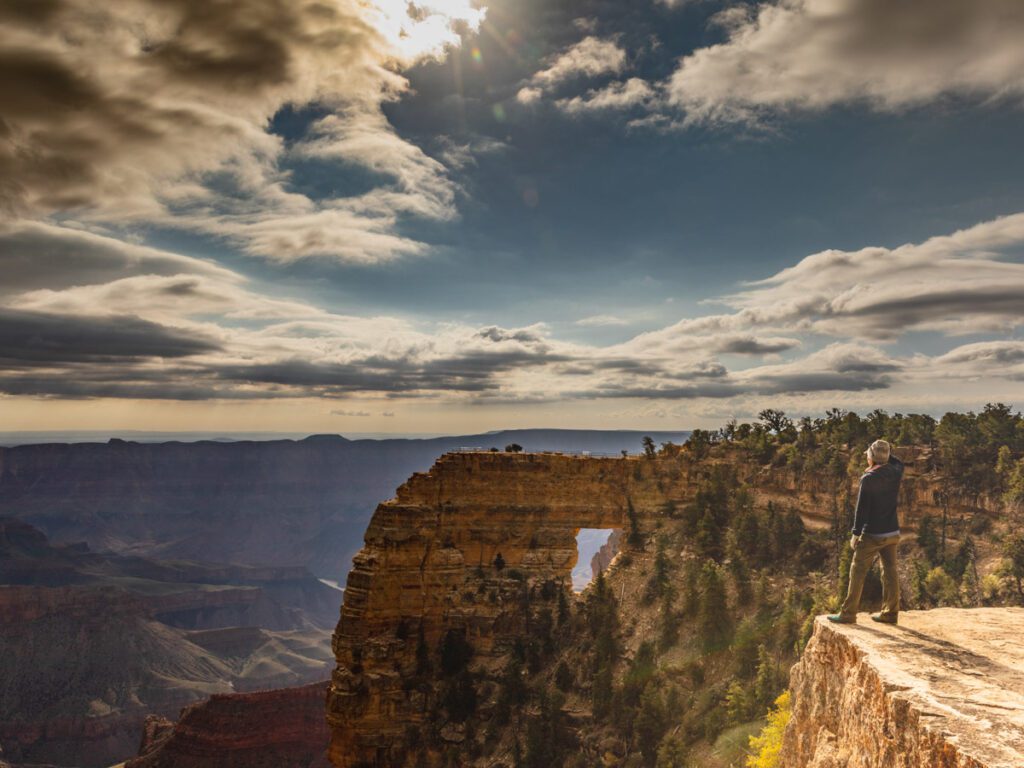
17. Cape Royal Trail
The Cape Royal Trail is one of the most breathtaking spots along the Grand Canyon. I’ve been here several times and I just keep coming back. The trail to the overlook is only a mile long and paved most of the way – making it very accessible.
However, the area has about 3 miles of trails that are well worth exploring. Be sure to check out the Angel’s Window!
Pro Tip: Come for sunset. There are lots of places to hop of the main trail and scope out the sunset on a nice rock.
Distance: 1.0 miles, or 3-ish miles if you explore all of the paths here.
Elevation Gain: 65 feet
Difficulty: Easy
Estimated Time: 2 hours – you’ll be stopping every 10 feet to take photos.
Dog-Friendly: No
Crowd Factor: The second most crowded point at the North Rim. Expect crowds for sunset, but it’s generally low-key for most of the day. Mornings are very quiet.
Corridor? No.
18. Bright Angel Point Trail
At the main hub (ie the North Rim Lodge) you’ll find the Bright Angel Point Trail. This area is really cool and there are a few surrounding viewpoints to check out. This is one of the more crowded spots along the North Rim (it feels busy, but it’s never crowded).
I spent 4 nights right on the rim at the Lodge when my daughter was 4 months old. We visited Bright Angel Point multiple times during the day. This is a really excellent spot for sunrise (busy) and there are a lot of night photography options too!
Distance: 0.9 miles
Elevation Gain: 144 feet
Difficulty: Very easy
Estimated Time: 1 hour
Dog-Friendly: No
Crowd Factor: Busy, but not crowded. The most popular area on the North Rim, but I had plenty of solitude just walking around at various points in the day in the fall.
Corridor? No.
19. Coconino Overlook via North Kaibab
If you want to dip below the rim on the north side, this is as easy as it gets. Most people will be underwhelmed by the views here – I certainly was. But it was a unique opportunity to dive into the Big Ditch without a huge commitment.
The world here feels quiet, secluded, and almost cozy.
Lots of people complain about the mule trains and subsequent odor but we didn’t have a problem with it. We took our 4-month-old here – it was an adventure I wouldn’t repeat (my partner fell while carrying her).
Distance: 1.3 miles
Elevation Gain: 459 feet
Difficulty: Easy
Estimated Time: 1 hour
Dog-Friendly: No
Crowd Factor: Quiet at sunrise. Pack animals use this trail. Parking can be a huge pain. Gets pretty busy as the day wears on.
Corridor? Yes.
20. Cape Final
I think Cape Final is the most underrated North Rim hike. Make your way up and over a gentle hill through a rolling forest. You’ll get a few quick peeps at the canyon beyond, but the area doesn’t really reveal itself until the very end.
If you want spanning vistas without guard rails (or people) Cape Final is where it’s at!
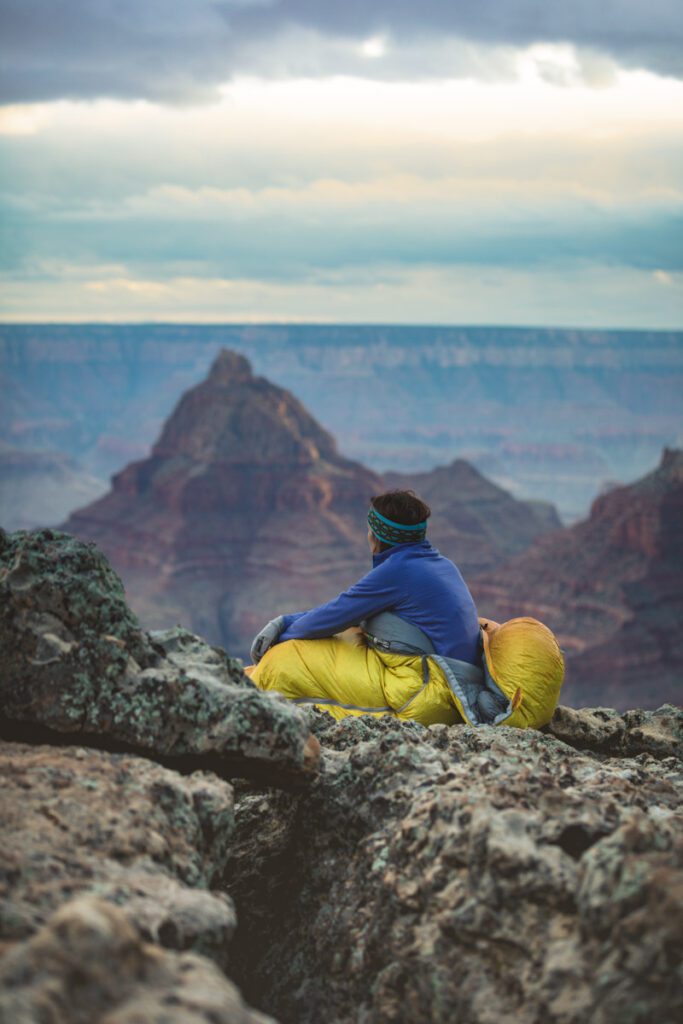
Pro Tip: There is a single backcountry campsite you can reserve here. Talk about solitude and uninterrupted views! We stayed here on a windy, cold night and it was still worth it even though we got very little sleep!
Distance: 4 miles
Elevation Gain: 495 feet
Difficulty: Easy
Estimated Time: 2 hours. Highly recommended, beginner 1-night backpack (must carry water).
Dog-Friendly: No
Crowd Factor: Quiet.
Corridor? No.
Moderate Grand Canyon Hikes on the North Rim
These moderate Grand Canyon North Rim hikes are a great addition to your itinerary. There are only a few, but if you’ve made the journey to the North Rim, they are worth it.
21. Widforss Trail
Wander along the rim with views of Transcept Canyon along this incredible out-and-back trail. You’ll spend the first half of the trail along the rim, then dip back into the pine forest. At the end you’ll be rewarded with 180-degree views of the Grand Canyon at Widorss Point.
Distance: 9.3 miles
Elevation Gain: 1,082 feet
Difficulty: Easy to moderate
Estimated Time: 4 .5 ours
Dog-Friendly: No dogs allowed
Crowd Factor: Quiet. It does see traffic – especially the first half, but it’s usually pretty mellow.
Corridor? No.
22. North Kaibab to the Supai Tunnel
For a moderate romp below the rim, continue onwards from the Coconino Overlook to the Supai Tunnel. The tunnel is pretty fun, but this trail does lack the 180-degree views. What you do get is a sense for just how massive the feeder canyons are to the Colorado River.
Distance: 3.4 miles
Elevation Gain: 1,377 feet
Difficulty: Moderate
Estimated Time: 2.5 hours
Dog-Friendly: No
Crowd Factor: Quiet at sunrise. Pack animals use this trail. Parking can be a huge pain. Gets pretty busy as the day wears on.
Corridor? Yes.
Challenging Grand Canyon Hikes on the North Rim
These obscure challenges are sure to give you all the views while getting your hike on!
23. Rainbow Rim Trail
This technically isn’t in Grand Canyon National Park. And because of that, most people mountain bike it. But by most people, I mean a very small number of people do this trail.
The Rainbow Rim Trail jostles in and out of forest, giving you cool views of the canyon without ANY tourists, but there are mountain bikes. You’ll see signed junctions for quick jaunts to overlooks.
The entire trail is long (that’s why it’s mostly an MTB trail) which is why it’s on the hard list. But you can hike to various points and back – check out Locust Point and North Timp – and it’s a very easy day.
Pro Tip: Bring a bug net for your face! There are pesky gnats here that are attracted to your face. They may only be seasonal. I’ve only been here in the fall and they were out.
Distance: 34.6 miles.
Elevation Gain: 2,979 feet
Difficulty: Difficult. Easy if you’re just hiking to a few viewpoints.
Estimated Time: 2-3 days if doing the whole thing. 4 hours if you’re hopping to a couple of viewpoints.
Dog-Friendly: yes, but must be on a leash
Crowd Factor: Very quiet
Corridor? No.
24. North Kaibab Trail to Roaring Springs
Another continuation option for a day hike on the North Kaibab trail, the Roaring Springs hike is certainly unique. Most people hike to the old pump house and back. There’s definitely something special about hiking near water in the Grand Canyon, but you’ll earn it with this one!
Distance: 8.4 miles
Elevation Gain: 3,517 feet
Difficulty: Very hard
Estimated Time: 7 hours
Dog-Friendly: No
Crowd Factor: Quiet at sunrise. Pack animals use this trail. Parking can be a huge pain. Gets pretty busy as the day wears on.
Corridor? Yes.
25. Nankoweap Trail
This is the hardest named route in the Grand Canyon and it shouldn’t be done in a day. (Although I do know people who have done it). It’s on the list simply because it’s the hardest.
This rugged, steep, loose trail traverses many narrow cliff bands and has zero water until you’re practically at the river. It’s an AMAZING backpack though. Full of challenges, water caching, granaries, and plenty of exposure.
Pro Tip: You need a 4WD, high-clearance vehicle to reach the trailhead. The road can close for controlled burns in the fall.
Distance: 23.7 miles
Elevation Gain: 8,372 feet
Difficulty: Extreme. Should only be attempted by accomplished Grand Canyon backpackers.
Estimated Time: 18 hours if you’re going for a ultra day. Most people take 2-3 nights.
Dog-Friendly: No
Crowd Factor: Very quiet
Corridor? No.
Best Hikes in the Grand Canyon Along Both Rims
There is only one way to hike along both rims without bringing a pack raft and that’s via the Corridor.
26. Rim to Rim Trail: North Kaibab to Bright Angel
The Grand Canyon Rim-to-Rim hike is one of the most popular backpacking trips in the world. Permits are extremely competitive and required for overnight journeys.
Anyone attempting the Rim to Rim in a day needs to be extremely experienced with endurance hiking and trail running. You should also have ample experience with elevation gains as well as desert hiking.
Many people do the Rim to Rim hike one way, then hire a car to bring them on the 4-hour journey back to the opposite rim.
Most people start their journey on the North Rim, simply because they will have less uphill and more services when they finish. The downside to this is that it gets HOT – October, right before the North Rim shuts down, is the best time if you’re going one-way.
There are two choices, with the most popular being the North Kaibab to Bright Angel Trail. People like Bright Angel because of the water stations, bathrooms, and resthouses. South Kaibab is slightly shorter, but no shade and no water.
Distance: 24.6 miles one-way
Elevation Gain: 5,574 feet
Difficulty: Very challenging to do in a day. Challenging as a multi-day backpack.
Estimated Time: 12-14 hours for the average ultra runner. Most people do this hike in 2-3 nights.
Dog-Friendly: No
Crowd Factor: Very crowded.
Corridor? Yes.
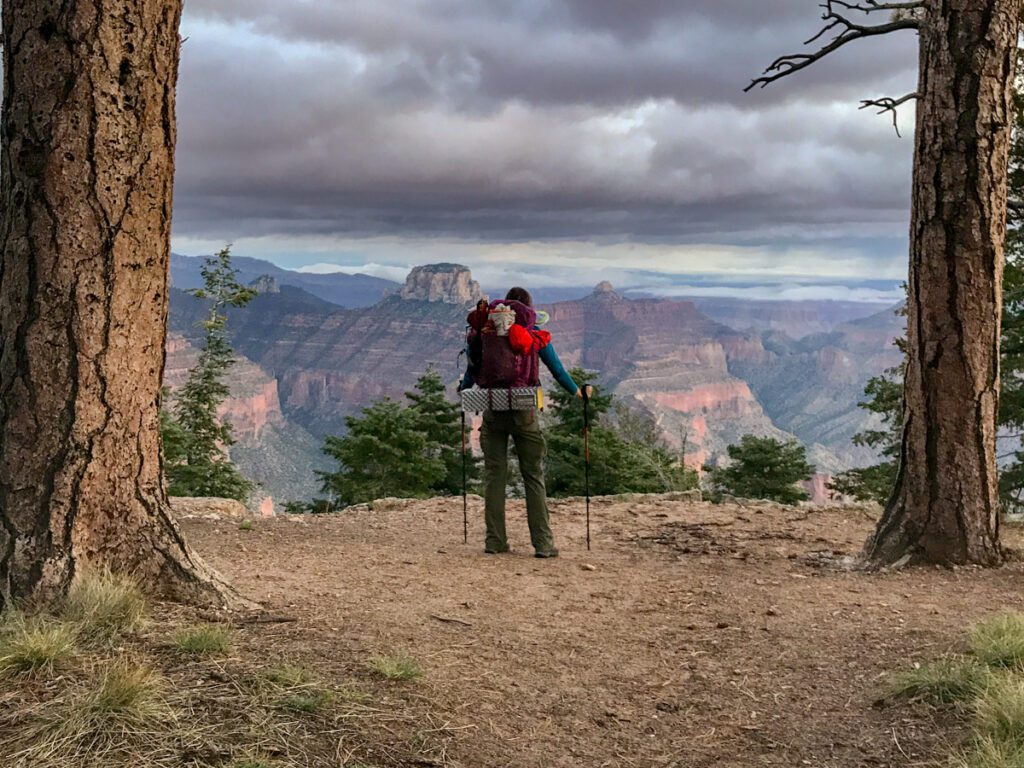
Backpacking in the Grand Canyon
If you’re adventurous there are plenty of amazing backpacking routes in the Grand Canyon – including plenty of spots that are suitable for more of a beginner crowd. However, there are also a lot of ways to get into trouble as well.
All backpacking requires an advanced Grand Canyon backcountry permit. The permit system has moved to recreation.gov. It’s confusing and requires a lottery entry. Permits in the corridor are insanely competitive.
In my personal experience, backpacking outside of the corridor is far better and has a more natural feel. However, below-rim routes are substantially more challenging.
Quick tips for hiking in the Grand Canyon
You’ll want to know a bit about desert hiking before you venture into the Grand Canyon. Even the above-rim trails require some pre-planning. This is an unforgiving place. Here are a few quick tips.
Start EARLY. High temps are common in the inner canyon. You’ll be one step ahead of the heat and the crowds. Starting by headlamp is typical here.
Have a water plan. Water is a scarce resource here and even reliable water sources dry up. There has been a lot of work on pipelines in the corridor because they haven’t been reliable. Be comfortable caching, call the backcountry office to get the latest updates, and bring a filter.
Do not plan a hike to the river and back in a day. Unless you’ve got AMPLE experience out here, this is a serious endeavor.
Pack for temperature swings. It can be near freezing at the rim and hot as two mice getting it on in the inner canyon. Pack accordingly.
What down must come up. Uphill is far harder for the average hiker. And the downhill wears on your joints. So you’ll be returning by exerting a LOT more effort with achy joints.
Bring poles. Hiking poles are pretty much essential if you dip below the rim.
Plan on no shade. Shade is a luxury while hiking in the Grand Canyon. Keep exposed skin to a minimum, and bring sun protection. For big, long days out, it’s not uncommon to sit under a sliver of shade against an exceptionally hot rock for HOURS until it’s cool enough to hike again.
Stay on marked trails. You can get seriously hurt here, so stay on the trail. The rock is generally brittle and loose off-trail. Not to mention cacti, rattlesnakes, agave and other critters can easily give you a hard time.
Pack out all of your trash. Bring a small baggy for fruit peels, wrappers, and other trash.
The Grand Canyon is not dog-friendly. Dogs are only allowed on above-rim, south rim hikes. Dogs shouldn’t be left in cars, as they can die from overheating. In all honestly, this isn’t a place for your pet, so leave them at home.
What to Pack
You’ll want to be prepared to hike in the Grand Canyon. Here’s a look at what to bring (and what to have stashed in the car).
- Plenty of water – I like to use a water container for the car. Budget at least 4 liters per person per day, more if you’re out in the summer months plus 2 liters per person in the car.
- America the Beautiful Annual Pass
- Sunscreen, sunhat with a wide brim, sunglasses
- Sunshirt
- First Aid Kit with tweezer (for cacti)
- Noncotton socks
- Breathable footwear that you feel comfortable wearing all day
- A change of breathable footwear for the car. I love Crocs, but Tevas or Chacos are great too.
- Non-cotton shorts for hiking
- Non-cotton, lightweight pants for hiking. Pants protect you against aggravating foliage.
- Non-cotton, breathable t-shirt for hiking (the sun can really beat you up if you wear tank tops, so be aware)
- Electrolyte powder
- A water bladder capable of carrying at least 2 liters of water.
- Large dromedary or plastic water bottles for water carrying or caching (budget at least 8 liters per person per day for bigger hikes). Label with tape. Include your name, hike, and date you plan on using the water.
- Water filter capable of handling sediment (if you plan to filter at the river). Otherwise, a quick grab-and-go filter is fine for springs.
- A bandana to pre-filter water (if you plan to filter at the river)
- Salty snacks
- Camera
- Camera clip to strap to your back
- Beanie – the desert can get cold at night so warm clothes are great to have
- Glove liners
- Fleece layer (fall through spring)
- Puffy layer (fall through spring)
- Hiking poles (strongly recommended)
- A hiking pack. I love the REI Flash series for something multi-use and economical
- A toilet kit: shovel, WAG Bag (most national parks require this), hand sanitizer, TP/baby wipes, a small plastic baggy to pack out TP and sanitary items
- Pee funnel – optional
- Pee rag – optional
- A plastic baggy for trash (wrappers, fruit peels, etc). I like to use compostable dog waste bags.
- Headlamp
- GPS navigation
- emergency communication device
- Wind/rain layer
- Pocket knife
Catch me on YouTube!
Want more secret backpacking trips? Ultralight hacks that every hiker can adapt? Experience the top outdoor destinations in the world without the crowds? If you want to get insider knowledge of all things outdoors, then you’ll wanna subscribe to my YouTube channel, where I am giving away my DECADES of knowledge as an outdoor professional. I’ll see ya there!
Additional Planning Resources
Looking to explore the Grand Canyon like a pro? Then check out these expert resources: