Last Updated on September 15, 2025 by foxintheforest
I’ve been told all about how Capitol Reef National Park is one of the most underrated spots for hiking. The Cassidy Arch Trail is certainly one of the more special hikes I’ve done. It delivered on being a hidden gem that’s an excellent few-hour outing.
The unique surprise at the end of this (mostly) gently uphill grind made this one of my favorite Utah hikes and one of the best hikes in Capitol Reef too. I won’t ruin the surprise (you’ll have to keep reading), but Cassidy Arch is a hike you won’t want to miss.
I’ve spent the last 15 years traveling across the American Southwest in search of the best desert experiences. If you’re looking to explore Cassidy Arch like a seasoned pro, and not a tourist then you’re in the right place!
About this Guide to the Cassidy Arch Trail
Inside this expert’s guide to Cassidy Arch you’ll find pro advice about:
- How to reach Cassidy Arch
- The best time to hike in Capitol Reef
- Practical info about the Cassidy Arch Trail including difficulty, mileage, and expert tips to make the most of your hike.
- Nearby attractions
- Tips and tricks to master moving in the desert
- Additional expert resources on hiking in southern Utah
Where is the Cassidy Arch Trail?
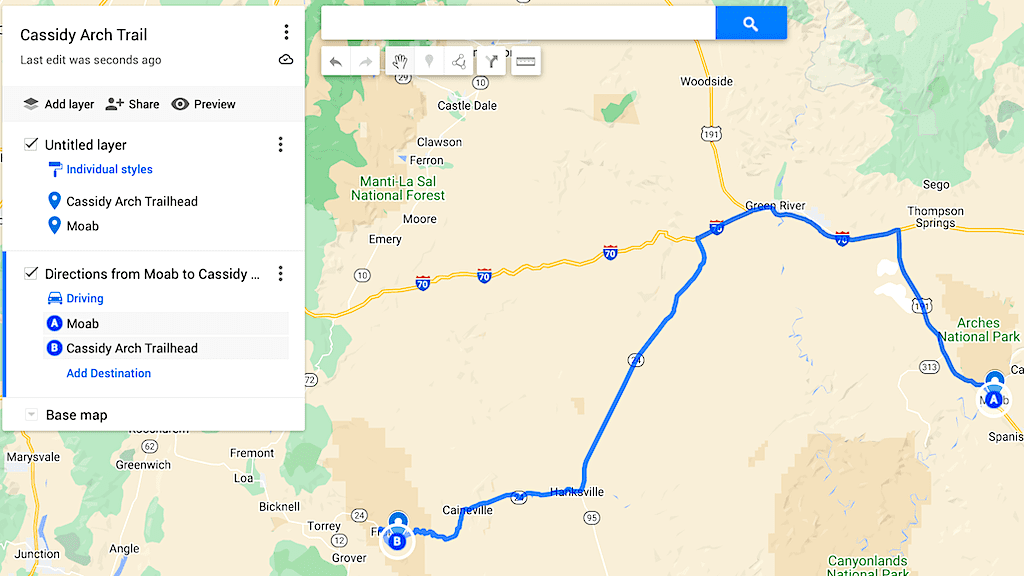
Cassidy Arch is located within Capitol Reef National Park. You can pick up the Cassidy Arch Trail at the Grand Wash Trailhead off of E Grand Wash Road south of Highway 24.
Take the Campground Road Scenic Drive south from Highway 24 through Fruita. From here you’ll see signs for Grand Wash Road.
Pro Tip: Grand Wash Road is a dirt 2WD road. Trailers and vehicles over 27 feet are not allowed. We had our camper and just parked it in a dirt pullout near the turnoff.
The Best Time to Hike in Capitol Reef
The absolute best time to visit Capitol Reef is during the spring or fall. Summers tend to be quite hot (and more crowded). Winters are cold but stunning. However, roads can close and conditions can be a bit rough.
As one of the top hikes in Capitol Reef, Cassidy Arch does see a few crowds. We were there on Easter Sunday in the middle of the day and ran into probably 20 or so people on the Cassidy Arch Trail.
Since this trailhead shares the famous Grand Wash Trail, the parking can fill up quickly, leaving you with a 3-mile round-trip road walk. Just be aware during a busy weekend.
Practical Info
There are a few important things to know before you go on your Cassidy Arch hike. Here’s a look at some trail details to get you oriented.
Mileage: 3.4 miles
Elevation Gain: 666 feet
Difficulty: Easy to moderate (if you’re not used to steep uphill sections, this will feel more moderate, but the switchbacks are short-lived)
Average time to complete: 1.5 to 2 hours depending on how much time you spend at the arch
Fees or Permits? No permits. However, it’s $30 to enter the park (self-pay) or free with an America the Beautiful Parks Pass
Dog-friendly? No dogs allowed.
Highlights: Gorgeous, large arch you can walk over, stunning desert views, walking up the side of a canyon wall.
How Long Does it Take to Hike to Cassidy Arch?
Most people complete the Cassidy Arch hike in 1.5 to 2 hours. Since this is a moderate trail, a good rule of thumb is to estimate a pace of 30 minutes per hour. There is one steep uphill section that may take a bit longer for the uninitiated.
How Hard is the Cassidy Arch Trail?
I found the Cassidy Arch Trail to be on the easier end of moderate. However, I’m a highly-experienced hiker used to steep trails.
Most hikers will find this to be a moderate trail thanks to the steep uphill section towards the beginning.
The trail is consistently uphill on the way up, but the grade eases quite a bit once you’re through the switchbacks, making it a bit easier than most moderate trails.
Unlike most trails in the desert, Cassidy Arch is well-marked and well-maintained. This makes the trail easier than your standard desert hike, which often includes the need to wayfind.
How Much Elevation Gain is the Cassidy Arch Trail?
Officially the trail has 666 feet of elevation gain. I clocked 802 on my hike. The elevation isn’t too bad, with a mostly gentle uphill grade. The big exception is about a quarter to a half mile of switchbacks once you leave the Grand Wash Trail.
About the Hike
Hiking to Cassidy Arch is a relatively straightforward experience. You’ll start on the Grand Wash Trail, look for a signed junction about 0.2 miles in, then follow the trail to the arch. It’s an out-and-back route, so you can come back the way you came.
Reaching the Trailhead
You’ll need to navigate a 1.5-mile dirt road to the trailhead. This road is regularly graded and maintained, however, it is in a flash-flood area. There are plenty of signs warning you of the dangers if storms are in the forecast.
If you have a trailer or you’re driving an RV, you may want to park at one of the few spots next to the turn. We had our pop-up camper. I simply dropped the trailer with a bit of tape on the tongue that said where we were going and when we planned to return.
Pro Tip: If there’s rain in the forecast, you shouldn’t drive the road. Flash flooding will make quick work of ruining your car or making the road impassible. Not to mention it’s a safety hazard while hiking.
There’s a nice pit toilet at the trailhead, but be prepared to pack out all of your trash. There also isn’t any cell service.
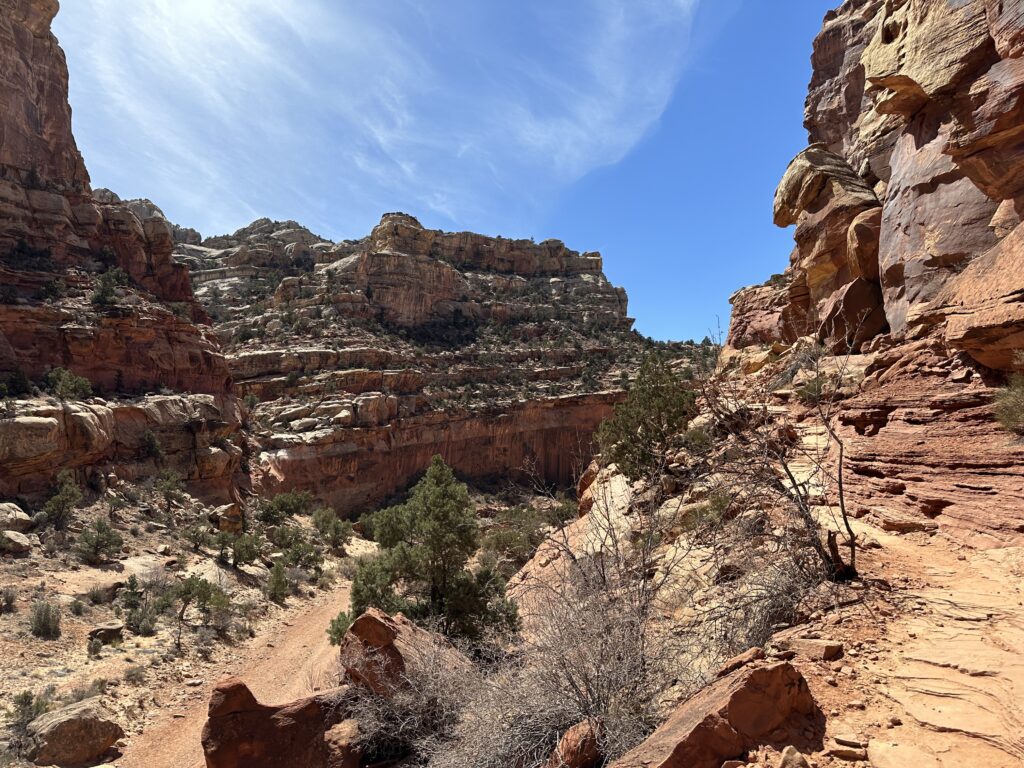
Grand Wash Trail
The hike starts along the Grand Wash Trail. This wide, open wash is a beautiful hike unto itself, and a worthwhile jaunt if you’re looking for more adventures after Cassidy Arch.
The trail skirts the wash, or you can walk directly in the wash. The trail is less sandy and deep, so we stuck to the trail, but the choice is yours.
Eventually the little trail dumps into the main wash.
Cassidy Arch Turnoff
After about 0.2 miles there is an obvious, signed junction on your left. This is the junction for the Cassidy Arch Trail. From here, you’ll simply follow the Cassidy Arch Trail until you reach the arch.
The trail quickly gets steep after the turnoff. This is by far the toughest part of the trail. You’re aiming to gain a bunch part-way up the canyon wall. Everything is well-marked and there are even built steps to help you out.
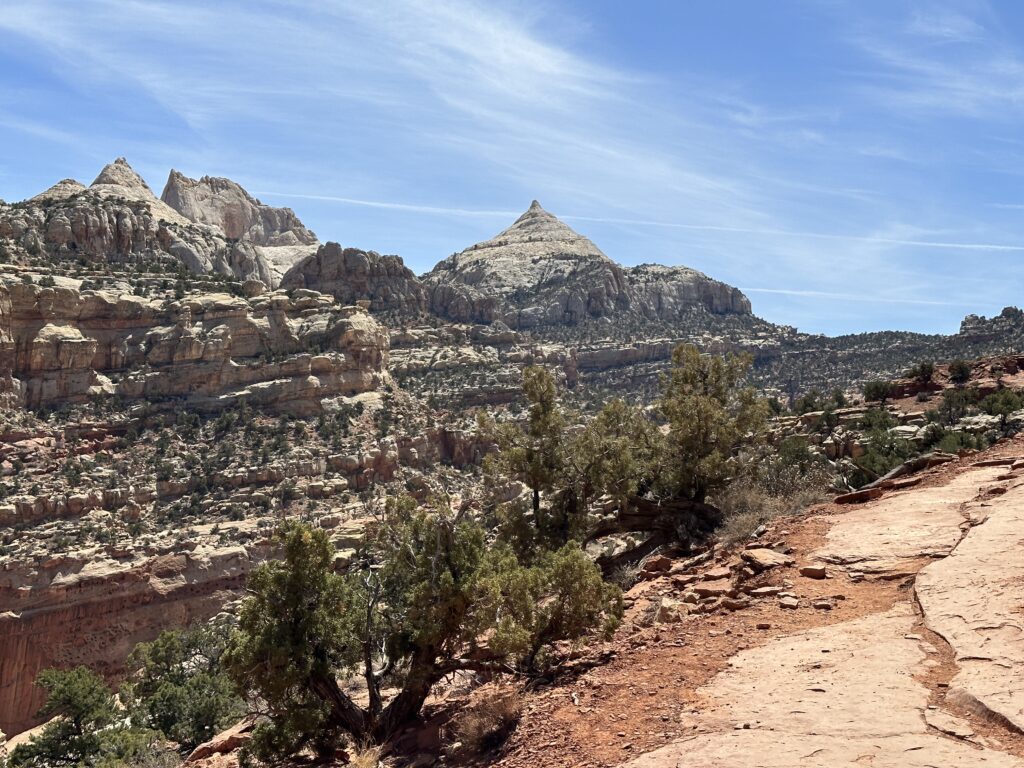
Continue up the trail until the switchbacks level out. From here, you’ll follow the canyon wall gently upward toward the arch.
Soak in those beautiful views! It’s really stunning to see the many layers of different sandstone here. The trail jumps between packed sand and slick rock.
When you’re on the slick rock, keep an eye out for cairns (rock piles) and rocks that line the way. These are built by the parks service and should not be added to or disturbed.
In general, the trail is easy to follow if you’re paying attention.
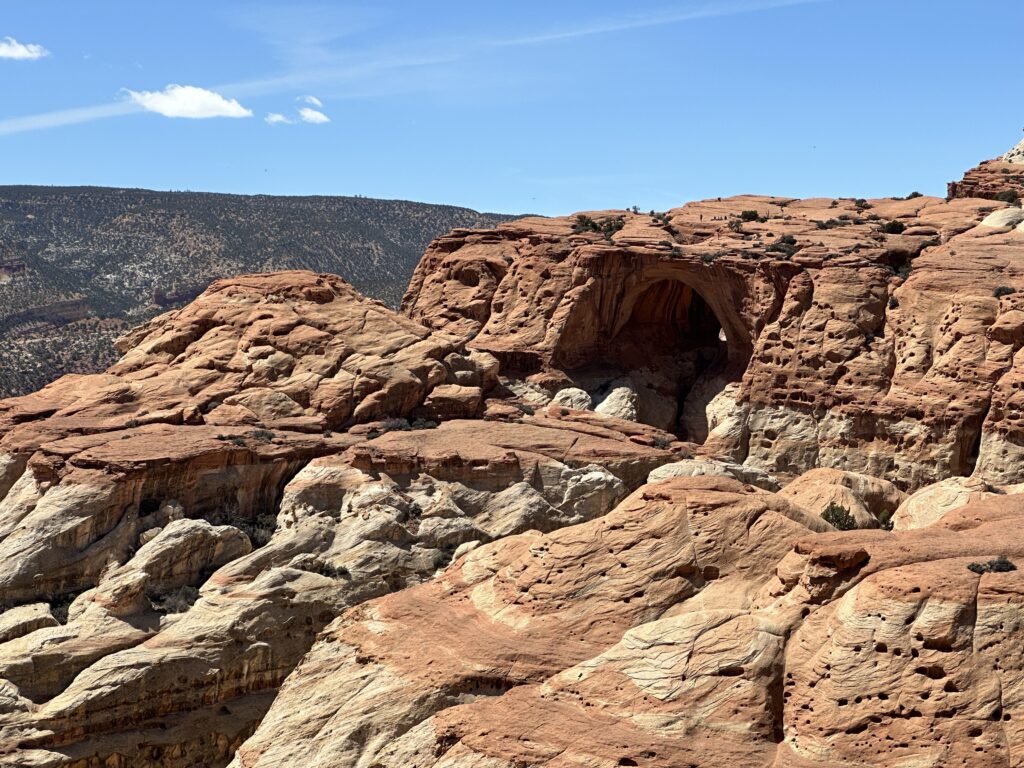
Cassidy Arch Overlook
About three-quarters of the way there, you’ll come around a bend and be able to see Cassidy Arch in the distance. It’s a little tricky to spot at first, but the view will stop you. This is an awesome photo opp and shows you just how far up the canyon wall you’ve hiked.
From the Cassidy Arch Overlook, it’s about a 10-minute walk to the arch. You’re almost there!
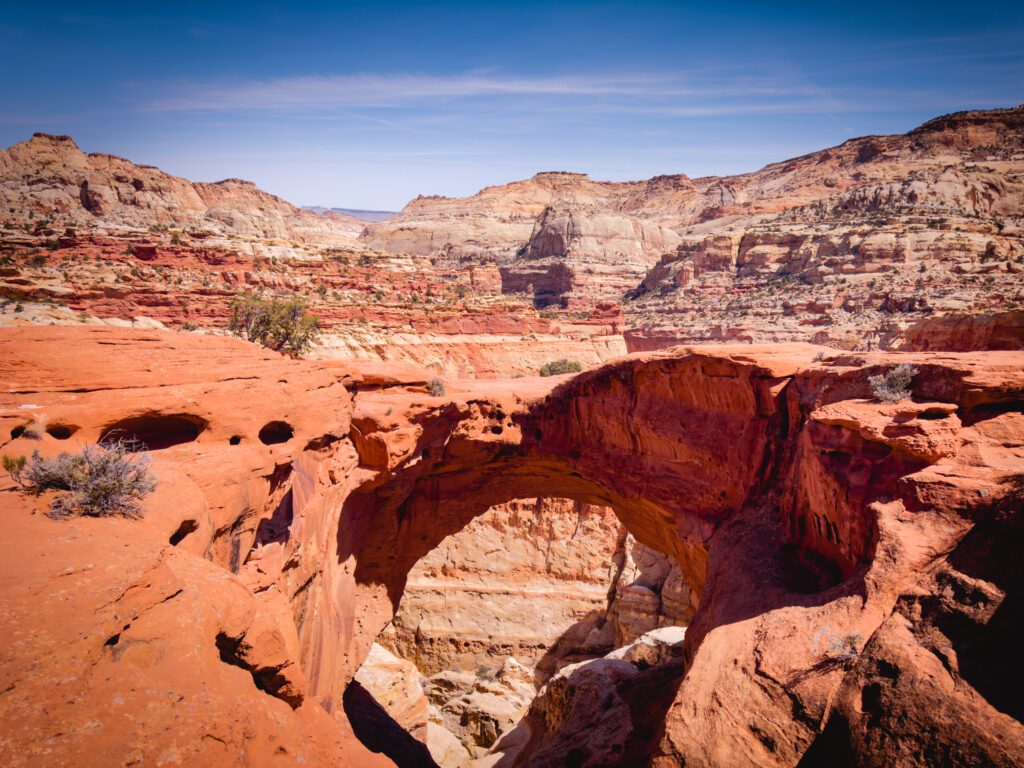
Reaching Cassidy Arch
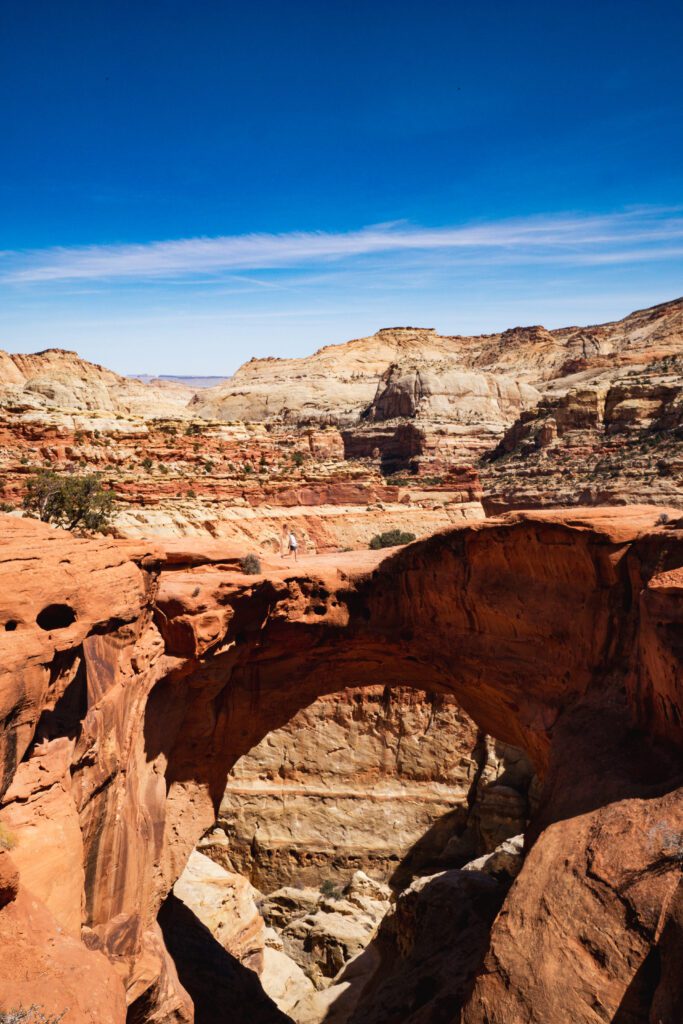
Once you come upon Cassidy Arch you can take a rest right in front of the arch with an amazing view!
Now for the fun part, unlike almost any arch in a national park, you can walk across Cassidy Arch. It’s really cool to walk across the arch, and not particularly scary. The path is wide and secure, although getting there will require a bit of scrambling (using your hands).
Can You Walk on Cassidy Arch?
Yes! It’s actually quite unique to be able to walk across an arch. It’s illegal to walk across arches in both Canyonlands National Park and Arches National Park. In fact, in most places the arches are either inaccessible, too dangerous, or illegal to walk across. Cassidy Arch provides a unique opportunity to walk across the arch!
Once you’re there, just pick a route to walk around. Both ends of the arch have a small little down (or up) climb. It’s not too difficult and all the holds are there, but you will have to use your hands to reach the arch.
For the avid scrambler, this access is very, very easy. However, if you’ve never done anything like it before, it might be a little intimidating. Just scootch on your butt and use your feet to get down (or turn around and climb down), then reverse the moves to get back up. It’s maybe a 6-foot drop on one side and eye level on the other.
Tips for Hiking in the Desert
Be in the know before you go! Hiking in the desert can be an unforgiving experience if you’re not prepared. So here are a few tips to help you make the most of Cassidy Arch.
Check the weather! This hike is a dangerous endeavor if it’s raining. Always use a tool like weather.gov to check the weather for the specific spot you’re going.
Pack layers. The desert can be just as cold as it is hot. Always bring a layer or two when you hike in places like the Cosmic Ashtray.
Wear sun protection. Sunscreen is great, but sun shirts are better. Always bring a sunhat, sunglasses, sunscreen, and even UPF clothing to avoid getting sunburned. There is no shade on this hike!
Bring plenty of water and salty snacks. Budget about 2.5 liters per person on this hike, more if it’s summertime. Salty snacks help keep you hydrated just as much as water does!
Don’t bust the crust. The raised, black soil is a living organism integral to preventing erosion and allowing life-giving plants to take root. Stay on the trail and stick to durable surfaces.
Pack it out! There are no trash services at the trailhead or along the trail. Always bring a small baggy to pack out your trash. This includes toilet paper (those who squat to pee may want to consider a pee funnel), food wrappers, and fruit peels.
What to Pack
Hiking to Cassidy Arch doesn’t require you to bring the kitchen sink, but you’ll at least want the 10 Essentials. Here’s a look at what you’ll need for your hike:
- At least 2.5 liters of water
- Sturdy hiking footwear
- Wear non-cotton socks, shorts/pants, and a shirt
- Sun protection: Sunscreen, sunglasses, sunhat, and consider purchasing a sun shirt if you plan on doing lots of desert hiking.
- A jacket and a wind layer
- A lighter
- Headlamp
- An emergency bivvy
- Snacks
- First aid kit with tweezers
- Beanie
- Camera
- GPS device (optional)
- Small hiking pack to fit all of your gear
- Hiking poles (optional)
Pro Tip: Bringing a few layers even if the temps are sweltering will be helpful in case of an emergency. Help takes a while and the desert can cool off drastically at night.
Additional Things to Do Nearby
There are lots of amazing things to do in Capitol Reef. If you’re looking for a few nearby adventures, I’d recommend checking out these attractions:
- Hike to the Hickman Bridge
- Check out the living museum at Fruita
- Scope out petroglyphs along the petroglyph trail
- Check out the sunset at Goosenecks and Sunset Point.
Catch me on YouTube!
Want more secret backpacking trips? Ultralight hacks that every hiker can adapt? Experience the top outdoor destinations in the world without the crowds? If you want to get insider knowledge of all things outdoors, then you’ll wanna subscribe to my YouTube channel, where I am giving away my DECADES of knowledge as an outdoor professional. I’ll see ya there!
Additional Expert Resources for Southwestern Utah
Looking to navigate the American Southwest like a pro? Then you’re in the right spot! Be sure to check out these posts: