Last Updated on January 30, 2026 by foxintheforest
The Escalante Route is a 30-ish-mile point-to-point backpacking route along the Colorado River in Grand Canyon National Park, connecting Tanner Trail and Grandview Trail via Tanner Beach, Escalante Beach, and the Tonto Trail. The route requires 4-6 days, involves approximately 7,000-9,000 feet of cumulative elevation change, some class 3 to 4 scrambling, and strategic water planning at river access points. Unlike most Grand Canyon routes that stick to high terrain, the Escalante spends significant time at river level, offering unique access to the Colorado River.
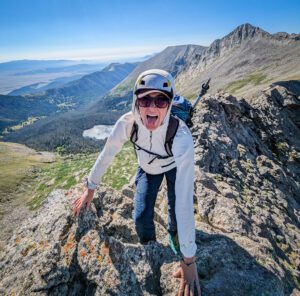
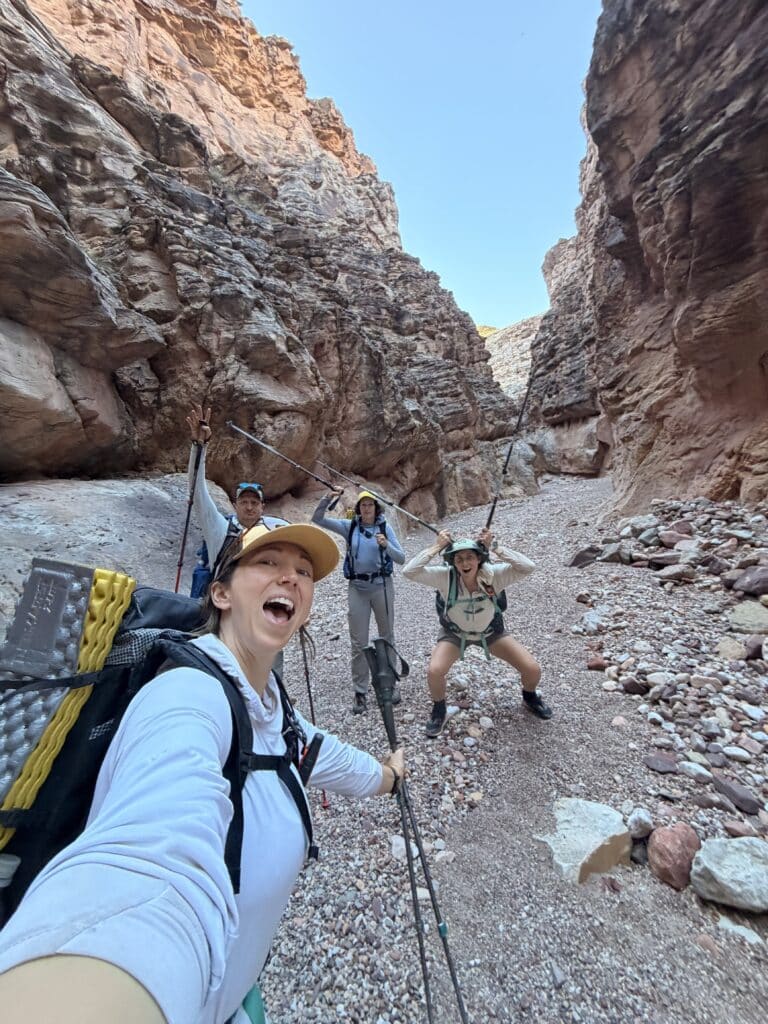
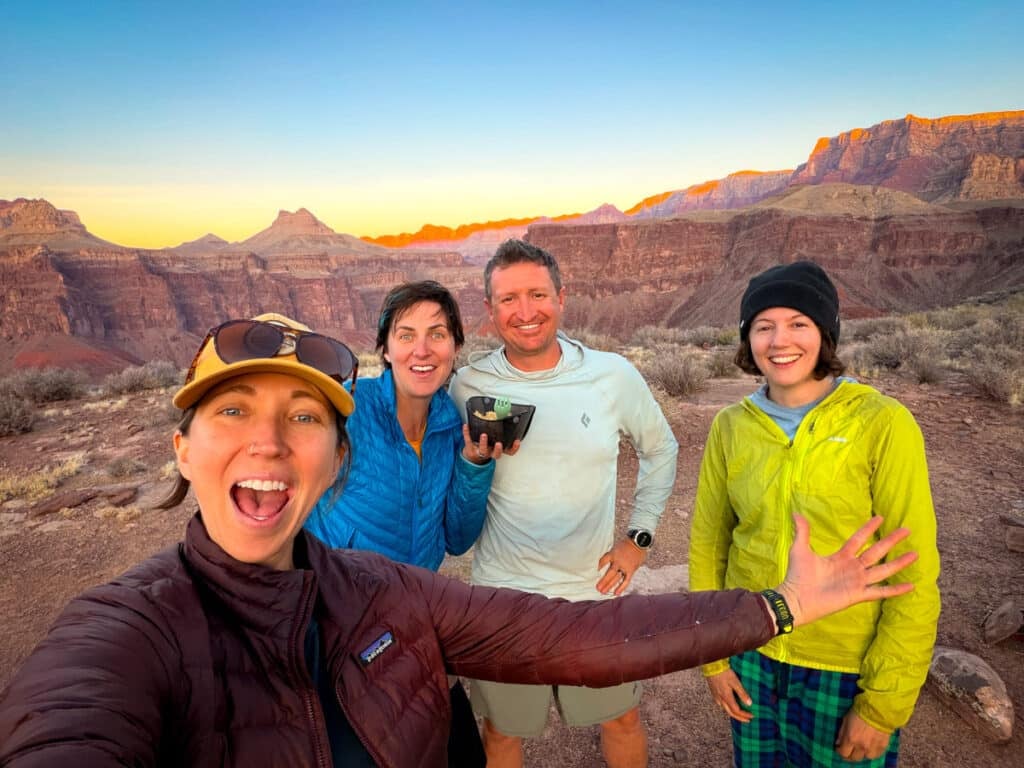
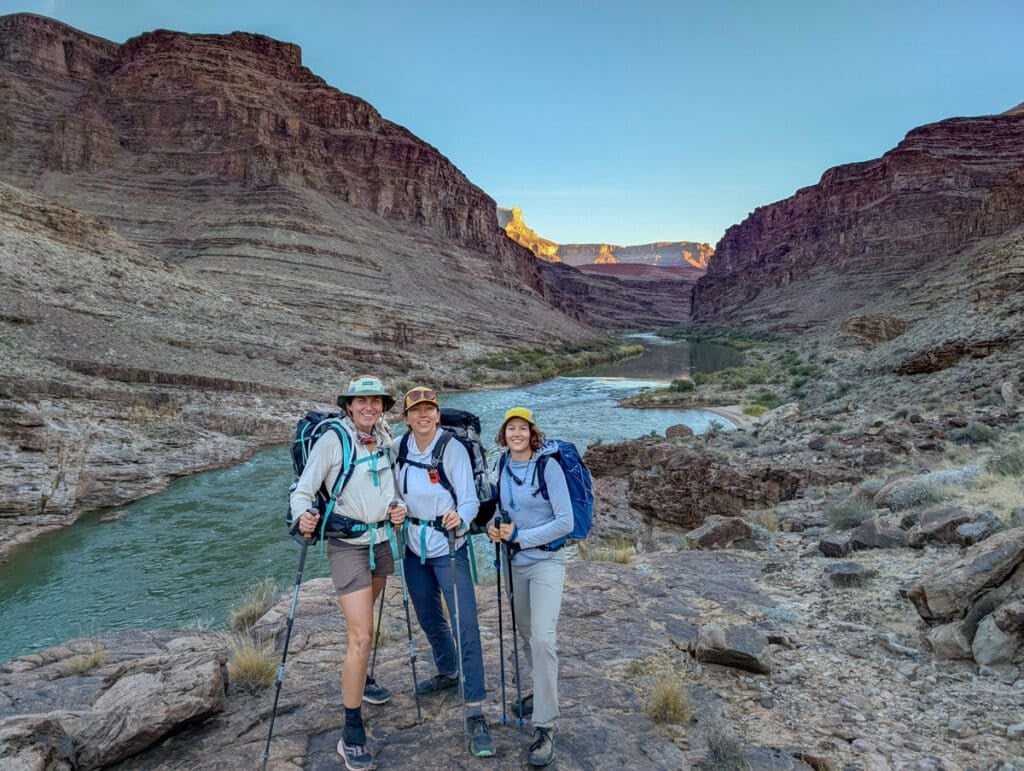
My friend and I both have the same birthday, and we thought what better way to celebrate than hauling a cake down into the Big Ditch. We wanted a mild challenge, good views, and lots of laughs. So we got a group together and dove into the Big Ditch.
The Escalante hits that sweet spot: challenging enough to feel earned, beautiful enough to take your breath away, and accessible enough that you can actually enjoy the experience instead of white-knuckling through it.
But a PSA here: I’ve done quite a bit of backpacking in the Grand Canyon. For most, this will be a challenging journey that requires a bit of grit.
This was my latest Grand Canyon backpacking trip in a long string of adventures through the canyon’s remote corners. I’ve done routes that required ropes, routes where I genuinely questioned my sanity, and solo routes where going multiple days without seeing another human was guaranteed. The Escalante Route is different. It’s popular enough that the route is worn in and easy to follow, but still remote enough that you escape the crowds that plague the Corridor trails.
What makes me different from other Escalante Route guides? I’m not writing this after my first Grand Canyon trip. Or even my second (I’m in the double-digits here). I’ve navigated through dozens of the canyon’s unnamed drainages, tackled routes that require legitimate scrambling skills, rappelled into canyons, and spent enough nights below the rim to understand how this landscape works. I know what makes a Grand Canyon route hard versus just long. I know the difference between challenging navigation and genuinely dangerous terrain. And I can tell you exactly where the Escalante Route fits in that spectrum, especially if you’ve got some scrambling and rock skills under your belt.
The Escalante Route is special because it offers an accessible entry point into Grand Canyon route travel without throwing you into the deep end. The route is beaten in enough that route-finding is minimal by Grand Canyon standards, making it perfect for those looking to dip their toes into off-trail travel in the canyon. But it still delivers that remote wilderness feeling, has some exposed pucker factor, river access, and genuine adventure that makes Grand Canyon backpacking so addictive.

Quick Reference: Is the Escalante Route Right for You?
You should hike the Escalante Route if:
- You have significant backpacking experience with multi-day trips.
- You’re comfortable with some class 3/4 scrambling and exposure.
- You can navigate using map and compass with minimal route-finding.
- You want a step up from corridor trails without extreme difficulty.
- You’re looking to experience Grand Canyon route travel for the first time.
- You want significant river access and time at river level (comparatively).
- You’re physically fit enough for sustained daily mileage with elevation.
You should choose a different route if:
- This is your first Grand Canyon backpacking trip (do Bright Angel or South/North Kaibab aka the Corridor, first). Then hop off-Corridor and do a different trip next.
- You’re uncomfortable with any exposure, narrow trails with steep drops, loose/steep rock gullies, or scrambling.
- You need a completely maintained trail with zero route-finding.
- You want guaranteed complete solitude with no other hikers.
- You’re looking for the most challenging Grand Canyon route available.
Quick Stats:
- Distance: Approximately 30-ish miles point-to-point (GPS units are not accurate in the Canyon)
- Days: 4-6 days. 4 days is relaxed, 3 is pretty tight anything beyond 4 is recommended for slower hikers new to this kind of terrain.
- Cumulative elevation change: 7,000-9,000 feet (varies by GPS and side trips)
- Difficulty: Strenuous for most. Moderate for the initiated. (easiest of the named Grand Canyon routes)
- Trail type: Route with well-worn social path throughout, minimal route-finding required but present
- Solitude level: High to Moderate (busy by Grand Canyon route standards, quiet compared to corridor)
- Water: Frequent Colorado River access with some planning required for specific sections
- Best seasons: Spring (March-April) and Fall (October-November)
Route Overview and Logistics
The Route
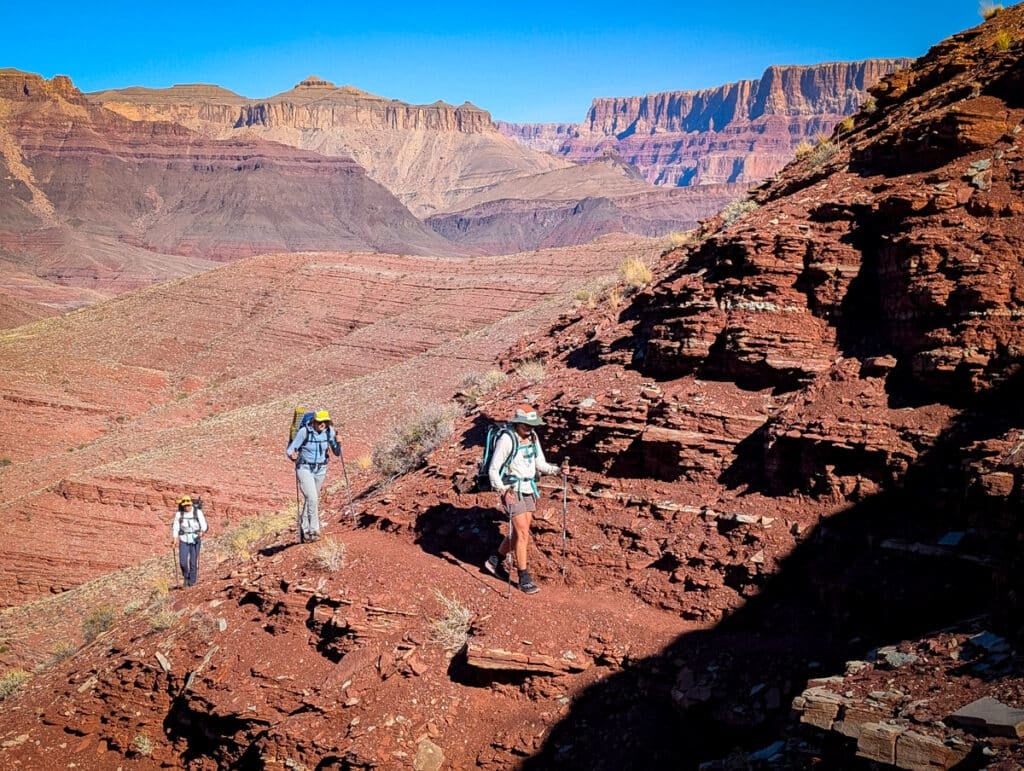
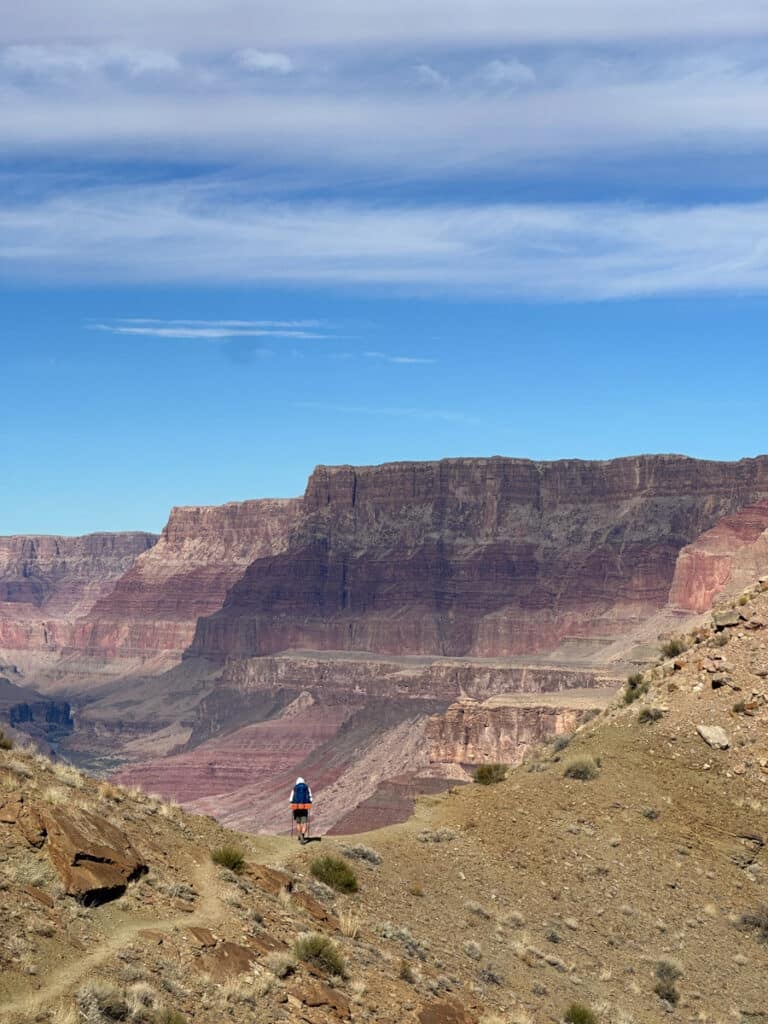
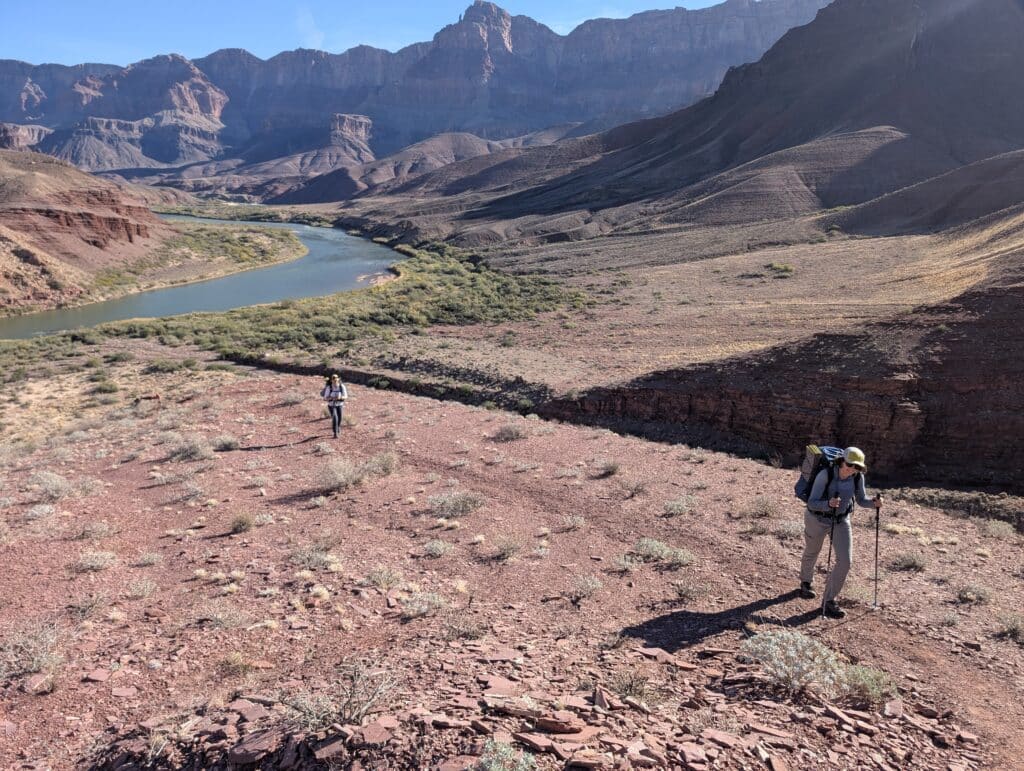
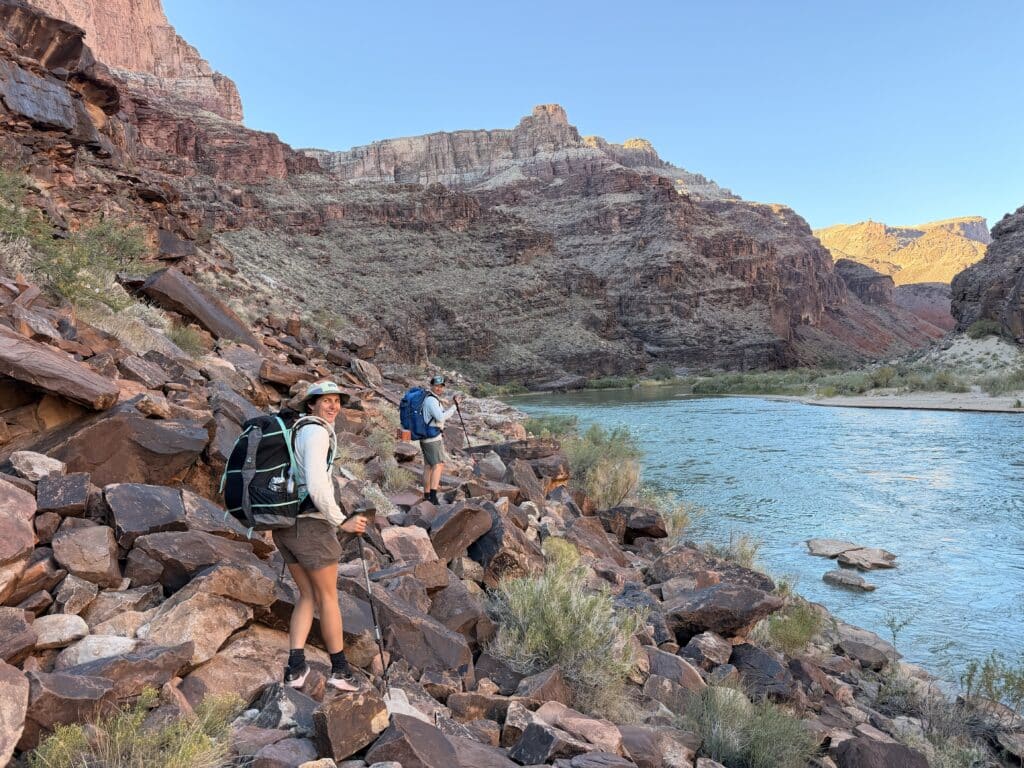
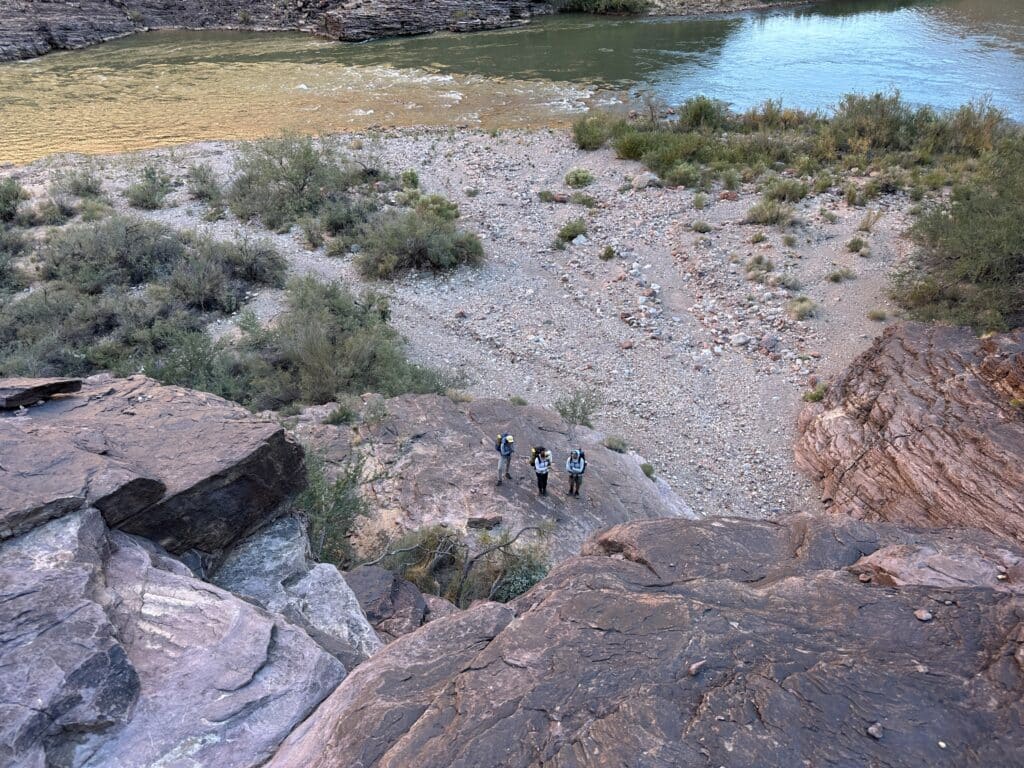
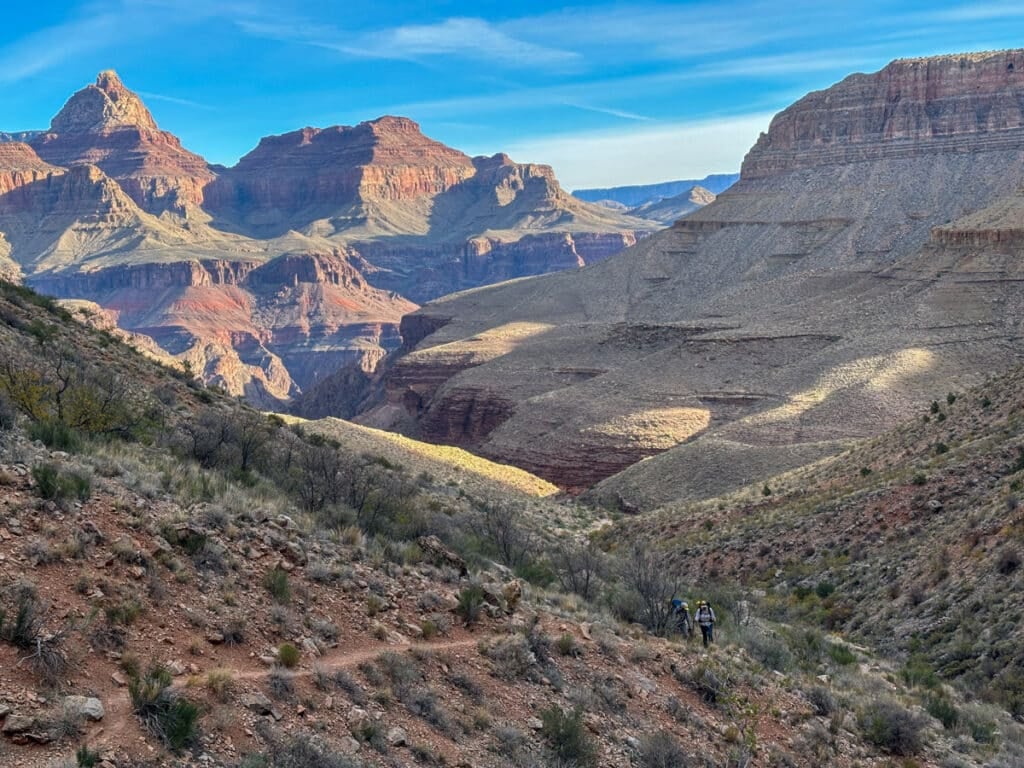
The Escalante Route follows the Colorado River’s south bank through some of the most scenic terrain in the Grand Canyon while spending more time at river level than almost any other route in the canyon. Most of this section of the canyon is relatively open, which is a rarity in the Grand.
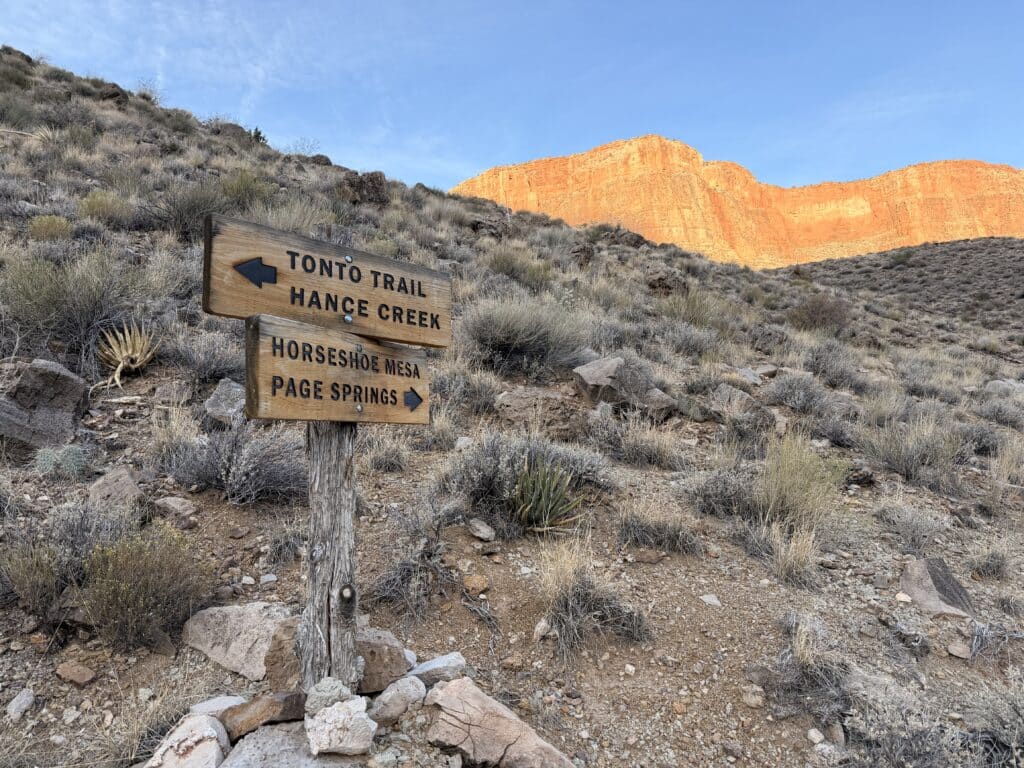
Starting at Tanner Trail, the route travels downstream past Tanner Beach, Cardenas Beach, the Unkar Delta archaeological area, Escalante Beach, 75 Mile Canyon, Papago Canyon and eventually connects to the Tonto Trail before ascending via Grandview Trail or New Hance Trail.
Note: New Hance is shorter, but it’s a much more rugged trail. Grandview is a great way to top out as the trail lives up to it’s name!
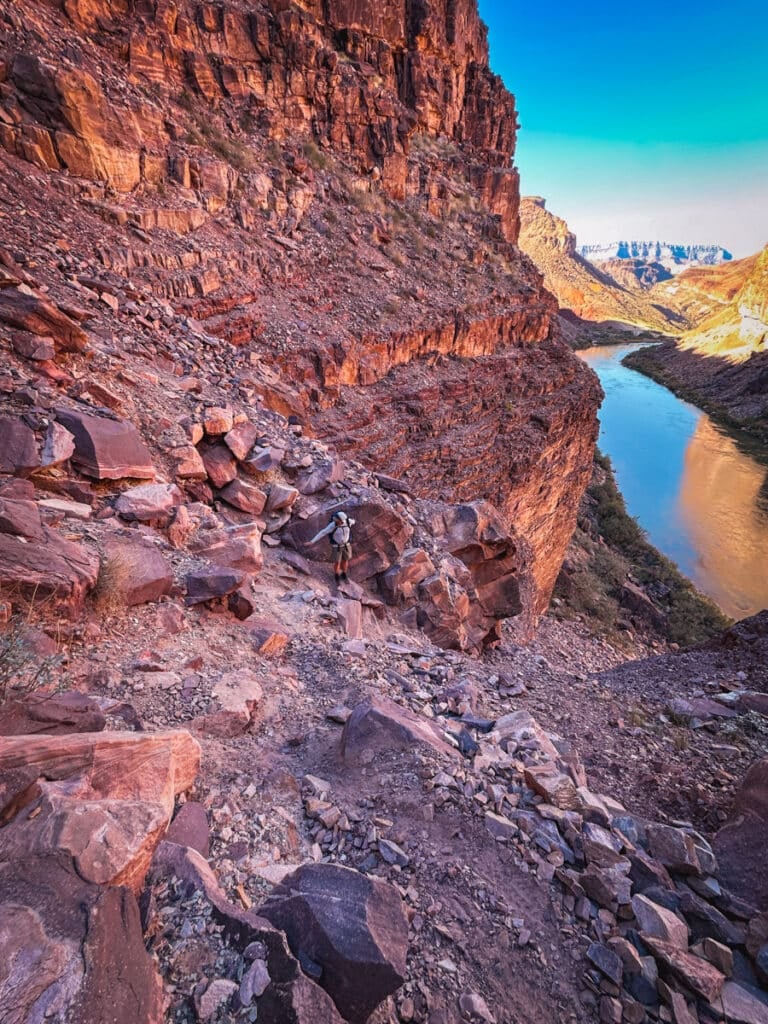
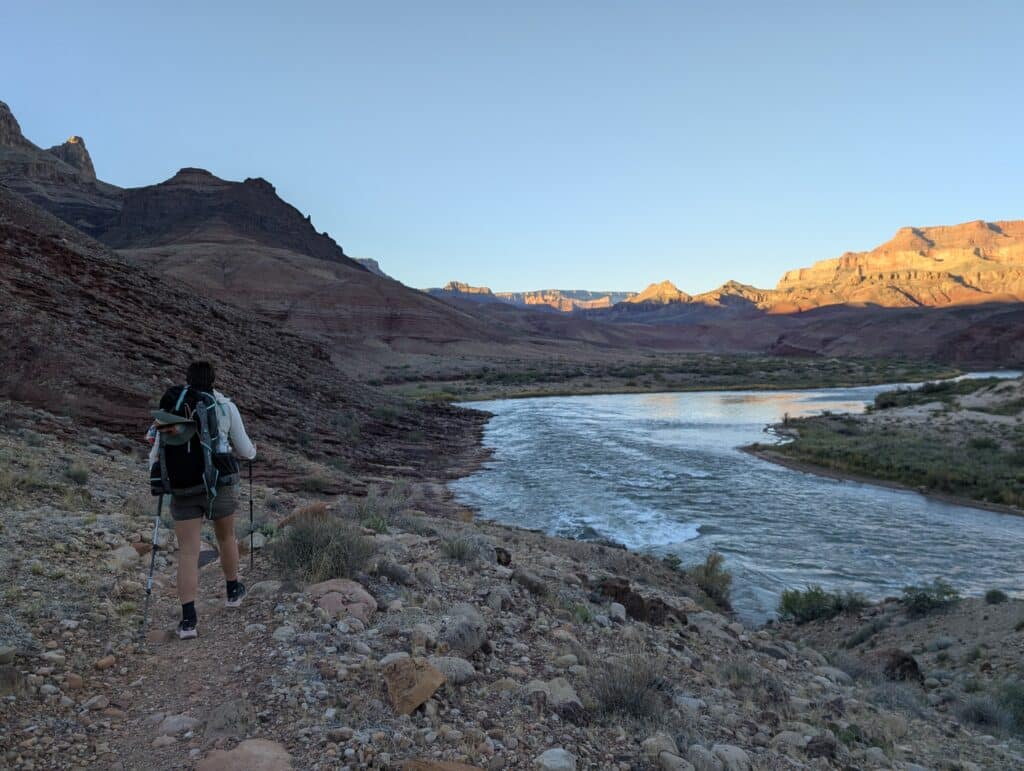
Here’s what makes the Escalante different from most Grand Canyon routes: you spend significant time walking right along the Colorado River. Most Grand Canyon hiking happens on the Tonto Platform or higher, keeping you hundreds or thousands of feet above the river. The Escalante puts you at water level for miles, letting you walk beaches, deltas, hop boulders along the shore, and camp within steps of the rushing Colorado. That river access is both the route’s defining feature and what makes it more accessible than other routes, providing frequent water sources by GC standards.
The route section (the part that’s not maintained trail) runs between Tanner Beach and the New Hance Trail or Red Canyon junction, with a slight add-on to reach the Tonto platform above Hance Rapids. Although this is technically a route and not a trail, it’s been hiked so many times that there’s a worn social path throughout almost the entire journey. You’re following boot paths and cairns, but the route is beaten in enough that you’d have to actively try to get lost in my opinion, especially by Grand Canyon route standards.
The only sections requiring legitimate route-finding are the less-traveled low route option between 75 Mile Canyon and Papago Canyon, plus scrambling up Papago Wall and down the Papago Slide. Everything else follows an obvious path. This makes the Escalante Route an excellent choice for those looking to dip their toes into the world of off-trail travel in the Grand Canyon without the stress of constant navigation.
Permits
Grand Canyon backcountry permits operate on a lottery system with a four-month rolling basis. Applications open four months before the first day of the month you want to hike. For example, permits for November trips become available in July.
Because the Escalante Route is popular and permits fill up, entering the lottery is strongly recommended. The lottery system works in your favor even if you don’t win initially. If you enter the lottery and don’t get selected, you have a window to book a trip before it opens to the general public, significantly bettering your chances of securing permits.
You’ll specify your exact itinerary, including entry and exit dates, trailheads, and camping zones. The application requires a $10 non-refundable fee, with the actual permit costing $10 per person per night. Note: there is rumors this will change, so you be sure to check up on the latest fees at recreation.gov.
Trailhead Logistics and Shuttles
This is a point-to-point route requiring a shuttle between Tanner Trailhead (start) and Grandview Trailhead (finish). Most hikers descend the Tanner and ascend the Grandview or New Hance, which is the conventional and preferred direction.
Shuttle logistics are genuinely challenging. While commercial shuttle services exist, they’re very hard to book and often unavailable. The taxi service typically doesn’t serve this area. Most people handle shuttles one of two ways: coordinating with another hiking group or a local (check out the Grand Canyon Backpackers and Hikers Facebook Group), drive 2 vehicles (what we did), or hitching a ride from Grandview Trailhead back to Tanner after finishing the hike. The ladder option is generally pretty easy, especially if you opt to have one person grab your vehicle.
The hitchhiking option works surprisingly well from Grandview Trailhead since it’s a popular destination with a large parking area. If you’re finishing at New Hance Trail instead of Grandview, hitching becomes much harder since there’s no big pullout and significantly less traffic.
Plan your shuttle logistics carefully before the trip. This is one of those details that seems minor until you’re standing at Grandview Trailhead with no way to get back to your car.
Best Time to Hike
Spring (March through April) and fall (October through November) offer the best conditions. Summer is dangerously hot with temperatures exceeding 110°F along the river, making this route genuinely life-threatening without extreme caution. Winter can be cold with snow on the rim, though the inner canyon stays relatively mild. However, you’ll be dealing with limited daylight.
My trip was during the first weekend of November, and we absolutely lucked out with perfect weather. Temperatures were moderate (in the low 70s at river level), skies were clear, barely any wind, and we had comfortable hiking conditions throughout. One thing I noticed compared to spring trips I’d heard about was the shade situation. Fall offers more shade along certain sections of the route due to the sun angle, particularly in afternoons and evenings. Spring gets more direct sun exposure during the day and shade is harder to come by.
The tradeoff with fall is shorter days. By early November, you’re working with about 8 hours of daylight compared to 10 hours in spring. This affects your daily range and means you need to be more strategic about when you break camp and when you aim to arrive at your next camping zone.
Day-by-Day Breakdown
I’m structuring this based on the four-day itinerary I hiked, which I recommend for most people with solid fitness and backpacking experience. You can stretch it to five days if you want more time to hang out and explore.
With this itinerary we rolled into camp at around 2-3 PM each day and had tons of time to relax. However, our group was composed of serious hikers who moved efficiently and have over a decade of backpacking experience each.
Day 1: Tanner Trailhead to Tanner Beach
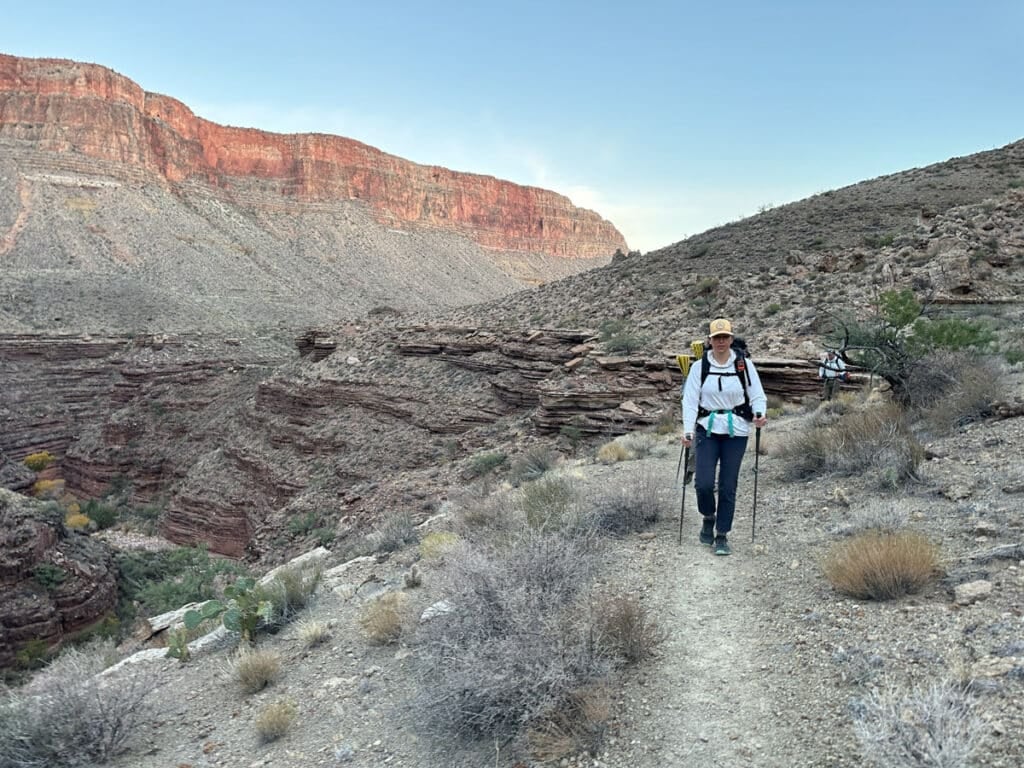
The Tanner Trail is known to be one of the easiest non-corridor trail that descends to the river in the Grand Canyon. That’s not saying it’s easy in absolute terms. You’re dropping 5,000 feet in 8.8 miles with a few sections that are far steeper than 1,000 feet per mile.
But compared to other river-access trails like the Hermit, Nankoweep, or South Bass to the river Tanner is remarkably straightforward.
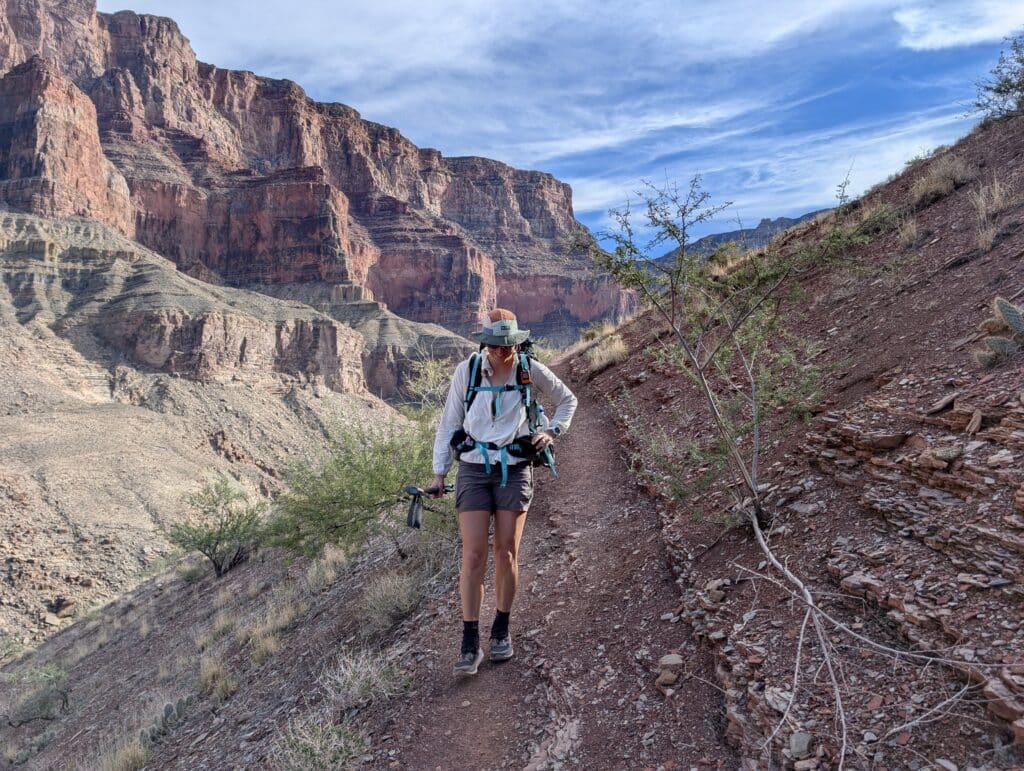
The trail starts at 7,360 feet on the South Rim at Lipan Point and descends through multiple geological layers with consistent downhill grade. The trail is rocky in several sections, but it’s broken up with a lovely flat-enough jaunt through the Esplanade.
The upper section through the Kaibab and Toroweap formations offers shaded rocky downhills that make the knee-pounding descent more bearable. As you drop lower, you’re passing through the Coconino sandstone, then the distinctive red layers of the Hermit shale and Supai Group.
You’ll pass through the an area of pointed rocks, nicknamed the Stegosaurous ridge. This is a great place for a break. You’ll get spanning views of 75 Mile Canyon, an area you’ll pass over then through later in your journey.
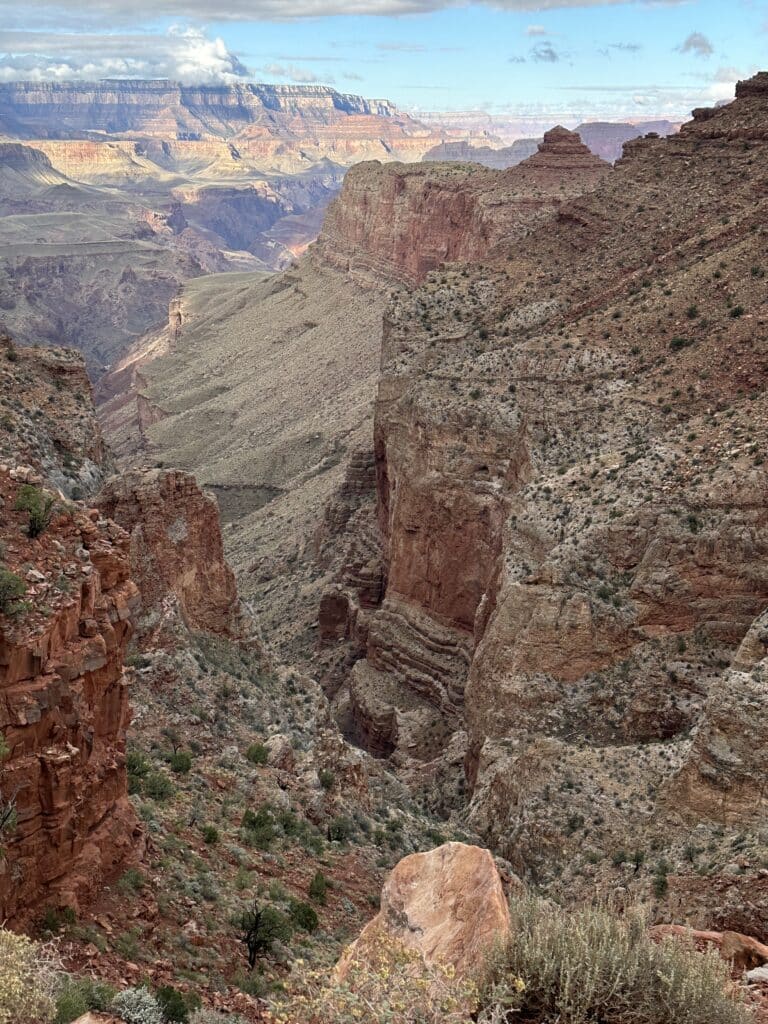
The Redwall limestone section is where things get steeper and looser underfoot. Pay attention to your footing here because the trail crosses some scree and loose rock. But it’s never technical or scary, just steep and a little sloggy. But the views start to really deliver here with beautiful bends in the river in the distance.
The final descent crosses the Tapeats sandstone and drops you onto Tanner Beach, a beautiful riverside camping area with established sites among tamarisk and mesquite. I’ve done the Tanner Trail to the rive in a day multiple times and this last descent, I found the final downward slope to be a bit of a knee killer.
We descended Tanner on our trip and immediately noticed we were leapfrogging with a group of ten. When we arrived at Tanner Beach, we discovered there were more people camping in the zone than there were permits issued. This happened during a government shutdown when, apparently, some folks believed the rules didn’t apply. It was frustrating to see. Don’t be that person.
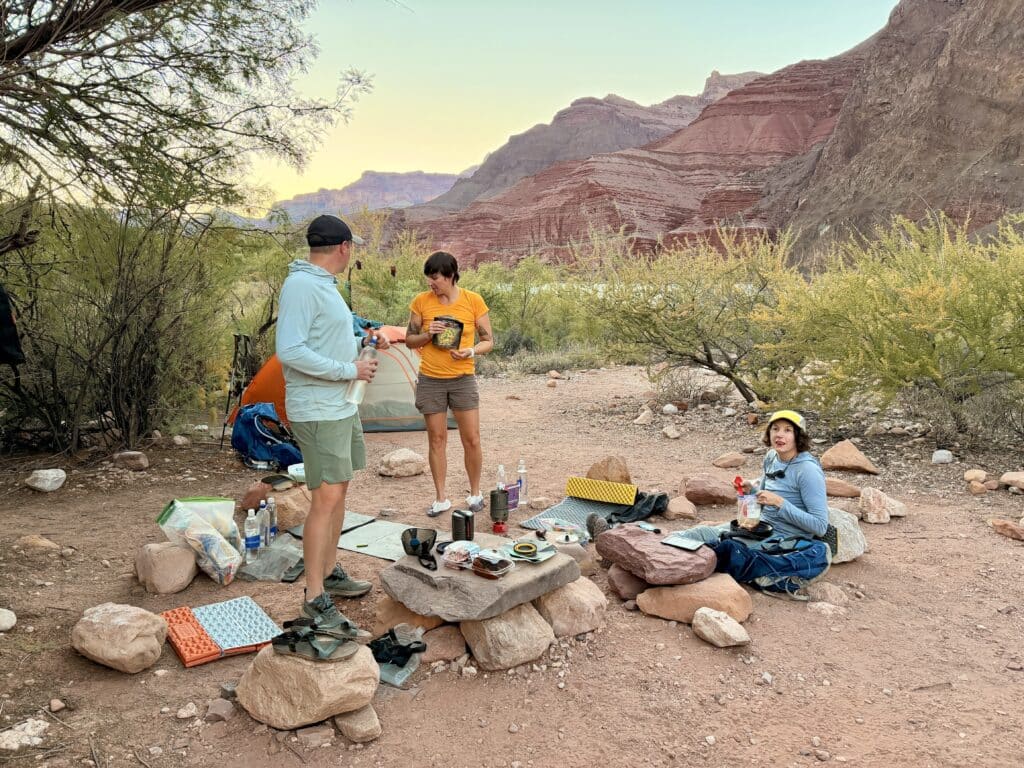
Despite the permit violations, Tanner Beach was still beautiful. We set up camp, filtered water from the river, and watched the light change on the canyon walls as the sun dropped. There’s something special about that first night at river level after descending from the rim. The temperature is warmer, the sound of the river is constant, and you feel like you’ve entered a completely different world.
Day 1 Stats:
- Distance: 8.8 miles.
- Elevation loss: 5,000 feet.
- Time: 4-6 hours.
- Water: Colorado River at Tanner Beach.
- Camping: Use Zone BB9 (Tanner Beach).
Insider Tips: Start as early as you can from the trailhead. Even though Tanner is the easiest river descent, it’s still 8.8 miles downhill on your knees. We started around 10 AM and that felt a little late, although we managed. Fill all water containers at the river because while you’ll have river access the next day, it’s nice to start the morning fully loaded, and accessing the river is a bit of a bushwhack-y vibe for a while. Budget 2 liters per person for the hike to Cardenes, then 2-3 more liters to Escalante Beach the next day, depending onthe weather.
Day 2: Tanner Beach to Escalante Beach
This is where the Escalante Route starts to show its true colors. You leave Tanner Beach and start hiking downstream along the Colorado River, and for the first time you realize how much time you’re going to spend at river level. This is unusual for Grand Canyon hiking and absolutely wonderful.
The route follows the worn social path along the river; you’ll travel through a lovely, flat delta. The views are fantastic, especially in the morning light. What a wonderful warm-up – a rarity in the canyon. The terrain is straightforward to navigate because the path is so beaten in and often lined with bigger rocks. We were never not on a trail during this section. Just follow the obvious boot path and “sidewalk.”
You’ll climb a small hill before reaching Cardenas. We stopped to look for pottery remains in the area where we’d heard they existed, but we didn’t find any.
About midway through the morning, you’ll pass Cardenas Beach, which offers another river access point if you need water. We stopped here to eat some breakfast, enjoy the cozy sand, and fill up on water for the next section, as it’s dry. You can also camp here, but this is a popular spot with hikers and river groups.
The Unkar Delta area is one of the highlights of this section. But you’ll start to earn it. Coming up from Cardenas, you have 2 options. The left-most path will take you directly to the hilltop with a ruin. It’s right on the hill, so if you don’t see it, check your topo.
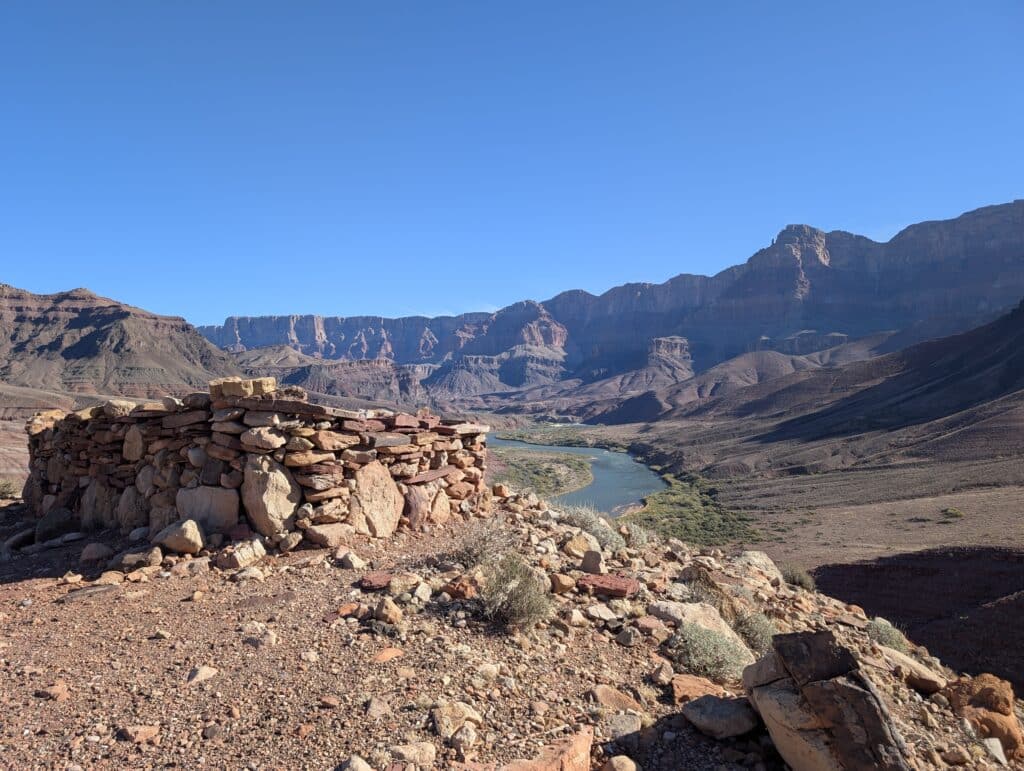
This area contains significant Ancestral Puebloan ruins, including granaries and structures that offer a fascinating glimpse into how people lived in the canyon centuries ago. You can catch a good glimpse of impressive ruins (over 23 buildings) on the Unkar Hill Overlook – a popular stop for river trips.
We took a side trip up to Unkar Hill to see the ruins and the Unkar Delta overlook. Walking past Unkar Hill Ruin, take a side path that diverts to the right. You’ll head down a hill to gain the next hill in front of you, towards the river.
Standing above these granaries and structures, looking out over the delta where these people farmed and lived, was genuinely moving. The overlook offers incredible views of the Colorado River and the surrounding canyon. We spent probably 30 minutes up there just taking it in.
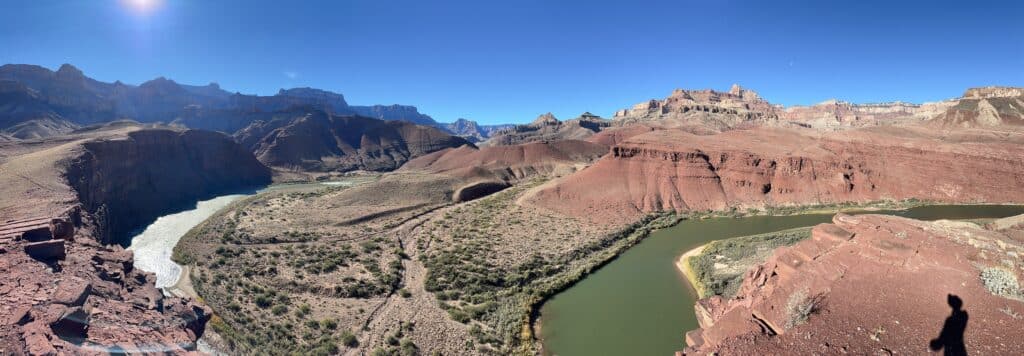
After leaving the Unkar Delta area, the route continues above the river. The hiking remains straightforward with a good trail throughout. You’re approaching the huge Dox Hill pockmarked by rocky spires.
From afar, it looks like there is no way this area is passable, but like any obstacle, it always looks worse head-on.
This next section is one of the most tedious parts of the whole trip. Oftentimes in the Grand, you’ll have to divert heavily up a side canyon to reach your next destination. This area is no exception.
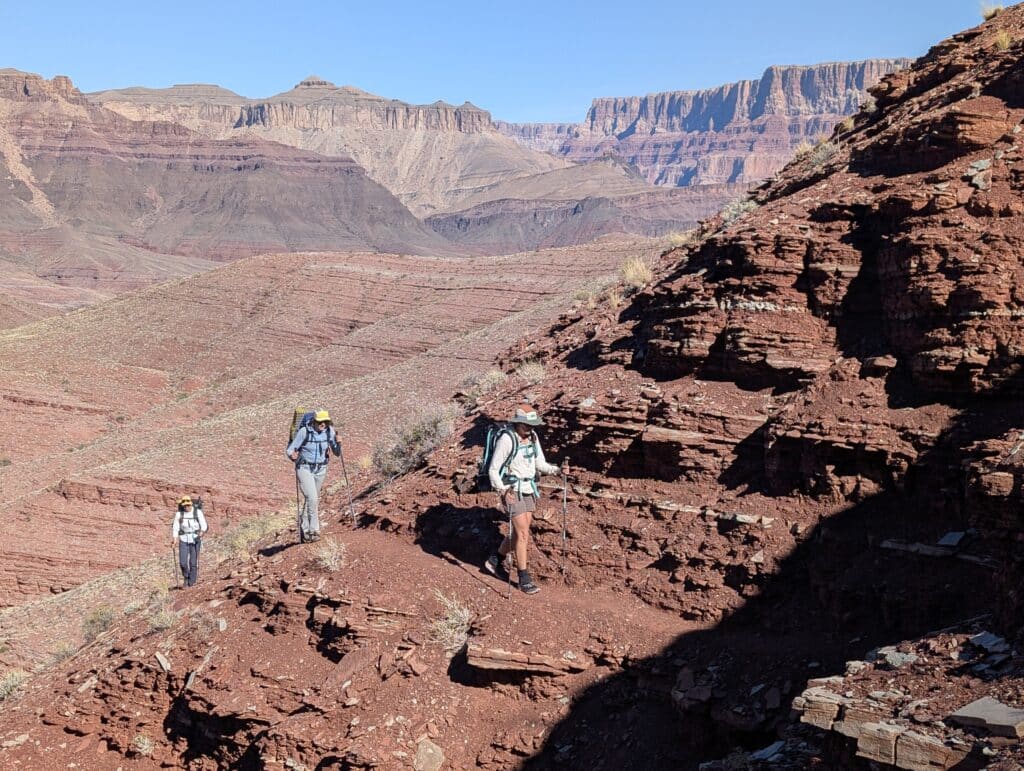
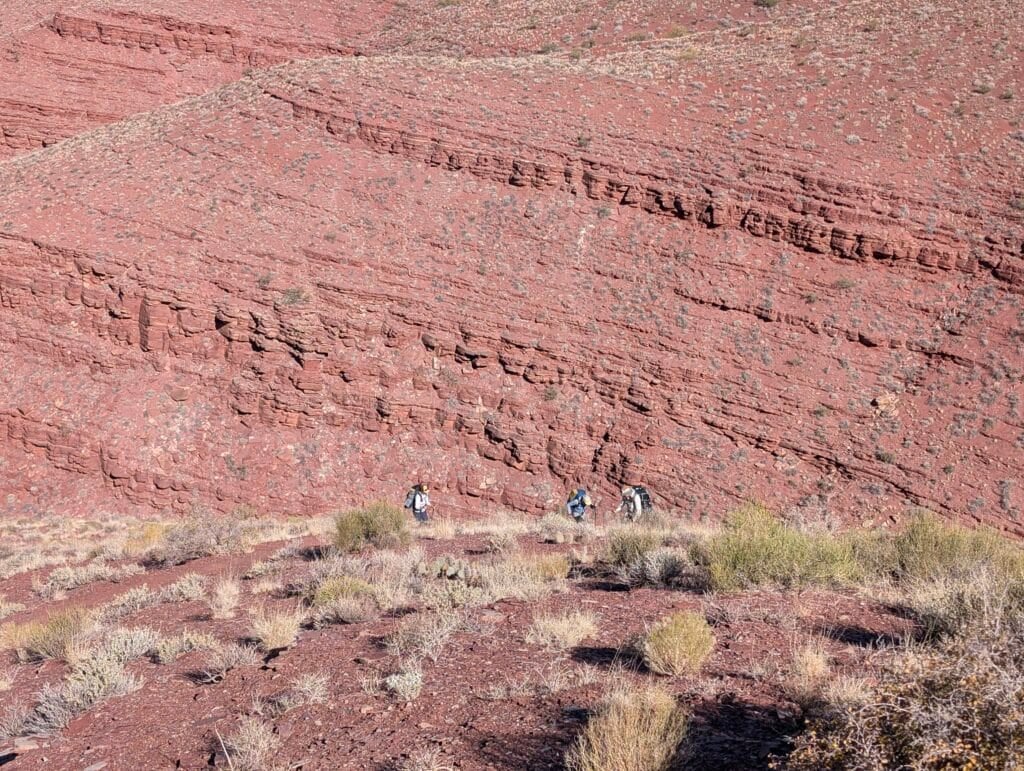
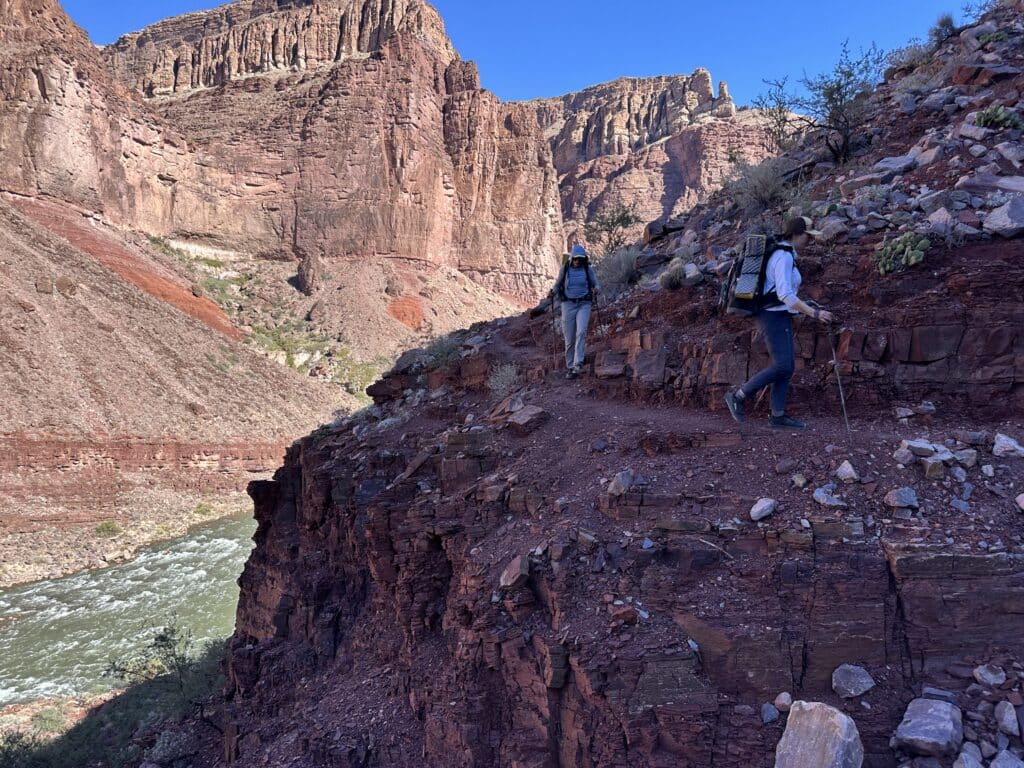
Many people spoke about how spooky and scary this section of trail is. We found it to be very mellow. But we are all seasoned rock climbers and have done plenty of exposed hiking. The trail is a bit off-camber with steep drops on either side, but it’s insanely solid.
There was only one or two very small sections (maybe 10 yards) that felt truly exposed.
What wears you down is the unrelenting off-camber walking as you traverse the hill. You’ll think the end is just around the corner. It’s not.
Descending to Escalante Beach
Eventually, the torturous off-camber section ends, and you begin a steep, loose-ish, yet swift descent to Escalante Beach.
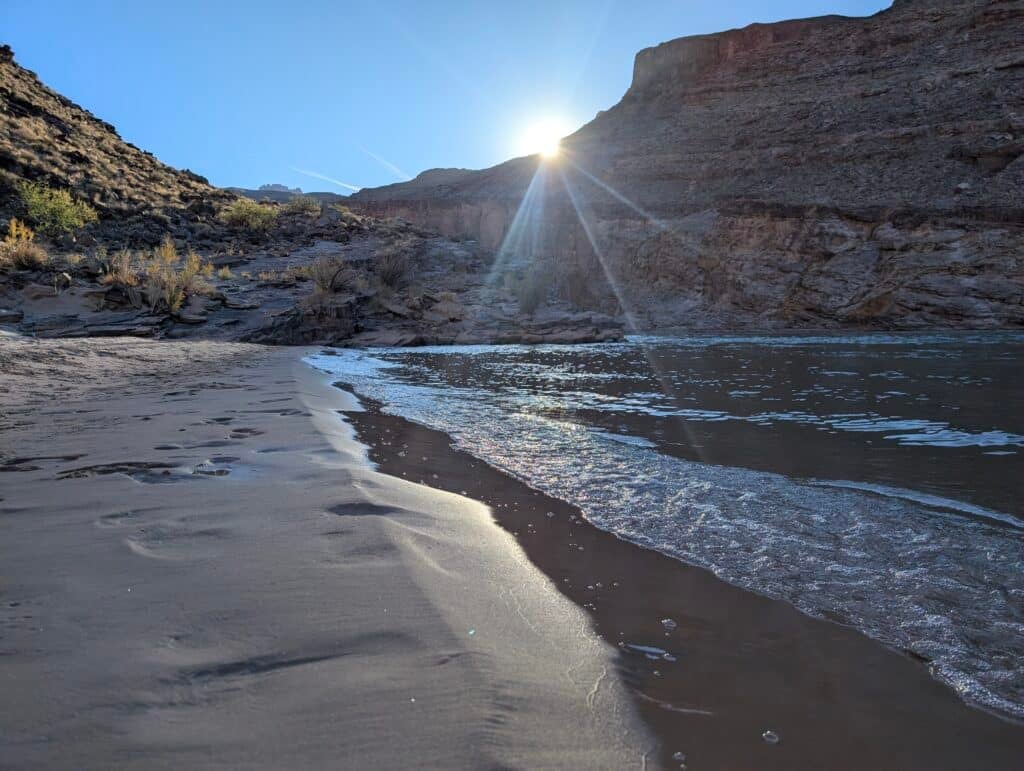
This oasis will have you believing you’ve been transported to an expensive tropical island, if it weren’t for the cliff across the river.
There is a large, protected cove perfect for swimming and suitable for 2 tents (flat ground is a little tough to find). There are a few more rogue sites set back a bit from the river, just upstream at the rapids.
This is by far the best beach campsite I’ve ever experienced in the Grand Canyon. And we had it all to ourselves. The sand is divine. The water is cool, and the lull of the rapids are incredible.
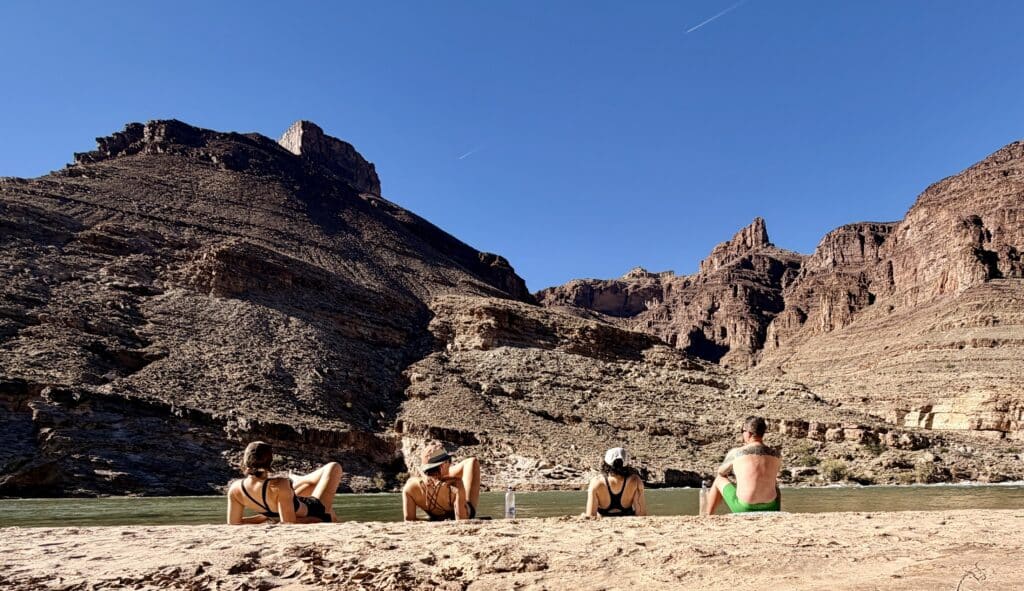
We came across one group of packrafters who stopped in the cove to say hi. I think they planned to camp there, but in true Grand Canyon fashion, they portaged a few times through the rapids and continued downriver. Leaving us to our blissful solitude.
After leaving Tanner Beach that morning, we didn’t see anyone. Not a single person. We had the entire route to ourselves, which is exactly what we were hoping for. The solitude after the crowded night at Tanner was refreshing and reminded us why we seek out these routes instead of the corridor trails.
This slice of paradise was pure bliss!
Day 2 Stats:
- Distance: 9.9 miles.
- Elevation gain: Approximately 2,600 feet cumulative (with ups and downs).
- Time: 5-7 hours.
- Water: Colorado River at Cardenas Beach (optional), Escalante Beach.
- Camping: Use Zone BC9 (Cardenas).
Insider Tips: The Unkar Delta archaeological site and viewpoint are absolutely worth the side trip if you have time and interest. Just be respectful and don’t disturb anything. Having lightweight binoculars/monocular make it easier to spot the ruins on the north side of the river.
Day 3: Escalante Beach to Tonto Trail Dry Camp
This was the most interesting navigation day of the trip, and the section where the route really tests your skills.
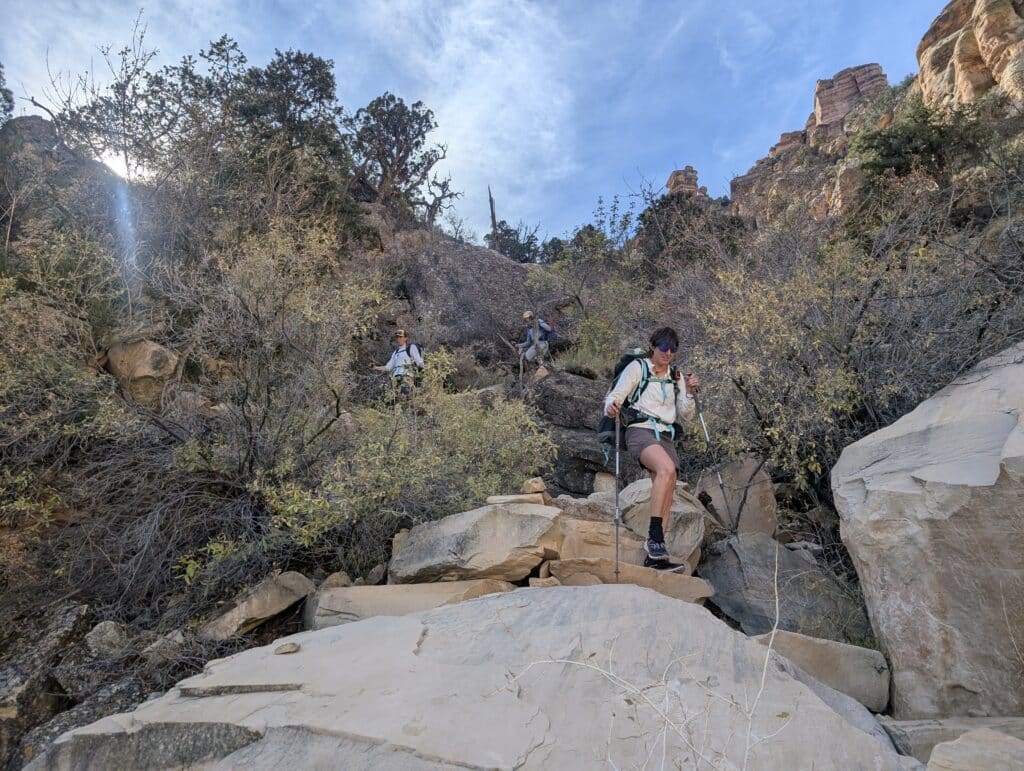
You leave Escalante Beach and right out of camp, you’ll start to climb to the rim of 75 Mile Canyon. Honestly, this was my favorite part of the trip.
The trail goes right along the edge of the steep cliffs that make up the slot section of 75 Mile Canyon. Prepare for vertigo-inducing views!
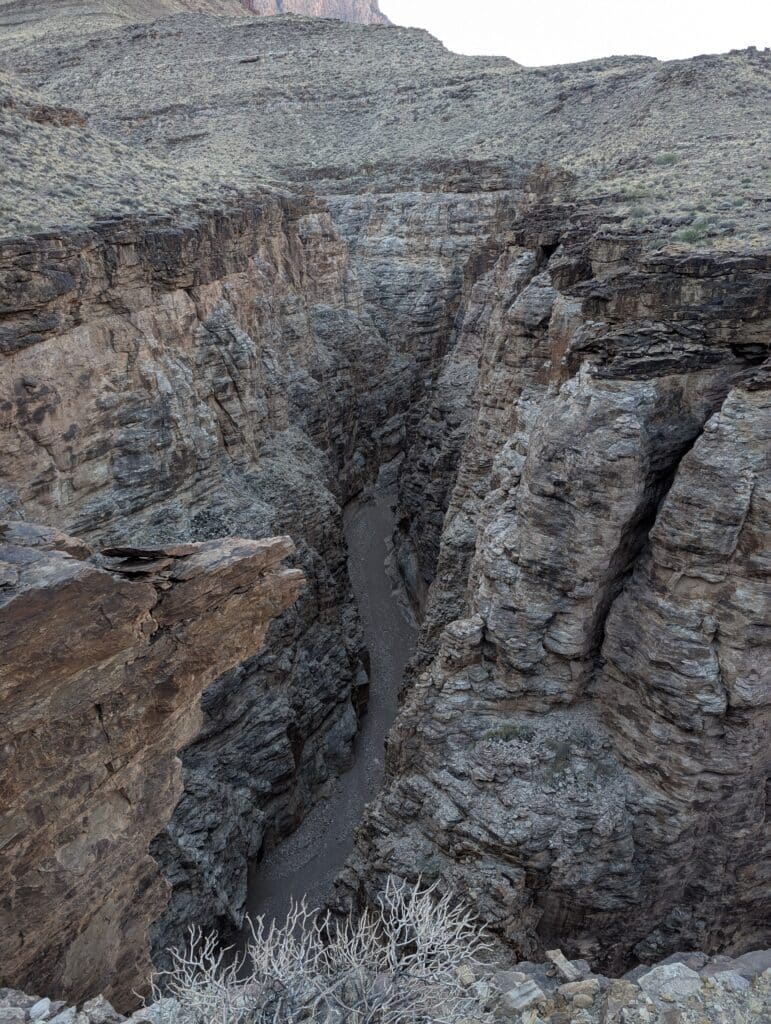
You’ll make your way towards the back of the canyon, where an obvious route in shows itself. The scrambling is rather light here, but it exists. Take your time.
Now you’re down below looking up at those steep, impressive walls. Some very light and easy obstacles are present, and this section of the route is a real treat. A wide-ish slot canyon jaunt takes you the mouth of 75 Mile Canyon. It was over too soon for us.
Next, you’ll make your way to Papago Creek (almost always dry).
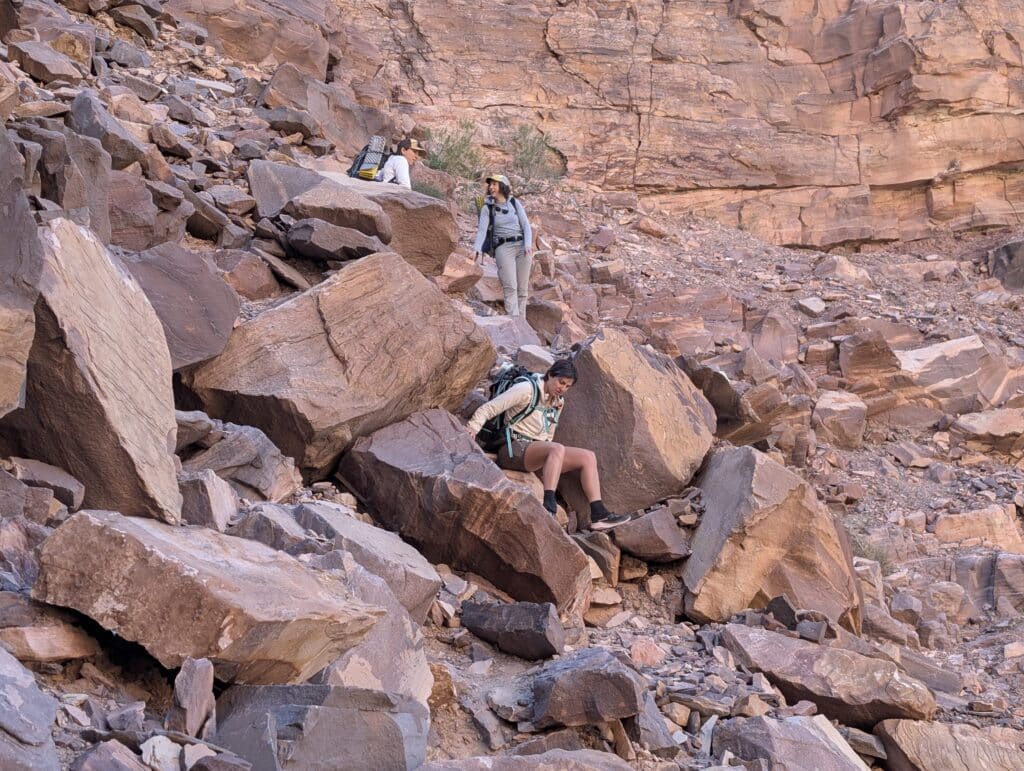
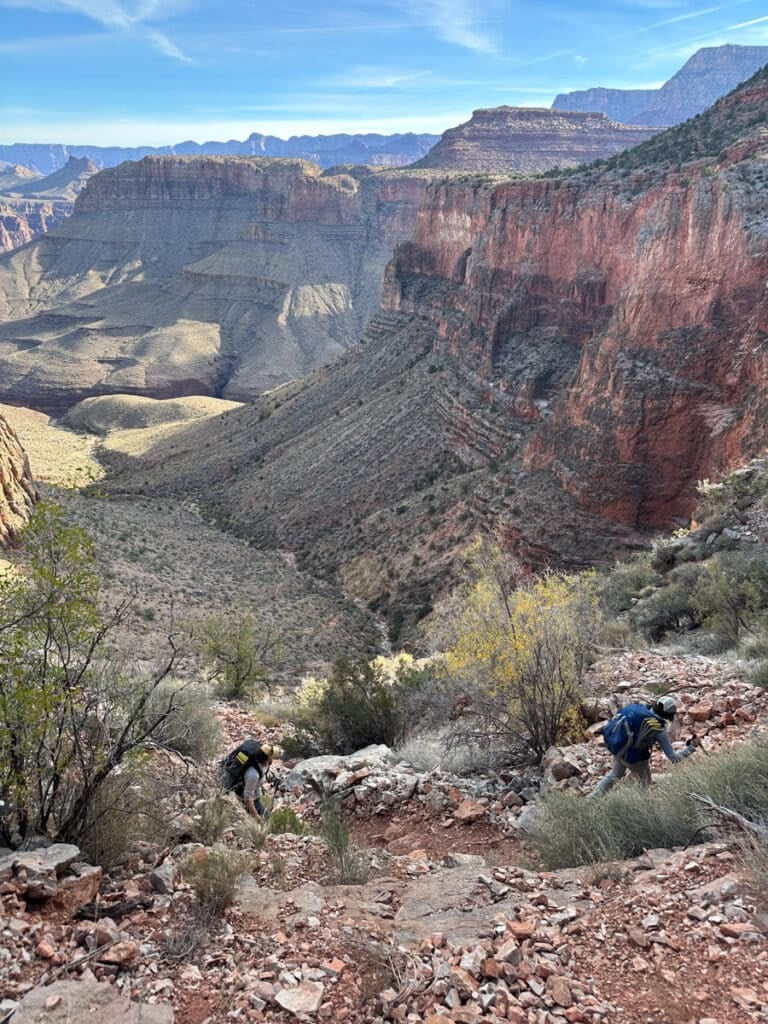
This section includes the choice between the “low route” and “high route” between these drainages. The low route stays closer to river level and involves more boulder-hopping, scrambling, and technical terrain. It’s less traveled and requires actual route-finding skills. You’ll need to pay attention to cairns and follow the way.
The high route climbs up to the Tonto Platform earlier and trades mild scrambling for elevation gain on a more obvious trail. The upper route has a pretty gross descent (it’s loose, steep, and tedious). But the low route plops you about 2/3rds of the way down this descent, avoiding most of it.
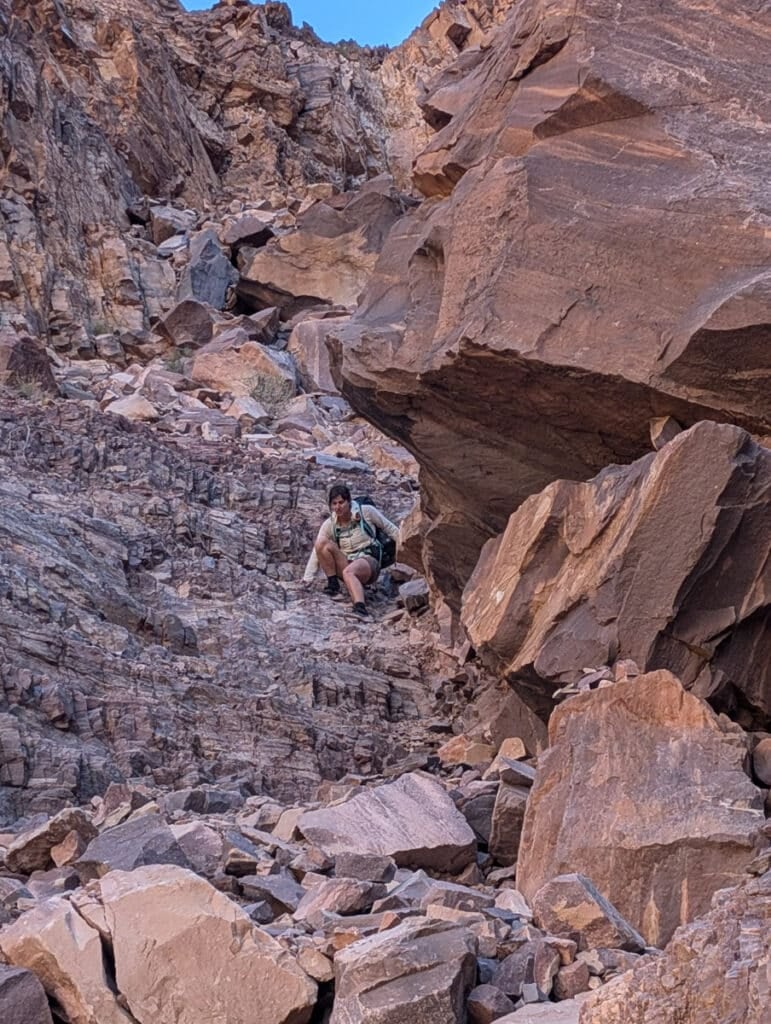
We took the low route because we wanted the experience and challenge, and to avoid unnecessary elevation gain. This was the only bigger section of the entire trip where we were genuinely route-finding rather than following an obvious path – aside from the scramble and slide. The terrain was complex with boulder fields to navigate, some scrambling right along the river, and decisions about which way looked most reasonable. It was engaging and fun, but definitely required paying attention. If you’ve got experience, this bit of the route was a load of fun and the only real time we felt like we were on a route over the entire journey.
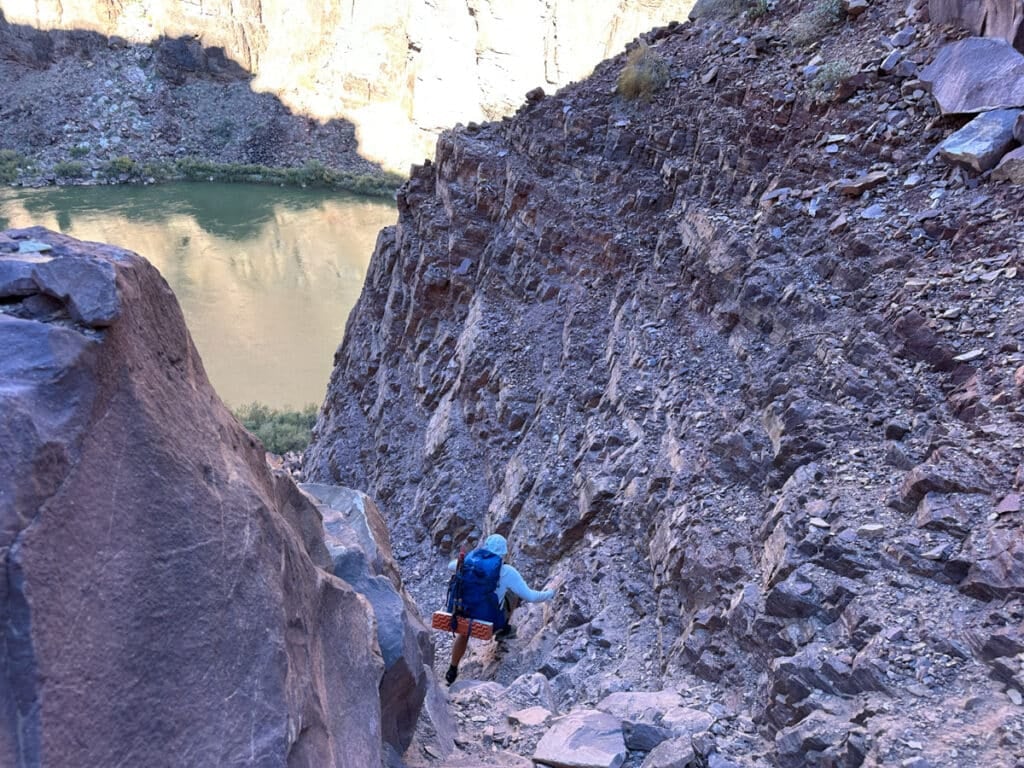
Papago Wall and Slide
Definitely keep in mind that I’ve been backpacking, climbing, scrambling, and mountaineering for over a decade. This type of terrain is very familiar to me. And on the spectrum of sketchiness, it had its moments, but I’ve been in far more risky situations. Take the following description with a grain of salt. If your experience is less, this will be a daunting stretch of canyon and where the route really gets its reputation for being challenging. In my mind, this short area is what makes this route an actual route.
After the low route section, you reach the obvious Papago Wall. You’ve got access to the river here, so fill up and take a rest if you need to.
Everyone certainly has a lot ot say about the Papago Wall and Slide, but we found them to be insanely straightforward. The rock is very solid and all of the handholds are there. Overall, I’d consider this a class 4 section that had exposure, but at the same time felt like it was over before it really started.

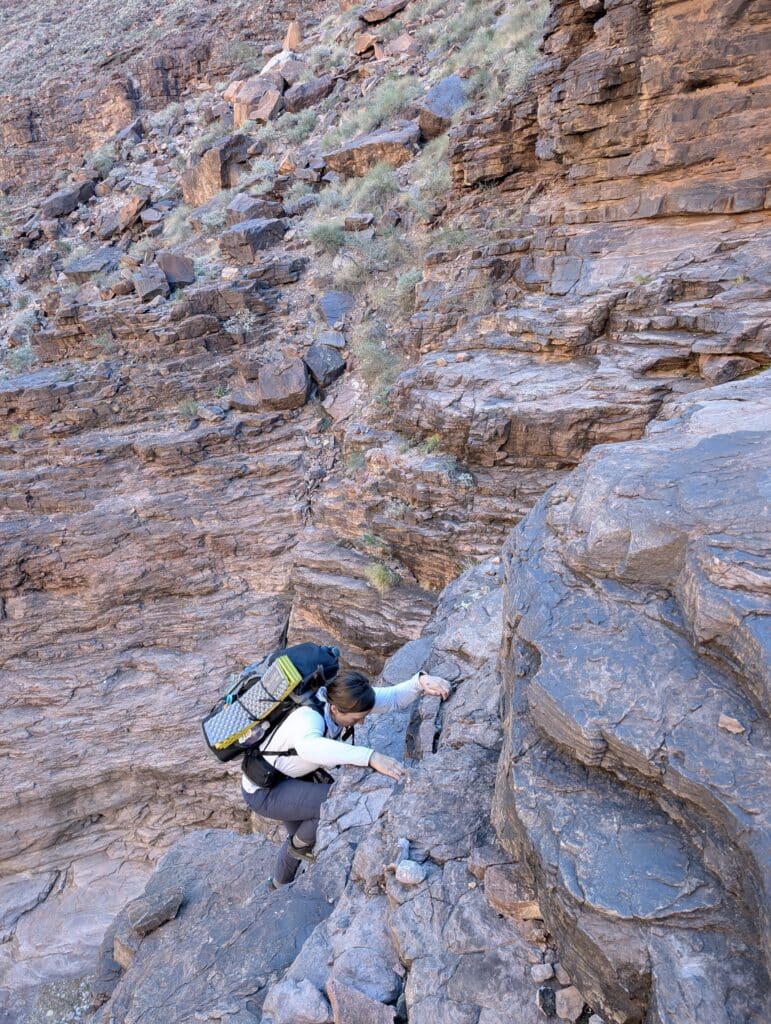
You’ll trapeze a short way through a small, easy squeeze, then across a bench until you turn inward and are presented with a really obvious scree-filled gully. Meet the Papago Slide.
Now I’ve had my fair share of loose, ugly gullies, and this one certainly has an intimidation factor looking straight down at it. Mostly because it funnels to a point, meaning if an unfortunate rock event were to happen, everything is headed your direction.
It’s loose, steep, and unnerving for the uninitiated. But if you’re a climber at all, it feels very familiar – like a crummy walk off on any standard climber’s trail.
Pick your way down the path – it’s a bit of a zig-zag to get to the hourglass apex. As a group of 4, it was easy to stagger ourselves in stages. This is to avoid toppling rocks onto one another. Remember, you don’t have a helmet. Stagger by traversing a little ways to a safe area out of the line of fire, then let the next person go. Once we got moving, it felt much easier than it looked.
Of course, this is really heads up, but I’ve been in far worse rock cannons in my years of doing stuff like this. However, if you have zero experience in this kind of terrain, you’ll likely have a fair amount of trouble.
Fortunately, the way down is obvious. Stick to the worn path and go one at a time until the person in front can get out of the line of fire.
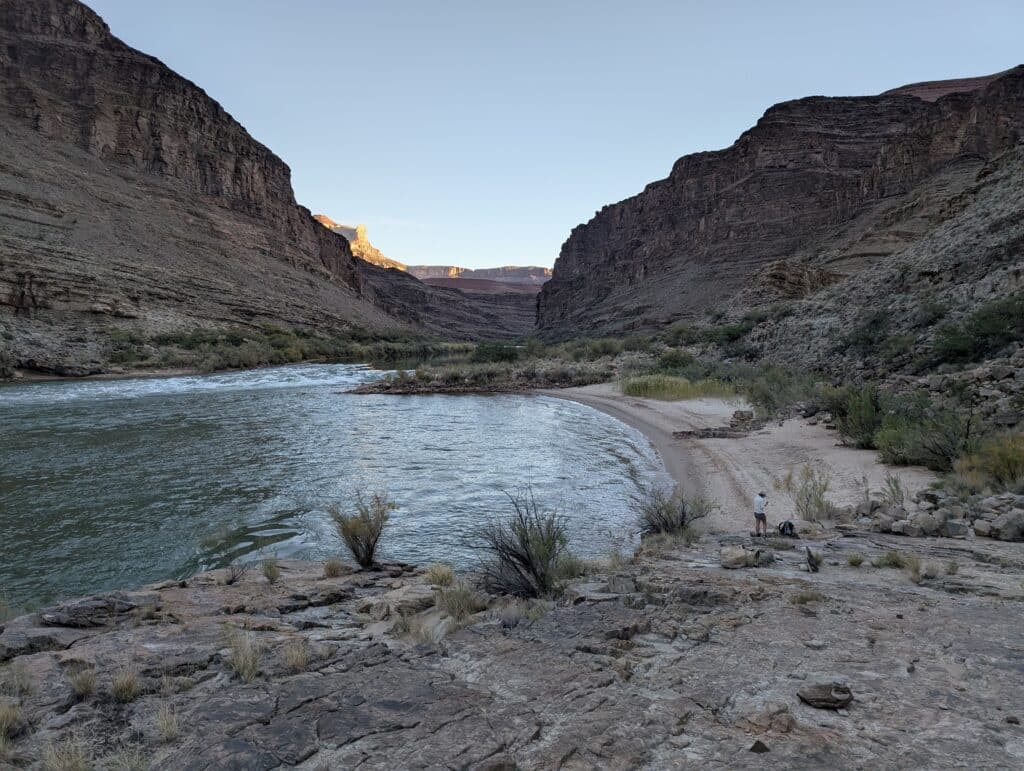
New Hance Rapids
Once you’re past Papago, you’ll make your way through some tamarisk and catclaw towards New Hance Beach.
This is a popular river camp stop. We knew of a group that was about a day behind us upriver on a rafting trip, so we left them with a small hello in the sand.

Hance Rapids is your last chance at water until either the top (exiting New Hance Trail) or Hance Creek (exiting Grandview) so camel up here.
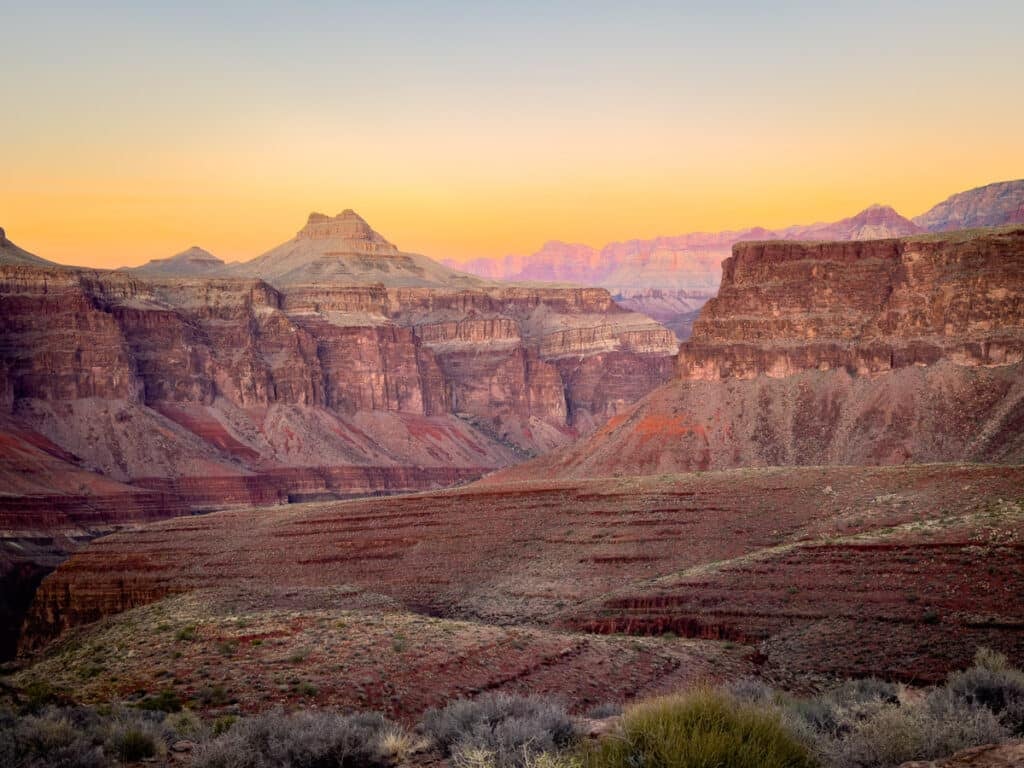
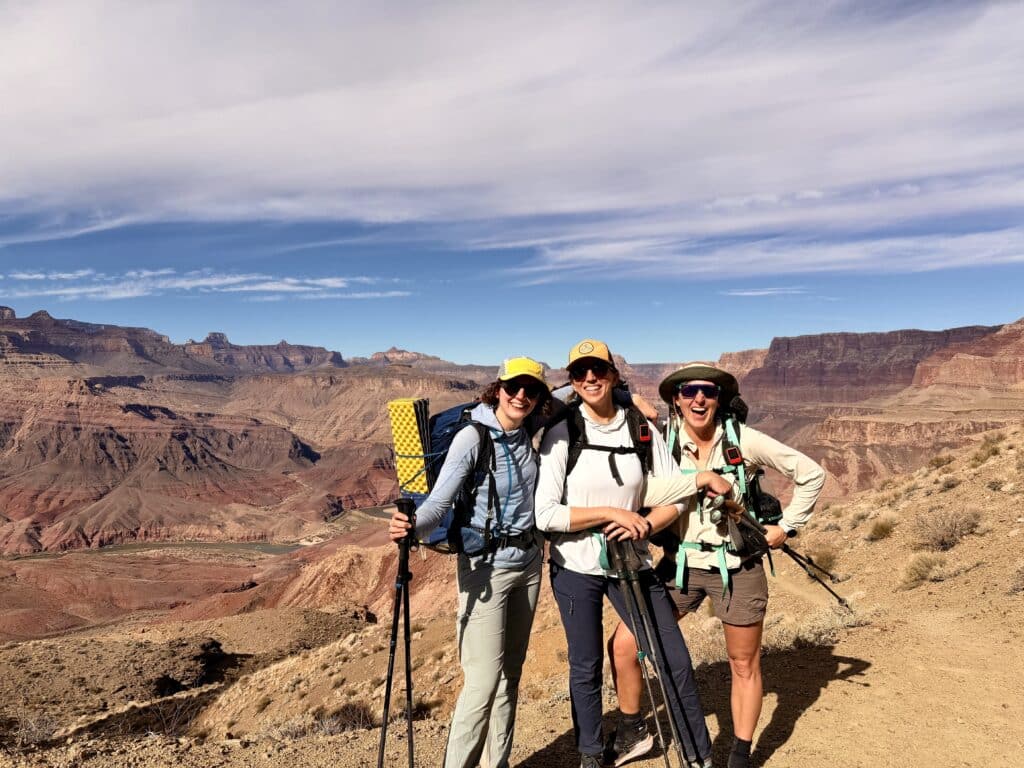
One thing I always enjoy doing on any Grand Canyon trip is a dry camp out on the Tonto Platform. The views are so epically expansive in all directions. Sunsets are something that you’ll have to witness to really grasp.
If the weather is even half decent, I’m doing it, and this trip was no exception.
So I convinced my friends to haul 4-5 liters of water to a spot I had marked on my topo that just looked like it would have the perfect view. I’ve done this enough to just know. If you’ve got some grit and are willing to put in a little sweat equity, you’ll be greatly rewarded.
Out of New Hance, you’ll climb a small sand hill. The route is obvious – there is a beaten path. But beware: AllTrails is WRONG here. Do not follow the GPS, which continues along the beach in the wrong direction. Look for the path that climbs the hill and you’re officially starting your haul out of the canyon.
You’ll reach a bench below the Tapeats that travels through some weird and wacky rock formations. Shade can be found here. We stopped to rest, feeling the 1,000 feet of elevation with an additional 10 lbs on our backs.
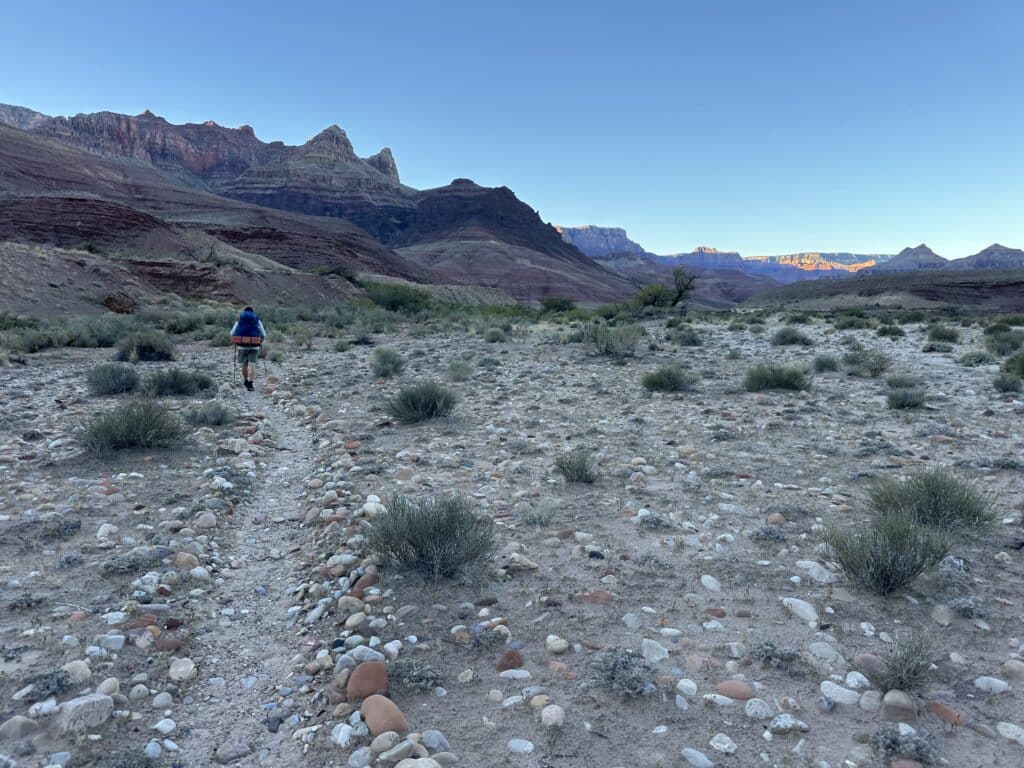
You’ll then settle into the rhythm of the Tonto. Winding your way in and out of side canyons, making river mile progress in inches. You can see where you want to go, but you can’t see the gaping side canyons in your way to get there.
Settle in and check your topo as little as possible.
Finding a good campsite on the Tonto Platform required some scouting. The ground has a lot of sharp shale and cacti. But there are a few notable spots right along the trail that others have cleared.
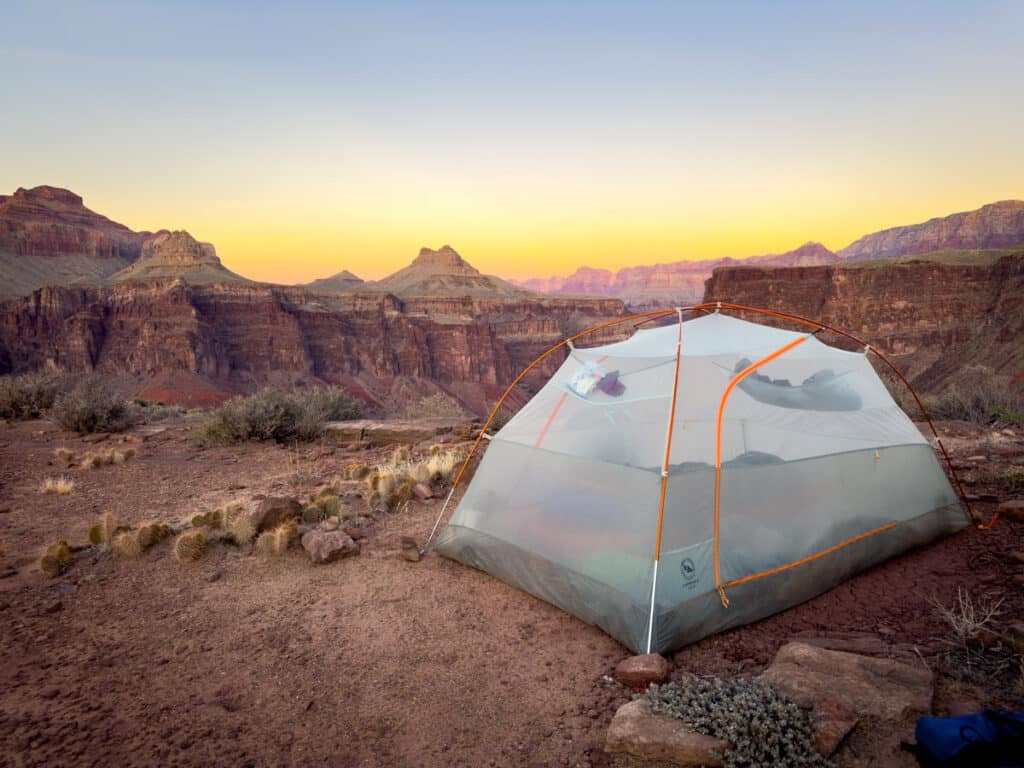
The sunset from our Tonto camp was absolutely unbelievable. The canyon opened up around us in all directions, and we watched the light paint the rock layers in shades of orange, pink, and red as the sun dropped below the rim. This is why you carry heavy water loads to dry camp on the Tonto. The views are worth every ounce.
We basked in the perfectness of the day.
Day 3 Stats:
- Distance: 7.3 miles.
- Elevation gain: Approximately 2,600 feet.
- Time: 5-7 hours.
- Water: Must carry from New Hance Beach area (4-5 liters per person recommended).
- Camping: Use Zone BD9 (New Hance).
Insider Tips: The low route is more interesting than the high route but requires comfort with scrambling and route-finding. If you’re not confident with that kind of terrain, take the high route instead. For the dry camp water carry, 4 liters per person minimum is smart. We carried 4-5 liters and used most of it. Always stop and “camel up” at water sources, meaning drink your fill so you’re carrying less weight in your pack and more in your body. Choose your campsite on the Tonto as close to the Colorado as you can so you maximize views
Day 4: Tonto Dry Camp to Grandview Trailhead
We started before sunrise for the hike down to Hance Creek to refill water before beginning the climb out. Pre-dawn starts in the Grand Canyon are magical, with that pre-light glow illuminating the canyon and the temperature still cool from the night.
I was a little grumbly, though – I didn’t want to leave our stunning Tonto camp behind! But alas, we needed to make time because we had a long drive ahead of us and a lot of elevation gain.
Hance Creek runs semi-reliably in both spring and fall. Avoid filling up at Miner’s Spring and Page Spring – arsenic is present in the water. We filtered water here, drank our fill, and had some breakfast. Thanks to the shade, we opted to carry 2 liters each for this section, but if it’s hot and during the springtime, bring more because you’ll have nothing until you reach your car.
Managing the redwall break above Hance Creek is special. Just think about doing pistol squat after pistol squat until you reach some mining equipment and a cave (how did they get that there???). Then you’ll be doing some more steep uphill until you reach the camping area for Horseshoe Mesa.
There are toilets here, and it’s a good place to rest before joining up with the Grandview Trail. Also, if a Tonto dry camp sounds like too much, you can always dry camp at one of the spots on Horseshoe Mesa (specific permits are required, and you must stay in a designated site). Having done this trip before, it’s a worthwhile extra night if you’re looking to slow down.
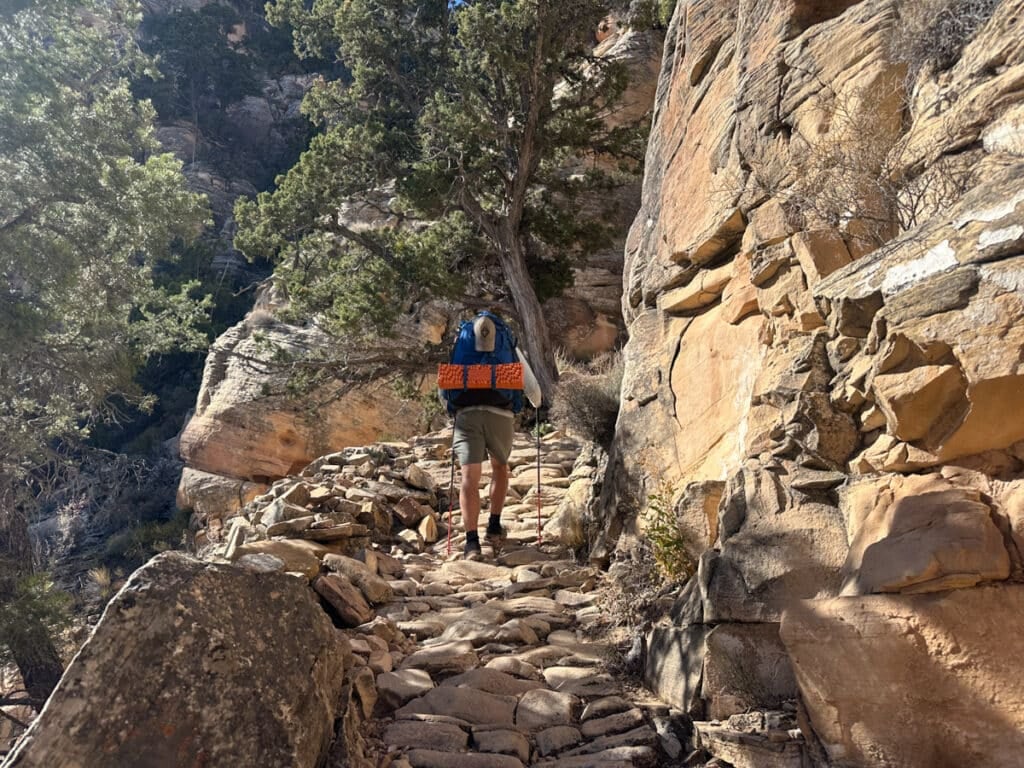
The Grandview Trail climbs 4,000 feet in approximately 4 miles, gaining elevation through switchbacks and traversing sections up through the geological layers. This was my fifth time hiking Grandview (I’ve done it four times before on other trips), and it never gets easier, but familiarity helps mentally.
Once you reach the riprap sections, it gets interesting, but it’s a slog. You’re still a long way from the top. Just stop thinking about it and settle into the grind. The good news is that the Grandview Trail has some of the best views in the Grand Canyon.
You can even see the side canyon for Tanner Trail way off in the distance.
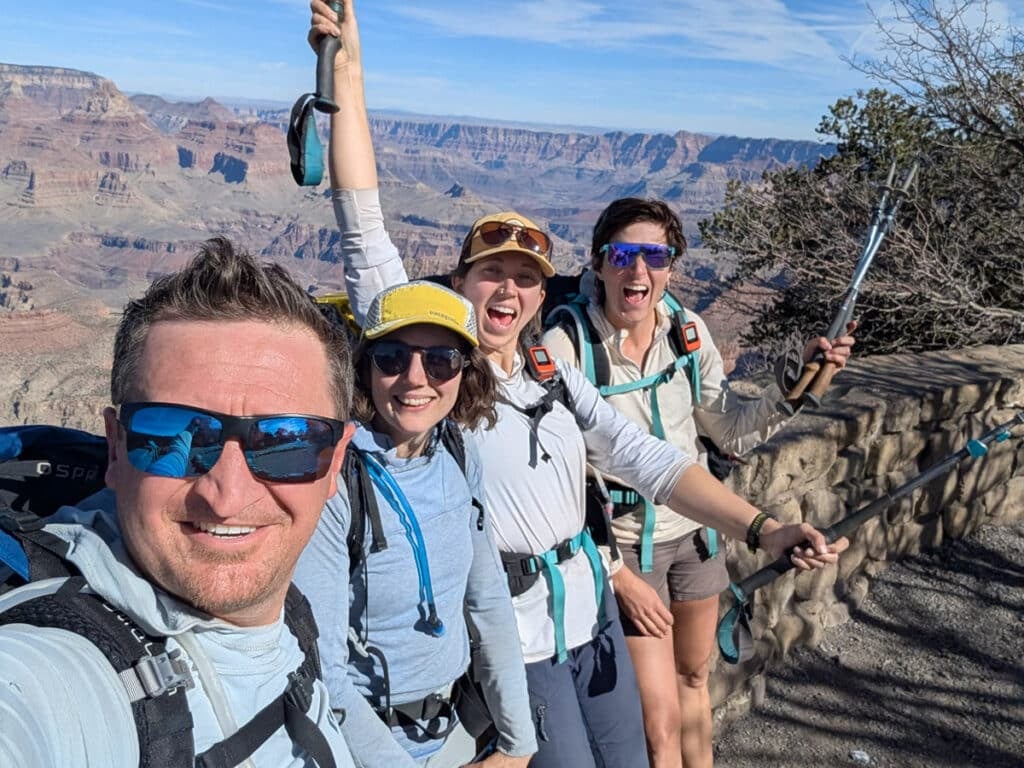
We emerged on the South Rim at Grandview Point around early afternoon, tired and satisfied. Standing on the rim after four days at river level provides that amazing perspective shift from being deep in the earth to suddenly being on top of it all.
Looking back on the trip as a birthday adventure, the Escalante Route delivered exactly what I wanted. It was challenging enough to feel earned but not so difficult that it stopped being fun. The river access, the archaeological sites, the solitude after day one, and that incredible sunset from the Tonto all combined into a trip that felt like a celebration rather than an ordeal. After 200+ miles of Grand Canyon backpacking, I can confidently say the Escalante Route is special, and I’ll definitely be back.
Day 4 Stats:
- Distance: Approximately 8 miles (from dry camp to Hance Creek to Grandview rim).
- Elevation gain: 4,400 feet.
- Time: 5-7 hours.
- Water: Hance Creek refill, then no water until rim.
- Camping: N/A (finishing day).
Insider Tips: Starting early for the climb out makes a huge difference in comfort thanks to the shade. Morning temperatures are significantly cooler than afternoon temperatures, and you want to be making upward progress before the sun gets high. Budget 2-3 liters per person for the Grandview ascent. The Horseshoe Mesa area is interesting if you have extra time and energy, with old mining ruins to explore. Reaching the rim after multiple days below feels incredible, so take a moment to appreciate the accomplishment before dealing with shuttle logistics.
Water Strategy and Sources
Water planning on the Escalante Route requires some strategic thinking but isn’t overly complicated, especially compared to other Grand Canyon routes. The defining feature of the Escalante is frequent Colorado River access, which provides ample water sources throughout most of the route.
Water Sources
The route offers river access at multiple points, with only a few key sections where you can’t reach the water:
Sections WITHOUT river and water access:
- Tanner Trailhead to Tanner Beach (8.8 miles, no water)
- Tanner beach to Cardenas (a few short sections without water, but if you made an effort, you could reach the beach most of the time, just tedious)
- Unkar Hill to Escalante Beach (no water after Cardenas Beach)
- 75 Mile Canyon to Papago Canyon (no river access, roughly 3-4 miles. River access is semi-possible along the low-route but tricky and risky so not recommended)
- Hance Rapids area to Hance Creek (no water)
- Hance Creek to Grandview Trailhead (5-6 miles, no water)
Reliable water sources:
- Tanner Beach: Colorado River access
- Cardenas Beach: Colorado River access
- Escalante Beach: Colorado River access
- 75 Mile Canyon Mouth – brushy but possible
- Papago Creek mouth – river access possible
- New Hance Beach: Colorado River access before climbing to Tonto
- Hance Creek: perennial creek water usually available at the crossing in spring and fall, during drier years, you may have to walk up or downstream. Look for cottonwood trees.
Water Carrying Strategy
My recommended water capacity and strategy vary by section:
For most hiking sections: Carry 2-3 liters per person, depending on weather and personal consumption rates. The frequent river access means you’re rarely more than a few hours from refilling.
For the Tonto dry camp section: Carry 4-5 liters per person from New Hance Beach. This needs to cover your afternoon hike to camp, dinner and camp chores, overnight and breakfast, and morning hike to Hance Creek. Budget 4 liters per person per day as a general rule.
For the Grandview ascent: Carry 3 liters per person from Hance Creek. The climb out is work, and you’ll drink most of it.
Critical strategy: Always stop and “camel up” at water sources. This means drinking your fill at the river or creek, so you’re carrying less weight in your pack and more hydration in your body. I’ve watched people carry excessive water because they don’t drink enough at sources, then struggle with the extra pack weight.
Water Treatment
I strongly recommend a Platypus GravityWorks filter for the Escalante Route. The Colorado River can be extremely silt-laden, and that sediment clogs Sawyer Squeeze and BeFree filters quickly and painfully. The gravity system handles sediment better and requires less effort.
We were lucky during our trip and we had that beautiful emerald colored water. But I’ve dealt with chocolate milk colored water in the Colorado many times.
You should also carry alum powder or a P&G filter packet to help settle sediment before filtering. Pair your filter system with a UL bucket by Sea to Summit for collecting river water efficiently.
The process: scoop water into your bucket, add alum (measure it out appropriately before heading out) or P&G packet, let it settle for a few minutes, then filter the clearer water from the top. This dramatically extends your filter life and makes the whole process less frustrating.
Note: P&G will also purify, making it ideal as a backup water purification method in the canyon.
Creek water from Hance Creek also requires treatment but won’t have the sediment issues of river water.
Camping Zones and Recommendations
Grand Canyon backcountry permits specify camping zones rather than exact sites, giving you flexibility within defined areas. Understanding these zones helps with itinerary planning.
Use Zone BB9 (Tanner at large)
This zone encompasses the Tanner Trail and Tanner Beach area at the mouth of Tanner Canyon. Multiple established camping sites exist among the tamarisk and mesquite, offering river access and generally good tent sites. This is typically your night one camp. Also a good camp before the redwall break and in the Esplanade section if you want to break up your trip.
The zone sees the most traffic of any zone on the route since Tanner Trail is accessible and some day hikers come down partway. Even “crowded” is relative, though our experience during the government shutdown showed that people sometimes bend the rules.
Use Zone BC9 (Cardenas at large)
Escalante Beach offers excellent camping with established sites and easy river access. The zone is spacious enough that multiple permit groups can camp without feeling crowded. This is a great night two camp. One of the best camps I’ve ever encountered in my over 200 miles of backpacking in the canyon.
The beach itself provides good tent sites with convenient water access. There’s some shade from mesquite trees, though the area is still relatively exposed. The camping here felt peaceful and remote after the crowds at Tanner.
Use Zones BE9 (Hance Creek at large)
These zones covers Papago to Horseshoe Mesa and include the New Hance Trail. This is where you’ll plan your dry camp on night three. Other options include Hance Rapids (river groups almost always use this site), a couple of specific spots near the redwall along the New Hance Trail, Hance Creek, and various points along the Tonto Trail. The camping is dispersed rather than at established sites, so you need to scout for good locations.
Permit Strategy
When requesting permits, I recommend the four-day itinerary: Night 1 at BB9 (Tanner), Night 2 at BC8 (Cardenas), Night 3 at BE9 (Hance Creek). This provides reasonable daily mileage (7-10 miles per day) with time to explore side trips.
Some hikers prefer a five-day itinerary with shorter daily miles. You could add a day at Tanner to split up the rim to river section, or you could add some time at Horseshoe Mesa (different use zone) for more exploring.
Group size is limited to 6 people maximum for regular permits, or 10 people if you apply for a group permit. Only one group permit is issued per zone, so if you’re traveling with a larger party, that’s your only option.
Permits Regulations
Regulations
Group size is limited to 6 people maximum for standard permits. If you need to accommodate 7-11 people, you must apply for a group permit. Only one group permit is issued per camping zone, so this limits where large groups can camp.
Campfires are prohibited below the rim. You must use a stove for cooking.
All waste must be packed out, including toilet paper.
You are encouraged to pee directly in the Colorado River. This is required for river trips and strongly recommended for backpacking trips as well. This might sound opposite of what you have been told about Leave No Trace, but it’s certainly going to be written on your permit. This is because peeing at river camps makes them gross and encourages a nasty algea to grow that disrupts the natural environment.
Food protection is required from wildlife. Bears are NOT in the Grand Canyon at all, so ignore any advice about bear canisters. That’s bad information. Bear cans protect your food from mice too, but it’s totally overkill and not required at all. Just something folks do to avoid using a rodent-proof storage system. In my opinio,n it’s insane to take that weight.
Your food threats are ravens, mice, ringtails, and rats. Use a RatSack or similar rodent-proof food storage bag to protect your food at camp. I’ve had mice chew through stuff sacks and bags to get at food, so proper protection matters. Other people will use a large cookie tin to store their food (cheaper option).
Navigation and Route-Finding
The Escalante Route demands basic navigation skills but is far easier to navigate than most Grand Canyon routes. This is the most accessible route in terms of route-finding, making it an excellent introduction to Grand Canyon route travel.
Essential Navigation Tools
Carry a detailed topographic map. I recommend the National Geographic Trails Illustrated Grand Canyon map (Grand Canyon National Park). The 7.5-minute USGS quads provide more detail if you want maximum information.
A compass and knowledge of how to use it with your map is essential. GPS devices or smartphone apps like Gaia GPS provide helpful backup, but don’t rely solely on electronics. Batteries die, devices break, and GPS accuracy in the canyon can be questionable due to the high walls affecting satellite reception.
Download offline maps before your trip if using smartphone navigation. Cell service is completely nonexistent below the rim.
Route-Finding Reality
Here’s the truth about navigation on the Escalante Route: the path is beaten in throughout almost the entire journey. Although this is technically a route and not a maintained trail. However, it’s been hiked so many times that there’s a clear social path to follow.
We were never not on a trail during the standard sections of the route. You’re following boot paths and cairns, but the route is so obvious that you’d have to actively try to get lost. By Grand Canyon route standards, there is no significant route-finding required for most of the Escalante.
The only sections requiring legitimate route-finding skills are:
- The low route between 75 Mile Canyon and Papago Canyon (less traveled, more complex terrain)
- Scrambling up Papago Wall
- Down the Papago Slide
- Perhaps a small section of sand walking after New Hance, but we found that area to be quite obvious even though it diverts from the AllTrails route.
These sections require paying attention, scouting ahead, and choosing good lines through the terrain. But even here, you’re finding routes that many people have done before, so you can often spot boot prints or cairns if you look carefully.
Important Note About AllTrails
AllTrails track data is INCORRECT after Hance Rapids. Don’t blindly follow the GPS track. Instead, follow the obvious beaten-in path on the ground. The physical trail is clear and well-traveled. Trust what you see in front of you over what your GPS shows.
Navigation Tips
The sun’s position provides natural orientation. In the morning, you’re generally traveling west/downstream. The river’s sound gives you auditory reference when you’re near it.
Cairns mark route sections, but because the path is so beaten in, you’re often following the obvious boot path rather than cairn-hopping. That’s actually a luxury compared to other Grand Canyon routes, like the Royal Arch Route, where cairns are your primary navigation tool.
When you reach drainage crossings, pause and look ahead to spot where the path continues on the far side before descending. This prevents getting into a wash and then having to figure out where to exit.
This accessible navigation is exactly what makes the Escalante Route perfect for people wanting to experience Grand Canyon route travel without the stress of constant pathfinding. You get the remote wilderness feeling and the satisfaction of doing a “route” without actually spending all day staring at your map trying to figure out where to go.
What to Pack
Packing for the Escalante Route requires balancing the essentials you need with managing weight, especially considering water carries and cumulative elevation change over multiple days.
Below is my tried and tested desert backpacking packing list.
- OR Astroman Sun Hoodie
- Skratch Labs Hydration Electrolyte powder
- SaltTabs Electrolyte Fast Chews (if you don’t like the water)
- A way to carry 4 liters of water (I use a combo of SmartWater bottles and 6L Platypus bag)
- Granite Gear Blaze
- Snapfolds UL Bowl
- MSR PocketRocket
- Platypus Gravity Works Filter
- P&G Purifying Packet
- Alum Powder (choose this or the one above)
- Sea to Summit UL 10L Collapsible Bucket
- Silver Shadow Mini Sun Umbrella by Six Moon Designs
- Gossamer Gear Hands-free Umbrella Pack Clips
- One Hydration Drinking tube for SmartWater Bottle
- Sea to Summit UltraSil Compression Sack 20L
- Ratsack medium or a large thrifted cookie tin
- Sunscreen stick
- REI Cork-Grip Hiking Poles
- Freshette Pee Funnel
- Kula Cloth Pee Rag
- Garmin inReach Mini
- Gerber Dime Multi-Tool
- Nitecore NU25 400 Lumen Rechargeable Headlamp
- Gossamer Gear foldable, full-length foam pad (protection from prickly things and to hide out in the shade if it’s too hot)
- Thermarest NeoLoft Pad – wide
- Enlightened Equipment Enigma Sleeping Quilt 20F
- Sea to Summit Aeros Premium Pillow
- NiteCore NB10000 Gen 2 Power Bank
- Duece of Spades Toilet Trowel
- Culo Clean Bidet
- Big Agnes Copper Spur
NOTE These are affiliate links. I get a small kickback from every purchase, no matter the purchase, at no additional cost to you. This is a small way you can show support for my channel and it means a lot, so thank you!
Comparing the Escalante to Other Grand Canyon Routes
Having backpacked over 200 miles across multiple Grand Canyon routes, I can give you honest perspective on where the Escalante fits in the spectrum of canyon backpacking experiences.
Difficulty Comparison
The Escalante Route is a step up from any of the maintained trails along the South Rim, especially the corridor trails. It requires more fitness, some scrambling skills, and basic route-finding abilities that corridor trails don’t demand.
However, the Escalante is NOT comparable to routes like the Royal Arch Loop, Cranberry Route, Chuar/Lava, or the Marion Seiber in terms of difficulty. It’s significantly easier. The Escalante is the easiest of the named routes in the Grand Canyon due to its popularity and the resulting beaten-in path.
The Tanner Trail is actually the easiest non-corridor trail that descends to the river in the Grand Canyon. This makes the Escalante more accessible as an entry point into route travel. Compare this to descending something like the Hermit Trail or routes in the western canyon, and you’ll appreciate how reasonable Tanner is.
The route involves between 7,000-9,000 feet of cumulative ascent and descent depending on side trips and whose GPS you trust (they’re not particularly accurate in the canyon anyway). This is typical of most routes of similar distance in the Grand Canyon, so it’s not unusual in that regard.
What makes the Escalante different is that you spend significant time at river level rather than high on the Tonto Platform or rim-to-rim hiking. Most Grand Canyon routes keep you high. The Escalante puts you down by the water, which actually makes it feel easier because you’re not constantly grinding up and down the Tonto.
For me personally, having done tons of routes in the Grand Canyon including significantly more technical and demanding ones, this trip felt very Type 1. It wasn’t too difficult. I could relax and enjoy it rather than constantly managing risk or wrestling with navigation. That said, for people new to this kind of travel, the Escalante will feel tough. It’s all relative to your experience level.
The Royal Arch Route is significantly harder and more technical, requiring ropes for some sections. Other routes like the Cranberry Route, Marion Point, Seiber routes, and various unnamed drainage routes require much more navigation skills and are far steeper and more demanding with higher consequences and a bit more of a suck factor than the Escalante.
Solitude Comparison
The Escalante Route is busy-ish compared to other Grand Canyon routes and has a good amount of solitude compared to other backpacking trips in the Grand Canyon. The beaten-in path and relative accessibility mean more people hike it than routes that require serious navigation skills or technical climbing.
That said, it’s extremely quiet compared to the corridor trails. The permit quota system limits how many people can be on the route, creating a very different experience than the Bright Angel or South Kaibab trails where you’ll see hundreds of hikers and trail runners.
Our experience was typical: we leapfrogged with a group of ten on the Tanner descent, dealt with the overcrowding at Tanner Beach due to permit violations during the government shutdown, then didn’t see anyone from the time we left Tanner Beach on day two until we reached the midway point on the Grandview Trail on day four. That’s pretty standard for Grand Canyon backpacking trips away from the corridor.
On routes like the Royal Arch, you likely won’t see anyone other than river groups floating past. Those routes offer more complete solitude. But the Escalante’s moderate solitude level is part of what makes it accessible. Knowing other people are out there provides some psychological comfort for those new to this style of travel.
Scenery Comparison
The Escalante Route showcases classic inner Grand Canyon scenery with extensive river access, multiple geological formations visible in the walls, archaeological sites, and massive views from the Tonto Platform. It’s absolutely beautiful.
What makes the Escalante special scenically is the river proximity. Most Grand Canyon hiking keeps you high and dry. The Escalante puts you at water level for miles, letting you walk beaches and experience the Colorado River intimately. That’s unusual and wonderful.
The archaeological sites at Unkar Delta add cultural and historical dimensions that many routes don’t offer. Standing at those granaries and imagining people living and farming in this landscape centuries ago is powerful.
My Ranking and Recommendation
Among all the Grand Canyon routes I’ve done, the Escalante sits firmly in the “accessible adventure” for the Grand Canyon. Remember, that scale is a step up from typically backpacking trips elsewhere in the country. It’s not the hardest, not the most remote, and not the most technically challenging. But it’s a genuinely excellent route that delivers a wilderness experience without throwing you into the deep end.
Because I know people will think I’m sandbagging them, if you don’t have experience in the Grand Canyon and you don’t have experience scrambling or with steep grades, this will feel very tough. To be clear. I’m using my unique, highly experienced perspective here.
I recommend the Escalante Route as the perfect introduction to Grand Canyon route travel. If you’ve done corridor trails and want to step up to routes, start here. You’ll learn the basics of route-finding, experience solitude, develop your scrambling skills, and gain confidence for more challenging routes in the future.
For experienced Grand Canyon backpackers, the Escalante is a relaxing, enjoyable route where you can appreciate the scenery and experience without constant stress. It’s got that classic status because the route changes each day. It’s the route I’d choose for a birthday celebration or when introducing experienced friends to Grand Canyon backpacking.
Frequently Asked Questions
How difficult is the Escalante Route?
The Escalante Route is strenuous, requiring solid backpacking fitness and some scrambling ability, but it’s the easiest of the named Grand Canyon routes. It’s several steps up from corridor trails like Bright Angel or South Kaibab and even Hermits Rest to Bright Angel, but much more accessible than technical routes like the Royal Arch Loop. The route involves 7,000-9,000 feet of cumulative elevation change over 30 miles, with some class 3/4 scrambling but minimal route-finding due to the well-worn path. The Tanner Trail is the easiest non-corridor trail descending to the river, making this route more approachable than alternatives.
How long does the Escalante Route take?
Most hikers complete the Escalante Route in 4-5 days. A four-day itinerary with daily mileage between 7-10 miles is common for fit, experienced backpackers and allows time for side trips to archaeological sites. You can extend it to five or six days if you prefer shorter daily mileage or want more exploration time at Unkar Delta or other areas along the route.
When is the best time to hike the Escalante Route?
Spring (March through April) and fall (October through November) offer the best conditions, with moderate temperatures and manageable weather. Summer is dangerously hot with temperatures exceeding 110°F at river level. Winter can bring cold and snow on the rim, though the inner canyon stays relatively mild, but short days can be annoying. Fall offers more shade along certain sections due to sun angle, while spring provides longer daylight hours. I hiked in early November and had perfect weather.
Do I need a permit for the Escalante Route?
Yes, a backcountry permit is required for all overnight trips in Grand Canyon National Park. Permits operate on a competitive lottery system with a four-month rolling basis. Because the Escalante Route is popular and permits fill up, entering the lottery is strongly recommended. If you enter the lottery and don’t win, you get priority booking access before permits open to the general public, significantly improving your chances.
How much route-finding is required on the Escalante Route?
Minimal route-finding is required by Grand Canyon standards. Although this is technically a route rather than a maintained trail, it’s been hiked so many times that there’s a well-worn social path throughout almost the entire journey. Expect to route find along the low route option between 75 Mile Canyon and Papago Canyon, and the scramble up Papago Wall and down Papago Slide. This makes the Escalante an excellent introduction to Grand Canyon route travel for those looking to move beyond maintained trails.
Where do you get water on the Escalante Route?
The Escalante Route offers frequent Colorado River access at Tanner Beach, Cardenas Beach, Escalante Beach, 75 Mile Beach (with some effort), Hance Rapids, Papago Canyon area, plus Hance Creek before the Grandview ascent. Sections without river access include Tanner Trailhead to Tanner Beach (8.8 miles), 75 Mile Canyon to Papago Canyon (3-4 miles), and Hance Creek to Grandview Trailhead (5 miles). Always filter or treat water from the river and creek.
Can you hike the Escalante Route solo?
Yes, solo hiking is permitted and relatively common on the Escalante Route. However, solo hiking increases risk significantly since you’re entirely self-reliant with no cell service and potentially limited contact with other hikers. The Escalante sees more traffic than highly remote routes, so you’re more likely to encounter other groups if something goes wrong, but don’t count on it. Be honest about your skills and experience before attempting this solo.
How do you shuttle between Tanner and Grandview trailheads?
Shuttle logistics are challenging. While commercial shuttle services exist, they’re difficult to book and often unavailable. Most people either coordinate with locals, take two cars, or hitch a ride from Grandview Trailhead back to Tanner after finishing. Hitchhiking from Grandview works reasonably well due to the popular viewpoint and large parking area. If finishing at New Hance instead of Grandview, hitching is much harder due to limited pullout space and less traffic.
What’s the difference between the high route and low route?
Between 75 Mile Canyon and Papago Canyon, hikers can choose between the low route (staying near river level with more scrambling, boulder-hopping, and exposure) or the high route (climbing to the Tonto Platform earlier with more elevation gain but less technical terrain). The low route is less traveled and requires actual route-finding skills, while the high route follows a more obvious path but has a really crummy descent and unnecessary elevation gain. Both options work, and the choice depends on your comfort with scrambling and route-finding.
Do I need to worry about bears on the Escalante Route?
No. There are NO bears inside the Grand Canyon. Do not bring a bear canister as it’s unnecessary weight. Your food protection needs focus on ravens, mice, ringtails, and rats. Use a RatSack or similar rodent-proof food storage bag to protect food at camp. Any advice about bear canisters for Grand Canyon trips is incorrect and should be ignored.
What gear is essential for the Escalante Route?
Essential gear includes 5+ liters water capacity, a Platypus GravityWorks filter (handles river sediment better than Sawyer or BeFree), alum powder or P&G packets for settling sediment, freestanding tent (rocky terrain and sand makes trekking pole tents difficult), trekking poles (mandatory for descents and scrambling), appropriate sleep system, layering clothing, navigation tools (map, compass, GPS backup), comprehensive first aid kit, SOS device, and a RatSack for food protection. My base weight was 12 pounds with total pack weight of 24 pounds on day one. Travel partners ranged from 24-31 pounds, depending on comfort preferences.
Is the Escalante Route good for first-time Grand Canyon backpackers?
No, the Escalante Route should not be your first Grand Canyon backpacking trip. Start with corridor trails like the Bright Angel Trail or a rim-to-rim trip to understand Grand Canyon hiking demands, elevation change, and environmental conditions. The Escalante is perfect as your third or fourth Grand Canyon trip when you’re ready to step up to route travel. The only folks who should attempt this as their first trip should be comfortable with the following: 5,000 feet of elevation change in a day, class 3/4 scrambling on exposed terrain, route finding over rock, steep descents on loose/rocky gullies, people who have ample desert backpacking experience, folks with water management skills. It’s the most accessible of the named routes, making it an ideal introduction to off-trail Grand Canyon hiking once you have corridor experience.
How crowded is the Escalante Route?
The Escalante Route is busy by Grand Canyon route standards but quiet compared to corridor trails. Permit quotas limit the number of hikers, creating a very different experience than trails where you’ll see hundreds of people. Expect to see other groups at Tanner Beach on your first day, then potentially no one until you reach Horseshoe Mesa or Grandview on your final day. The well-worn path indicates popularity, but actual encounters with other hikers are limited due to the permit system and the route’s length.
Catch me on YouTube!
Want more secret backpacking trips? Ultralight hacks that every hiker can adapt? Experience the top outdoor destinations in the world without the crowds? If you want to get insider knowledge of all things outdoors, then you’ll wanna subscribe to my YouTube channel, where I am giving away my DECADES of knowledge as an outdoor professional. I’ll see ya there!